Copyright © 2006,2007,2008,2009,2010 Peter Soetens, FMTC
Permission is granted to copy, distribute and/or modify this document under the terms of the GNU Free Documentation License, Version 1.1 or any later version published by the Free Software Foundation, with no Invariant Sections, with no Front-Cover Texts, and with no Back-Cover Texts. A copy of this license can be found at http://www.fsf.org/copyleft/fdl.html.
Table of Contents
- 1. Introduction
- 2. Configuration Procedure
- 2.1. Where to look for component libraries
- 2.2. Which components to create and with which name
- 2.3. How each component is setup
- 2.4. Auto-Configuration and Auto-Starting components.
- 2.5. Connecting Data Ports
- 2.6. Loading configuration files - Properties
- 2.7. Setting up peer-to-peer relations
- 2.8. Include XML files
- 2.9. Setting up remote components: CORBA extensions
- 2.10. Accessing remote CORBA components
- 3. Setting up a deployable component library
This document describes the Orocos OCL::DeploymentComponent for loading and configuring other components using an Orocos script or XML file. This component can only load components into the same process.
Each Orocos component can be compiled as a shared, dynamic loadable library. Each such library can define a special function which will allow the DeploymentComponent to create new instances of a component type. This principle is analogous to the plugin mechanism found in web browsers or other desktop applications.
A common usage scenario of the DeploymentComponent goes as follows. An initial Orocos application is created which contains only the DeploymentComponent and the OCL::TaskBrowser. When the application is started, the TaskBrowser prompts for commands which can be given to the DeploymentComponent.
Figure 1. Component Deployment Overview
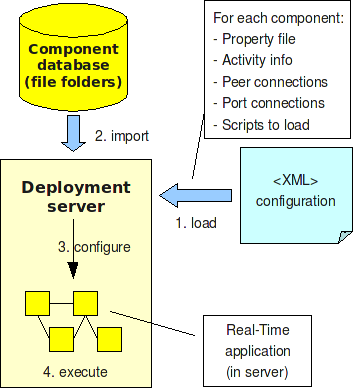
Components are located on your disk using the 'import' statement, loaded using 'loadComponents' and configured using 'configureComponents'. These three steps can be described in an XML file format or using the command prompt.
Figure 1, “Component Deployment Overview” shows the basic
steps. An XML file contains instructions for the
DeploymentComponent where to look for components ('import
statements'), which component types to create, which name they
must be given and how their internal thread is configured
(priorities, periods,...). Furthermore this file describes the
network interconnections between all components and how data
must be relayed from one component to another. The
loadComponents("file.xml") method reads
this file, looks up the components, creates them and stores
the configuration parameters. One can apply the configuration
(threads, properties, data connections,...) by calling
configureComponents(). After this step,
the components (and the application as a whole) can be started
with startComponents(). In order to do
these steps at once, you can just write
kickStart("file.xml").
The configuration does not need to be stored in XML format. One can apply the same configuration by using the scripting methods of the DeploymentComponent at the console prompt, or by listing them in an Orocos script.
The Orocos Component Library provides a number of ready to use applications for loading and starting components using the DeployementComponent.
The main application is the
deployer-<target> program, where
<target> is replaced by the
Operating System target (OROCOS_TARGET) for which you want to
load components, for example
deployer-gnulinux. The program can take an
optional argument --start filename.xml which
describes the components to load and is used to kick-start the
application. The XML specification is described below. When the
application is started, the TaskBrowser is presented to the
user for receiving interactive commands. The name of the DeploymentComponent
is by default 'Deployer'. In order to change this name, use for example
deployer-gnulinux NewDeployerName. See
also deployer-<target> --help for an overview
of the options.
There are three related programs to the deployer application.
cdeployer-<target>: like above but starts the CORBA enabled non-interactive deployer application. You are not presented with a TaskBrowser prompt, but the cdeployer tries to connect to a CORBA Naming Service, and if that fails, prints the IOR to a file and to the screen.
ctaskbrowser-<target> ComponentName|IOR: Connects to a remote component (like the cdeployer above) using the CORBA IOR address or using the CORBA Naming Service using ComponentName.
deployer-corba-<target>: Combines the cdeployer and deployer applications. It presents the TaskBrowser console and sets up a CORBA server. It can thus be commanded locally and accessed over a network. If you quit the TaskBrowser prompt, the application exits.
The complete list of options for the deployer, cdeployer and deployer-corba programs are:
--helpShow program usage
--start xml-file (also -s) Deploy the xml-file.
--log-level level (also -l) Sets the Orocos log level to level. The level parameter should be one of: Never, Fatal, Critical, Error, Warning, Info, Debug, or Realtime. The parameter is case-insensitive. Warning: this overrides the ORO_LOGLEVEL environment variable.
--no-consolelog Turn off logging to the console (will still log to 'orocos.log')
--DeployerName deployer-name Name of deployer component (the --DeployerName flag is optional)
Additionally, any CORBA options can be passed through these programs by adding a "--" command line option, followed by the CORBA-specific options.
Some examples are
deployer-corba --log-level warning -s myfile.xml
Sets the Orocos log level to warning and deploys
file myfile.xml
deployer-corba -l fatal --no-consolelog -s leftfile.xml LeftDeployer
Sets the Orocos log level to fatal, turns off all
logging to console, names the deployer LeftDeployer
and deploys file leftfile.xml
deployer-corba -l fatal --no-consolelog -s leftfile.xml LeftDeployer -- -ORBInitRef NameService=corbaloc:iiop:me.mine.home:2809/NameService -ORBFooBar 1
As with the previous example, and also passes some options through to the CORBA layer.
For more information about setting up components such that they can communicate with each other is explained at the end of this manual, in Section 2.9, “Setting up remote components: CORBA extensions”.
Figure 2. Deployment Procedure

The Deployment component API consists of import, loadComponents, configureComponents and startComponents.
The configuration format defines the instructions one can use to load and configure Orocos components. One can divide the instructions in three groups:
Where to look for component libraries
Which components to create and with which name
How each component is setup
Let's demonstrate this principle with a simple application example as shown in Figure 3, “Deployment Example Application”. We want to setup an application with three components: a Reporting component, a 'Controller' and a 'Plant'. The Plant component provides access to the hardware, the Controller component contains the control algorithm. The Reporting component is here to sense the values exchanged and write them to a file.
Figure 3. Deployment Example Application
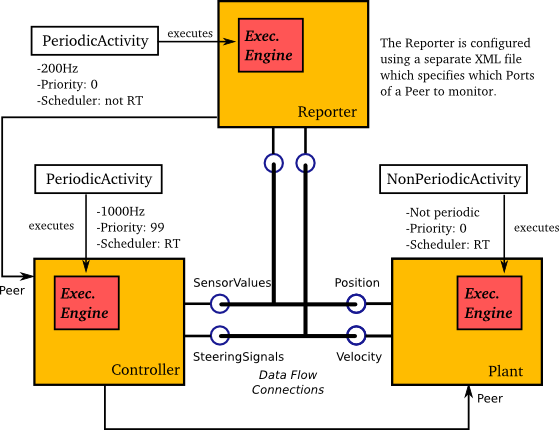
A Reporter component monitors communication between Plant and Controller. The Deployment component itself is not shown.
The import statement causes all
component libraries in a given directory to be pre-loaded.
It does not cause any component to be created, but
allows the OCL::DeploymentComponent to know where the
component libraries are located. This function does not recurse
and takes an absolute directory or a
relative directory path to the RTT_COMPONENT_PATH as argument.
In XML, the import statement looks like:
<?xml version="1.0" encoding="UTF-8"?>
<!DOCTYPE properties SYSTEM "cpf.dtd">
<properties>
  <!-- ....  -->

  <!-- Absolute path: -->
  <simple name="Import" type="string"><value>/opt/orocos/lib/orocos/gnulinux/myrobot</value></simple>

  <!-- Botha are relative path to RTT_COMPONENT_PATH: -->
  <simple name="Import" type="string"><value>myrobot</value></simple>

  <simple name="Import" type="string"><value>myrobot/drivers</value></simple>

</properties>
The script method equivalent is:
import("myrobot")
Each component library found under the given location is pre-loaded. The
import statement will also load libraries that are not components, but this
practice is not advised for migration towards RTT 2.x. You can explicitly
load a library using the loadLibrary function. It takes
an absolute path to a library or a relative path to a library in your
RTT_COMPONENT_PATH. So import takes a path or directory as argument
while loadLibrary takes a library name as argument. The
loadLibrary call does not require you to write the 'lib' and '.so'/'.dll' suffixes so you can
write 'foo' when you mean 'libfoo.so' or 'subdir/foo' when you mean 'subdir/libfoo.so'.
In XML, the loadLibrary statement looks like:
<?xml version="1.0" encoding="UTF-8"?>
<!DOCTYPE properties SYSTEM "cpf.dtd">
<properties>
  <!-- ....  -->

  <!-- Absolute path: -->
  <simple name="LoadLibrary" type="string"><value>/opt/orocos/lib/orocos/gnulinux/libmyrobot-vision.so</value></simple>

  <!-- Both are relative path to RTT_COMPONENT_PATH: -->
  <!-- Loads rtt_component_path/libmyrobot-vision.so : -->
  <simple name="LoadLibrary" type="string"><value>myrobot-vision</value></simple>

  <!-- Loads rtt_component_path/drivers/libmyrobot-arm.so : -->
  <simple name="LoadLibrary" type="string"><value>drivers/myrobot-arm</value></simple>

</properties>
If a loaded library or imported directory contains one or more Orocos components, the contained component types become available in the next step.
To see the effects of the import function, the available
types can be queried by invoking the
displayComponentTypes (script) method:
 (type 'ls' for context info) :displayComponentTypes()
      Got :displayComponentTypes()
 = I can create the following component types:
   OCL::ConsoleReporting
   OCL::FileReporting
   OCL::HelloWorld
(void)
In order to manage your XML files, one XML file can include another with the 'Include' directive. The include directive may occur at any place in the XML file (but under <properties>) and will be processed as-if the included file is inserted at that point.
| Warning | |
|---|---|
This option is new and experimental and may change in meaning and/or name in the future. |
In XML, the include statement looks like:
<?xml version="1.0" encoding="UTF-8"?>
<!DOCTYPE properties SYSTEM "cpf.dtd">
<properties>
  <!-- ....  -->

  <simple name="Include" type="string"><value>default-imports.xml</value></simple>
  <simple name="Include" type="string"><value>default-components.xml</value></simple>

</properties>
Import makes components available, but does not create an
specific instance yet. In order to add
a component of a given type to the current application,
use the loadComponent function:
In XML, the loadComponent statement of a reporting component would look like:
<?xml version="1.0" encoding="UTF-8"?>
<!DOCTYPE properties SYSTEM "cpf.dtd">
<properties>
  <!-- ... import statements locate Orocos reporting library ...  -->
  <simple name="Import" type="string"><value>/opt/lib/orocos</value></simple>

  <struct name="Reporter" type="OCL::FileReporting">
  </struct>

</properties>
This line causes the DeploymentComponent to look up the OCL::FileReporting type, and if found, creates a component of that type with the name "Reporter". This component is added as a peer component to the DeploymentComponent such that it becomes immediately available to the application. This step can be repeated any number of times with any number of types.
Alternatively, the type may be a filename if that file
contains only one component, which is exported using
the createComponent function.
The script method equivalent is:
loadComponent("Reporter", "OCL::FileReporting")
Now that one or more component instances are created, you can configure them by connecting components, assigning threads, configuration values and program scripts. Again, you can do this using XML or the scripting language.
In XML, one adds additional elements to the component struct.
<?xml version="1.0" encoding="UTF-8"?>
<!DOCTYPE properties SYSTEM "cpf.dtd">
<properties>
  <simple name="Import" type="string"><value>/opt/lib/orocos</value></simple>

  <struct name="Reporter" type="OCL::FileReporting">

    <struct name="Activity" type="Activity">
      <simple name="Period" type="double"><value>0.005</value></simple>
      <simple name="Priority" type="short"><value>0</value></simple>
      <simple name="Scheduler" type="string"><value>ORO_SCHED_OTHER</value></simple>
    </struct>

    <simple name="AutoConf" type="boolean"><value>1</value></simple>
    <simple name="AutoSave" type="boolean"><value>1</value></simple>

    <simple name="LoadProperties" type="string"><value>file-reporting.cpf</value></simple>

    <struct name="Peers" type="PropertyBag">
      <simple type="string"><value>Controller</value></simple>
    </struct>
  </struct>

  <struct name="Controller" type="ControllerType">

    <struct name="Activity" type="Activity">
      <simple name="Period" type="double"><value>0.001</value></simple>
      <simple name="Priority" type="short"><value>99</value></simple>
      <simple name="Scheduler" type="string"><value>ORO_SCHED_RT</value></simple>
    </struct>

    <simple name="AutoConf" type="boolean"><value>1</value></simple>
    <simple name="AutoStart" type="boolean"><value>1</value></simple>
    <simple name="AutoConnect" type="boolean"><value>1</value></simple>

    <!-- This section allows to define properties without using a file (see below)
         These properties can be overriden in the property files below. -->
    <struct name="Properties" type="PropertyBag">
      <simple name="K" type="double"><value>1.0</value></simple>
    </struct>
    <!-- Note: difference between 'PropertyFile' and 'UpdateProperties' (see below) -->
    <simple name="PropertyFile" type="string"><value>controller-main.cpf</value></simple>
    <simple name="UpdateProperties" type="string"><value>controller-opts.cpf</value></simple>

    <struct name="Ports" type="PropertyBag">
      <simple name="SensorValues" type="string"><value>SensorValuesConnection</value></simple>
      <simple name="SteeringSignals" type="string"><value>DriveConnection</value></simple>
    </struct>

    <struct name="Peers" type="PropertyBag">
      <simple type="string"><value>Plant</value></simple>
    </struct>

    <simple name="ProgramScript" type="string"><value>controller-program.ops</value></simple>
    <simple name="StateMachineScript" type="string"><value>controller-states.ops</value></simple>
  </struct>

  <struct name="Plant" type="PlantType">
    <struct name="Activity" type="Activity">
      <simple name="Priority" type="short"><value>0</value></simple>
      <simple name="Scheduler" type="string"><value>ORO_SCHED_RT</value></simple>
    </struct>
    <simple name="AutoStart" type="boolean"><value>1</value></simple>
    <struct name="Ports" type="PropertyBag">
      <simple name="Position" type="string"><value>SensorValuesConnection</value></simple>
      <simple name="Velocity" type="string"><value>DriveConnection</value></simple>
    </struct>
  </struct>
</properties>
The first section of all three components sets up the active
behaviour of the component in the Activity
element.
    <struct name="Activity" type="Activity">
      <simple name="Period" type="double"><value>0.005</value></simple>
      <simple name="Priority" type="short"><value>0</value></simple>
      <simple name="Scheduler" type="string"><value>ORO_SCHED_OTHER</value></simple>
    </struct>
Both have periodic activities (indicated by the "Period" element), which run with a
given period, priority and in a scheduler. The Controller
and Plant run in a real-time scheduler, the Reporter
doesn't. The activities are created and attached to each
component during the
configureComponents() step of the
DeploymentComponent. Possible types of activities are
PeriodicActivity(use only in special cases),Activity(the standard, recommended one),SequentialActivity(use only in special cases) andSlaveActivity(use only in special cases).
The latter activity allows a
component to be executed by a master component. You can
specify a master component using the Master
simple element in the Activity struct. The
DeploymentComponent makes slaves automatically a peer of
their master, but the master is responsible for calling 'execute()'
on its slave peers.
The next section of the Controller contains the AutoConf and AutoStart
elements.
    <simple name="AutoConf" type="boolean"><value>1</value></simple>
    <simple name="AutoStart" type="boolean"><value>1</value></simple>
If AutoConf is set to 1, the DeploymentComponent will call
the component's configure() method during configureComponents(),
after the properties are loaded. If AutoStart is set to 1, the component's start()
method will be called during startComponents().
By default AutoConf and AutoStart are 0 (off).
The Ports struct describes which ports of this component
participate in which data flow connection.
    <struct name="Ports" type="PropertyBag">
      <simple name="Position" type="string"><value>SensorValuesConnection</value></simple>
      <simple name="Velocity" type="string"><value>DriveConnection</value></simple>
    </struct>
So for each element in this struct, the name of the element is the port name, and the value is the name of the connection it belongs to. Ports with equal connection names are connected to each other. The port name itself is not used. If ports of different data types are being connected, the configuration phase will fail.
Looking at the Ports section of the Controller above, it has two data ports listed
(SensorValues and SteeringSignals), which are added to
two connection objects. These connections show up in the
Plant component's Ports section as well. And it shows that
the SensorValues Port is connected to the Position Port and
the SteeringSignals Port is connected to the Velocity
Port. If other component's ports in the same file refer to
the same connection object, the ports are connected to each
other by the DeploymentComponent during the
configureComponents() step.
The Properties struct allows to configure
a component's properties from the main XML file. These values
can be overridden by the listed property files:
  <!-- You can repeat this struct for each connection below ... -->
    <struct name="Properties" type="PropertyBag">
      <simple name="K" type="double"><value>1.0</value></simple>
    </struct>
The PropertyFile element specifies from
which XML file each component is configured and this file
must contain values for all properties
of the component.
In case you only want to update part of
the properties, use the UpdateProperties
element.
    <simple name="PropertyFile" type="string"><value>controller-main.cpf</value></simple>
    <simple name="UpdateProperties" type="string"><value>controller-opts.cpf</value></simple>
Finally, it is also possible to load and create
new properties from a file using LoadProperties
the Reporting component requires this for example:
    <!-- loads/overwrites existing properties in component: -->
    <simple name="LoadProperties" type="string"><value>file-reporting.cpf</value></simple>

    <!-- stores/overwrites properties in a file: -->
    <simple name="StoreProperties" type="string"><value>file-reporting-dump.cpf</value></simple>
You can use any number or combination of these elements.
The order is respected. The properties are read during the
configureComponents() step of the
DeploymentComponent. When the AutoSave
property is turned on, the listed property file will be
saved again with the values of the Component, just before
the Component is cleanup().
The last section of the Reporter component lists its peers.
    <struct name="Peers" type="PropertyBag">
      <simple type="string"><value>Controller</value></simple>
    </struct>
The Reporter has one peer, the Controller, which allows the Reporter component to scan and use the interface of the Controller component. For example, it will discover which ports Controller exposes and be able to create connections to them, without the need of a supervisor to do so.
The Controller has at the end two additional elements
describing which script files must be loaded into that
component: ProgramScript and
StateMachineScript.
    <simple name="ProgramScript" type="string"><value>controller-program.ops</value></simple>
    <simple name="StateMachineScript" type="string"><value>controller-states.ops</value></simple>
Any number of scripts
can be loaded and they are loaded in order. Both Orocos
program scripts and state machine scripts can be
loaded. This is again done during the
configureComponents() step.
The deployer XML format supports include directives, which allow you to manage your application configuration file in different files. This can be useful to separate the OS dependent settings from the OS independent settings, or share XML files between users. The include directive works similar like in "C":
<?xml version="1.0" encoding="UTF-8"?>
<!DOCTYPE properties SYSTEM "cpf.dtd">
<properties>
  <!-- ... -->

  <simple name="Include" type="string"><value>common-settings.xml</value></simple>

  <!-- ... -->

</properties>
You can override settings or components in an include file by redefining them after the include statement. The last seen setting is always used by the deployer.
| Note | |
|---|---|
Currently, include directives always look into the current working directory, also when an included file includes a file from another directory. |
When you distribute components over multiple processes or hosts, you need a way to connect them again to each other. Orocos does this by creating 'proxy' components in processes which act as if they are the remote component. Whatever you do with the proxy also happens with the real component. In order to be able to create a proxy for a real component, the real component must be made a CORBA server.
There are two ways to create CORBA proxies and servers: Using the XML syntax or using the scripting interface.
The deployer XML format allows two CORBA specific boolean
properties, which are optional: Server
(defaults to '0') and UseNamingService
(defaults to '1'). These properties are only used when you
use the CORBA enabled
cdeployer-<target> or
deployer-corba-<target>
applications.
<?xml version="1.0" encoding="UTF-8"?>
<!DOCTYPE properties SYSTEM "cpf.dtd">
<properties>
  <!-- ... -->

  <struct name="Reporter" type="OCL::FileReporting">

    <!-- CORBA specific extensions -->
    <simple name="Server" type="boolean"><value>1</value></simple>
    <simple name="UseNamingService" type="boolean"><value>1</value></simple>

  </struct>

</properties>
By default, only the 'Deployer' starts as a CORBA
server. You can have other components to start as a server
as well by setting the Server property to
1. By default, the component will try to use the CORBA
Naming Service to register its name. If this is not wanted,
set the UseNamingService property to 0.
The script method equivalent of the above XML construct is:
server("Reporter", true)Which will create a CORBA server for the Reporter peer, after the Reporter was loaded with loadComponent().
Or you can create a CORBA server immediately when creating the component by using the
corbaComponent("Controller", "RobotControllerType")script method, which both creates a server and adds it to the CORBA naming service. You need that in order to access them as shown in the next section.
The CORBA enabled deployers allow to create a proxy for a remote component using the name service, the IOR or the IOR file. As such, the remote component will appear as-if it had been loaded in the same process and you can use it like any other loaded component. For example, to start or stop it or to connects some of its ports.
Say you have a remote Orocos component with the name
'MyComponent'. It was created in one corba enabled deployer
application with the Server property set to 1,
or created using the corbaComponent() function.
You can connect to it from another deployer application by using the XML syntax:
 <!-- Option 1: Uses Naming Service to lookup 'Mycomponent' -->
 <struct name="MyComponent" type="CORBA">
 </struct>

 <!-- Option 2: Uses IOR file to lookup 'Mycomponent' -->
 <struct name="MyComponent.ior" type="IORFile">
 </struct>

 <!-- Option 3: Uses literal IOR to lookup 'Mycomponent' -->
 <struct name="IOR:...." type="IOR">
 </struct>
Which will make this component available in your current application, using the same name as the original. This also works for the scripting deployer command 'loadComponent'. For example, you can type in the TaskBrowser:
  // Option 1:
  loadComponent("MyComponent", "CORBA")

  // Option 2:
  loadComponent("MyComponent.ior", "IORFile")

  // Option 3:
  loadComponent("IOR:.....", "IOR")
which allows to quickly connect to a remote component once you can copy/paste the IOR into the console.
| Note | |
|---|---|
See also the |
This section explains how to prepare a component library for deployment. It is demonstrated with an example.
There exist three C macros for preparing a component
library. The simplest way is when the resulting library
will contain only one component type. Assume we have written
the OCL::HelloWorld component ( in
the OCL C++ namespace) which is compiled in the
orocos-helloworld.so library. The
following code is added to HelloWorld.cpp:
  #include "HelloWorld.hpp"
  #include <ocl/Component.hpp>

  /* ... Hello World implementation file ... */

  // You must specify the namespace:
  ORO_CREATE_COMPONENT( OCL::HelloWorld )
This macro inserts a function into the library which will allow the DeploymentComponent to create OCL::HelloWorld components.
In case multiple components are defined in the same
library, two other macros must be used. One macro for each
component type and one macro once for the whole
library. Say your library has components
NS::ComponentX and
NS::ComponentZ in namespace NS. In
order to export both components, you could write in
ComponentX.cpp:
  #include "ComponentX.hpp"
  #include <ocl/Component.hpp>

  /* ... ComponentX implementation file ... */
  // once:
  ORO_CREATE_COMPONENT_TYPE()
  // For the ComponentX type:
  ORO_LIST_COMPONENT_TYPE( NS::ComponentX )
and in ComponentY.cpp the same but without the
ORO_CREATE_COMPONENT_TYPE macro:
  #include "ComponentY.hpp"
  #include <ocl/Component.hpp>

  /* ... ComponentY implementation file ... */

  // For the ComponentY type:
  ORO_LIST_COMPONENT_TYPE( NS::ComponentY )
For each additional component in the same library, the ORO_LIST_COMPONENT_TYPE macro is added. It is allowed to put all the ORO_LIST_COMPONENT_TYPE macros in a single file.
| Note | |
|---|---|
You may not mix ORO_CREATE_COMPONENT and ORO_CREATE_COMPONENT_TYPE/ORO_LIST_COMPONENT_TYPE macros in one library. You must stick to one system, even if you link libraries. |
In order to have a working library, care must be taken of the compilation flags. You may compile your library static or shared. But a static library will not be dynamically loadable. In the final executable the DeploymentComponent will be able to find the linked in components and setup the application using the XML file.
| Important | |
|---|---|
The macros need some help to figure out if you are compiling a shared or static library. You need to define the RTT_COMPONENT macro (see below) when compiling for a shared library. If this macro is not defined, it is assumed that you are compiling for a static library. |
The compilation flag of a component for a shared library might look like:
  CFLAGS= -O2 -Wall -fPIC -DRTT_COMPONENT
  LDFLAGS= -fPIC
The compilation flag of a component for a static library lacks both options :
  CFLAGS= -O2 -Wall
  LDFLAGS=