Open RObot COntrol Software
1.12.1
Copyright © 2002,2003,2004,2005,2006 Herman Bruyninckx, Peter Soetens
Orocos Real-Time Toolkit Version 1.12.1.
Permission is granted to copy, distribute and/or modify this document under the terms of the GNU Free Documentation License, Version 1.1 or any later version published by the Free Software Foundation, with no Invariant Sections, with no Front-Cover Texts, and with no Back-Cover Texts. A copy of this license can be found at http://www.fsf.org/copyleft/fdl.html.
Abstract
This document delves deeply into the Orocos ( Open RObot COntrol Software ) RTT infrastructure. It targets developers which wish to extend or understand Orocos. It is complementary to the user's manuals.
Table of Contents
- 1. How to Read this Manual
- 2. Inside The Core Library
- 3. Inside The Task Infrastructure
- 4. Inside The Execution Engine
- 5. Inside The Program Script Parser
List of Figures
List of Tables
List of Examples
Table of Contents
This manual is for Software developers who wish to extend the RTT framework.
The first Chapter details the classes and concepts of the OS abstraction layer. It is useful to understand the Orocos threading mechanism and how Orocos can be ported to other platforms.
The second and third Chapters document the Core Library and Task Infrastructure and are the same as the one found in the Component Builder's manual.
The next Chapter shows some mechanisms on how to use CoreLib primitives behind the scenes in the Task Infrastructure.
The next Chapter details the workings of the Execution Engine and how it uses the various 'Processor' types to handle program execution and communication.
The last Chapter details on how to extend the Orocos Parser framework with user defined types.
The functionality available in Orocos is structured in a number of sub-projects; each of these is called a (Orocos) Package. A Package contains a coherent and related set of functionality, in the form of documentation and class libraries.
The following Packages exist, or will be created in the near future: corelib, kinematics and dynamics, device interface, device drivers, control kernel, applications, estimation, execution, operating system, robots, XY tables.
The directories of each Package contain a detailed documentation of
the Package in their local /doc
directories.
The packages directory is mostly found under the orocos directory. The orocos directory holds some general documentation in the doc directory (like this manual) and scripts for setting up a working packages directory.
Table of Contents
Abstract
This document explains the design and implementation of the Core Library of Orocos, the Open RObot COntrol Software project. The CoreLib provides infrastructural support for the functional and application components of the Orocos framework.
The RTT::PeriodicActivity is an activity that serialises itself in a common thread, such that multiple activities are executed by the same thread.
In case multiple activities are executed (serialised) in one thread, their execution must be ordered. The order of execution is determined by the order in which they are started. Stopping an activity removes it from the list.
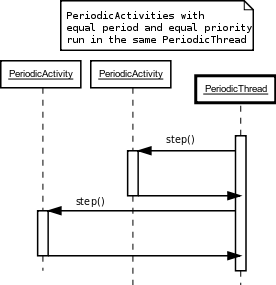
A PeriodicActivity instance is only serialised with another instance if the priorities and periodicities match. Otherwise, a new thread is created.
Example 2.1. Example Periodic Activity Creation
This example shows how all kinds of activities can be created. When a activity is started it will add itself to the correct thread.
#include "rtt/PeriodicActivity.hpp"

using namespace RTT;

ORO_main( int argc, char** argv)
{
  // Define your tasks.

  // ...

  // The threads are created by Orocos.
  // Both activities run in the same thread:
  PeriodicActivity fast_activity1(0, 0.001, &vel_loop);
  PeriodicActivity fast_activity2(0, 0.001, &vel_loop2);

  // This activity is run in its own thread.
  PeriodicActivity own_activity( 9, 0.05, &kine_loop );

  // This activity is run in its own thread as well.
  PeriodicActivity own_activity2( 9, 0.5, &kine_loop2 );

  // All is transparent from here on.
  fast_activity1->start();
  fast_activity2->start(); // is always run directly after fast_activity1 !

  // ...

  fast_activity1->stop();
  fast_activity2->stop();

  return 0;
}The SimulationThread is available to do as fast as possible execution of SimulationActivity objects. Its priority and simulated periodicity can be changed with the configuration tool, or before its started.
#include "rtt/SimulationActivity.hpp"

using namespace RTT;

ORO_main( int argc, char** argv)
{
  // Define your activities

  // ...

  // Manually start the simulation thread
  // 0.001 : The (virtual) period :  no activity can run 'faster' than this.
  SimulationThread::Instance()->setPeriod( 0.001 );
  SimulationThread::Instance()->start();

  // Optional, might hang your program :
  SimulationThread::Instance()->makeHardRealtime();

  // fast_sim_activity will measure 0.001s elapses between each step(),
  // slow_sim_activity will measure 0.01s elapses in time between each step()
  SimulationActivity fast_sim_activity(0.001, &vel_loop);
  SimulationActivity slow_sim_activity(0.01, &pos_loop);

  // All is transparent from here on.
  fast_sim_activity->start();
  slow_sim_activity->start();

  // ...

  fast_sim_activity->stop();
  slow_sim_activity->stop();

  return 0;
}| Warning | |
|---|---|
If other threads are running in the same program executable, they will also 'notice' the fast system time changes if the SimulationThread is started. It is thus advisable not to mix SimulationThreads with other threads. Also, any thread with lower priority than the SimulationThread will never run. |
A Priority inversion is the term used to indicate a scheduling situation in which a high priority thread is blocked on a resource which is held by a low priority thread, while a medium priority thread is running, preventing the low priority thread to free the resource for the high priority thread.
The result is an inverted priority because a medium priority thread is running while the high priority thread should be runnen, hence, the medium priority thread has, in practice, a higher priority than the high priority thread.
There are roughly said two solution to this problem. 1. Do not block on resources from high priority threads. 2. Use priority inheritance, where a thread gets the priority of the highest priority thread being blocked on a resource it holds. Once it releases the resource, its priority goes back to normal and the high priority thread can resume.
In essence, Orocos does not know of priority inversions and does not know if the underlying Operating System properly solves this common situation. Furthermore, it can be prooven that there are situations where priority inheritance does not work. Therefore, we try to provide as much as possible lock-free implementations of inter-thread messaging. Table 2.1, “Classes Possibly Subject to Priority Inversion” lists the know uses of Orocos which might lead to priority inversion.
Table 2.1. Classes Possibly Subject to Priority Inversion
| Class/method | Rationale |
|---|---|
| DataObjectLocked |
Uses Mutex for serialising concurrent access. Alternative Lock-free implementations are possible. |
| PeriodicTask::start(), PeriodicTask::stop() | Uses Mutex for serialising concurrent access. Alternative implementation are incorrect, since stop() guarantees that finalize() will be called after the last step(), hence a mutex/semaphore is used such that it will block until the step() returns and then call finalize(). |
| Logger |
Uses Mutex for serialising concurrent access. No Alternative implementation is possible, Std C++ IO must be serialised. |
Table 2.2, “Classes Not Subject to Priority Inversion” shows communication infrastructure in Orocos which is especially designed to be lock-free and which is thus not subject to priority inversions. It is our aim to shrink the former table and grow the latter in Orocos' development lifetime.
Table 2.2. Classes Not Subject to Priority Inversion
| Class/method | Rationale |
|---|---|
| DataObjectLockFree |
Uses a single writer, multiple reader Lock-free implementation. A read only returns the last written value. Used by the ControlKernel application to communicate data between Components. |
| AtomicQueue |
Uses Compare And Swap (CAS) to store object pointers in an atomic queue. Used by the Processor class to queue incoming Commands. |
| BufferLockFree |
Uses a many writers, multiple readers Lock-free CAS implementation. A read returns the oldest written value in a FIFO way. |
| ListLockFree |
Uses a many writers, multiple readers Lock-free CAS implementation of a single linked list. A special member function 'apply' must be used to manipulate the objects within the list. |
| Event::emit() |
Uses the ListLockFree above for keeping track of subscribers. Concurrent invocations of emit() will lead to concurrent execution of the subscriber's callback functions. |
| Handle::connect() and Handle::disconnect() |
(Dis)Connection of an event handle is hard real-time and lock-free because of the lock-free event implementation. |
A DataSource is the fundamental data exchange entity within Orocos. It's interface is that of an 'expression': it can be evaluate()'d, its result can be get() and an AssignableDataSource can even be set(). The DataObject types are implementations of DataSources, but many more kinds exists which are used by the Scripting engine and the task infrastructure.
The DataSourceBase interface is the most basic interface for exchanging data ( value types ) between objects. They are reference counted ('smart pointers'), such that ownership across many objects must not be managed. The DataObjectInterface implements the DataSource interface, and thus all Orocos DataObject types are DataSources.
The DataObjectInterface has multiple implementations, depending on the specific data access locking needs:
DataObject. This is the most simple DataObject implementation. The
Get()andSet()methods directly map onto the contents and can always be inlined by the compiler. It offers no thread safety, but maximum efficiency for copying data.DataObjectLocked. This is a thread safe DataObject whose
Set()andGet()methods are guarded by a single mutex. The second thread accessing this object will always block, which is not always appropriate in a realtime system.DataObjectPrioritySet. This is a more complex DataObject which gives always priority to the thread calling
Set(), which will never block. The thread accessingGet()will block if theSet()thread is accessing the contents. It is mainly used for sharing data between two kernels, running at different priorities.![[Note]](images/icons/note.png)
Note This DataObject will only work if the
Set()thread has the highest priority. When the inverse is true, data corruption will occur. It is obvious that this DataObject can only be used if both threads have static priorities (which is the case for all threads in the Orocos framework).DataObjectPriorityGet. The inverse of
DataObjectPrioritySet. The thread accessingGet()will never block.DataObjectLockFree. This DataObject implements a non blocking reader/writer buffer which always returns the last written value to the reader. If the reader is preempted with a write and a read, the last read will return a newer value, while the first read continues to read the uncorrupted old value. The depth of this buffer must be readers+3, for the algorithm to succeed in doing every write. Apart from memory consumption, it is one of the best thread-safe DataObject implementations.
Table of Contents
Abstract
This document describes the insideds of the Orocos Task Infrastructure, which allows to design Real-Time tasks which transparantly communicate with each other.
| Purpose | |
|---|---|
A task's datasources are read-only data the task wishes to export, for example, for logging or allowing other tasks to read internal status variables. A tracking error of a controller task is a typical datasource. |
DataSources are read-only objects which, when evaluated, return some data. The source of the data can be anything, as long as it takes finite time to get it. DataSources can be combined to new DataSources using algorithmic expressions. The only way they differ from Methods, is that the corresponding C++ function must be const.
To add a method to the DataSource Factory, one can use
the TemplateDataSourceFactory,
to easily create DataSource factories :
  #include <rtt/TemplateFactories.hpp>

  using namespace RTT;

  class MyTask
    : public GenericTaskContext
  {
    int _number;
  public:
    string getName() const { ... }
    double power(double a, double b) const { ... }
    // ...
    MyTask(std::string name)
      : GenericTaskContext(name)
    {
       // ...

       TemplateDataSourceFactory<MyTask>* dfact =
	   newDataSourceFactory( this );
       dfact->add( "number",
                     data( &MyTask::_number,
                           "the number." ) );
       dfact->add( "name",
                     data( &MyTask::getName,
                           "Read out the name." ) );
       dfact->add( "power",
                     data( &MyTask::power,
                           "return a to the power of b",
	                   "a", "the base",
	                   "b", "the exponent" ) );

       this->datasources()->registerObject("this", dfact);
     }
     // ...
  };
which is thus nearly identical to using a method. Notice the usage of the _number class member. The factory also accepts class member variables instead of const functions, but likewise, they are also read-only.
| Important | |
|---|---|
The data factory, and all other factories of a TaskContext take ownership of the registered or added objects. You are not allowed to delete them. |
If your application has set up DataSources itself (for example, using CoreLib DataObjects ), the MapDataSourceFactory can be used to add them to you TaskContext's DataSource interface. For example, continued from the program listing of the previous section :
 DataObjectInterface<MyDataType>* myData
     = new DataObjectLockFree<MyDataType>("MyData");

  MapDataSourceFactory::Map storemap;
  storemap["NewData_1"] = myData;
  // store other DataSources...

  // finally :
  MapDataSourceFactory* mdf
     = new MapDataSourceFactory( storemap, "Thread-safe DataObjects");

  this->datasources()->registerObject("dataobjs", mdf);
Which uses the thread-safe DataObjectLockFree (which implements DataSource) to exchange data between TaskContexts. You must use DataObjectLockFree to exchange any composite type between threads.
In scripting, the braces are optional when no arguments must be given. An external task might read the DataSources of "ATask" as such:
  var int nb = ATask.objname.number
  var double result = ATask.objname.power( 5., 6.)

  task.newData = ATask.dataobjs.NewData_1
Again, the "this" object can be used if the DataSource should belong to the task's interface.
The GenericTaskContext uses these two classes to manage properties and programs scripts.
Properties can be added to a task's AttributeRepository. To read and write properties from or to files, you can use the PropertyLoader class. It uses the XML Component Property Format such that it is human readable.
  #include <rtt/PropertyLoader.hpp>
  // ...
  TaskContext* a_task = ...
  PropertyLoader ploader;
  ploader.configure("PropertyFile.cpf", a_task );
  // ...
  ploader.save("PropertyFile.cpf", a_task );
Where 'configure' reads the file and configures updates the task's properties and 'save' updates the given file with the properties of the task. It is allowed to share a single file with multiple tasks or update the task's properties from multiple files. Fortunately, the GenericTaskContext has implemented this functionality also as script methods, thus you do not need to do this manually.
A function is formed by a group of commands and methods, which can be executed by a task. The scripting language defines functions as :
  export function myFun( int arg1, double arg2 )
  {
    // Group commands and methods
    var ...
    do ...

  }
  // repeat...
where the optional export keyword makes the
function available as a task's command ( which will fail if
one of its contained commands fail ) :
do ATask.myFun( 1, 2. )
If you omit the export keyword, then the function will not become available as a command. To use such a function, you need to execute it in the Execution Engine's Program Processor ( see below ), or call it in a program, which was parsed in the same file.
Functions must be parsed by the Parser, before they can be executed by the Execution Engine. It executes the Function until it finishes or it goes into error. In both cases, the Function is removed from the queue and can then safely be deleted (or re-run).
| Note | |
|---|---|
The Parser and ProgramLoader are located in the Orocos Program Parser package and not in the Task Context package. |
To directly execute any number of not exported functions in a file, or add an exported function in a TaskContext's Command API, do :
  #include <rtt/ProgramLoader.hpp>

  TaskContext* a_task = ...
  ProgramLoader loader;
  ProgramLoader::Functions funcs;

  funcs = loader.loadFunction( "Functions.ops", a_task );
funcs is an STL container wich contains all functions being executed.
| Warning | |
|---|---|
Using loadFunction with functions that require arguments will
execute the functions with default initialisation of the arguments.
It is easier to |
Programs are special functions in that they can be finely controlled once loaded in the ProgramProcessor. A program can be paused, it's variables inspected and reset while it is loaded in the Processor. It provides thus more funcitonality than a mere function. A program script calling the previous function would look like :
 [ ... myFun() function definition ... ]

  program myBar
  {
    var int i = 1
    var double j = 2.0
    do myFun(i,j)
  }
As with functions, any number of programs may be listed in a file.
Orocos Programs are loaded a bit different into a TaskContext :
  #include <rtt/ProgramLoader.hpp>

  TaskContext* a_task = ...
  ProgramLoader parser;

  loader.loadProgram( "ProgramBar.ops", a_task );
Take a look the ProgramInterface class reference for more program related functions.
Hierarchical state machines are modelled in Orocos with the StateMachine class. They are like programs in that they can call a peer task's members, but the calls are grouped in a state and only executed when the state machine is in that state. This section limits to showing how an Orocos State Description (osd) script can be loaded in a Task Context.
  #include <rtt/ProgramLoader.hpp>

  TaskContext* a_task = ...
  ProgramLoader loader;

  loader.loadStateMachine( "StateMachineBar.osd", a_task );
Again, take a look at the StateMachine class reference for more details about state context related functions.
Besides using scripts, you can directly build C++ commands or methods, although it requires more "red tape". The advantage is that you are not limited to the scripting language's syntax and do not need to use the script parsers.
To request a command from one task to another task, the command must be fetched from the factories of a TaskContext and next passed to that TaskContext which has two methods to accept commands. In a C++ program, this would be :
  // for GenerateDataSource :
  #include <rtt/DataSourceGenerator.hpp>

  //...
  TaskContext* peer = this->getPeer("ATask");

  // Create the command argument list.
  // up to 4 arguments can be given to GenerateDataSource()(...)
  std::vector<DataSourceBase::shared_ptr> args
     = GenerateDataSource()(1.0);

  // Create the command and condition :
  try {
     ComCon comcon =
        peer->commands()->getObjectFactory("objname")->
	     create("cleanup", args );
  } catch ( ... ) {
     // wrong arguments !
  }

  // Execute the command (real-time):
  if ( peer->executeCommand( comcon.first ) ==  false ) {
       // task does not accept commands !
  }

  // wait until done :
  while ( comcon.second->evaluate() == false )
     sleep(1);
  // command done, we can now delete it or keep it.
The factory can throw exceptions if the number of arguments,
the type of arguments or the command names are unknown.
It returns a ComCon struct, where the
first member contains a pointer to the
CommandInterface and the second member
contains a pointer to the ConditionInterface ( the Completion
Condition ).
executeCommand passes
the command to the task's command processor and returns true if
accepted by the command processor.
The alternative is queueCommand :
  // ... see previous listing
  int qnb = peer->queueCommand( comcon.first );
  if ( qnb == 0 ) {
	// Error, not accepted !
  }
  while ( !peer->engine()->commands()->isProcessed( qnb ) )
        sleep(1); // wait until the command is processed

  while ( comcon.second->evaluate() == false )
        sleep(1); // wait until the command is done
  // command done, we can now delete it or keep it.
You only know if it got in the queue, but not if the command function itself returned true.
The previous section showed how a command can be given to a task, but the return value of the Command was lost. In some cases, this does not matter, but when the program logic needs to know the result, two options are possible. One can write a program script, which check command return values (and goes into error if the command fails) or wrap the command in a TryCommand .
Assume you have a command,condition pair as above :
ComCon comcon = ...;
Before queueing, you can wrap both command and condition as such :
  #include <rtt/TryCommand.hpp>
  // ...
  TryCommand* trycommand
     = new TryCommand( comcon.first );

  DataSource<bool>::shared_ptr executed
     = trycommand->executed();
  DataSource<bool>::shared_ptr accepted
     = trycommand->result();

  peer->queueCommand( trycommand );

  while ( executed->get() == false )
     sleep(1); // wait for its execution
  if ( accepted->get() == false ) {
     // Error, Command returned false !
  }
  while ( comcon.second->evaluate() == false )
     sleep(1); // wait for its completion
The DataSources are used by the TryCommand to
store the result into. We use the get() function
to inspect the results. If you want to reuse the
trycommand, you need to reset()
the trycommand such that executed() and
result() functions are reset to their
initial values.
To call a task's method, the method must be fetched from the factories of a TaskContext. In a C++ program, this would be :
  // for GenerateDataSource() :
  #include <rtt/DataSourceGenerator.hpp>
  // for AdaptDataSource() :
  #include <rtt/DataSourceAdaptor.hpp>

  //...
  TaskContext* peer = this->getPeer("ATask");

  // Create the command argument list.
  // up to 4 arguments can be given to GenerateDataSource()(...)
  std::vector<DataSourceBase::shared_ptr> args
     = GenerateDataSource()(0.1);

  // Create the method object :
  try {
     DataSourceBase::shared_ptr meth =
        peer->methods().getObjectFactory("objname")->
	     create("changeP", args );
  } catch ( ... ) {
     // wrong arguments !
  }

  // Call the method (always synchronously):
  meth->evaluate();

  // OR : to retrieve the return value you need to do :
  DataSource>double<::shared_ptr meth2 = AdaptDataSource<double>()( meth );

  double result = meth2->get(); // assert that meth2 != 0 !
The method factory can throw exceptions if the number of
arguments, the type of arguments or the command names are
unknown. It returns a DataSourceBase
pointer which you must store in a
DataSourceBase::shared_ptr object, such
that memory deallocation can be managed. If you want the return
value of the method, you need to adapt it first to a DataSource
of the correct type. AdaptDataSource>T<()(arg)
will return null if the argument can not be converted to to T.
Upon success you can then use the get()
function to execute the method and collect
the result; evaluate() on the other hand
only executes the method and does not return the result.
The same rules apply for passing values by argument as with scripts.
A method, command or completion condition may store the results in its arguments, given
that the DataSources are of type AssignableDataSource.
After the command or method finished, you find the new values in the objects
referenced by vector<DataSourceBase::shared_ptr>.
Table of Contents
Abstract
The 'execution engine' executes Programs, State Machines, commands and events. It can execute any number of Programs and State Machines in parallel in a single thread.
Orocos is meant for building realtime systems. You will find
many usefull classes in the Orocos CoreLib to build them, but
they would only act as a noninteractive whole. The Execution
package allows a user to configure a system, execute
user-defined programs on that system and interactively accept
commands. An ExecutionEngine contains a
series of Processors which loads state
machine and program definitions and executes them. Execution of
the programs and state machines will happen in real-time. In
addition, it processes incoming commands and events in
real-time as well. The execution engine thus exists of four
processors : ProgramProcessor,
StateMachineProcessor,
CommandProcessor and the
EventProcessor. The Execution Engine
needs to run in a periodic (preferably) or non periodic corelib
task in order to execute these processors.
This document bundles the execution semantics of the Execution Engine and its processors and is no mandatory literature for understanding the Orocos task execution infrastructure.
The Parser will generate Programs and StateMachines from user defined text files, which are then executed in realtime.
A TaskContext's ExecutionEngine Executes Programs, Hierarchical StateMachines and processes Commands and events.
The ExecutionEngine is the core class of this package. It executes the decision logic of the TaskContext by executing programs and state machines. Any number of these may be loaded and can be controlled separately. It allows to start, pause, step,... stop programs and state machines. No recompilation is needed in order to use new programs or state machines. Its task is to serialise (do one after the other) the execution of programs, state machines, commands and events such that they are not concurrently executing, and can thus interact thread-safely. A TaskContext is running when it's ExecutionEngine is running. The Task Context provides the interface of the control task, the Execution Engine executes the implementation.
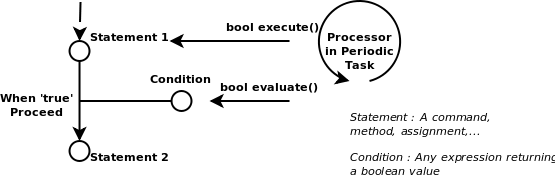
The FunctionGraph is a tree composed of command nodes ( See : CommandInterface class ), where each node contains one or more statements. A FunctionGraph keeps track of the start node and the node to be executed next. As such a program is executed one node at a time and the transition to the next node is done on a given boolean condition ( See : ConditionInterface class). The FunctionGraph is built by the program parser and almost never by the programmer by hand.
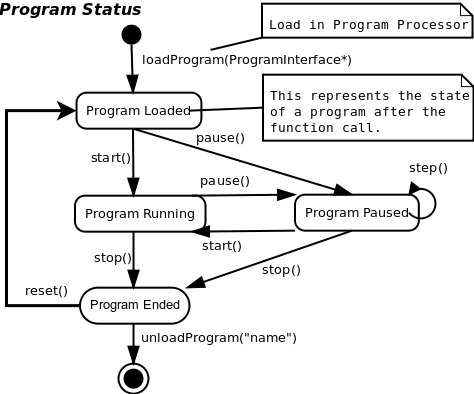
In order to access (start, stop, pause,...) a loaded program, use :
  ProgramInterface* prog = mytaskC.engine()->programs()->getProgram("ProgName");
  if (prog == 0 ) {
      // program not found.
  }
  int line = prog->getLineNumber();
  prog->start();
  // ...
  prog->pause();
  // .. etc.
All commands are also accessible from within the interactive 'TaskBrowser'.
Programs are generated from a script. The Parser is able to convert Orocos Program Scripts to a Program which can be loaded in the Program Processor.
Loading, unloading and deleting a Program may throw
an exception. The program_load_exception
and program_unload_exception
should be try'ed and catch'ed on load and unload or deletion
of a Program in the Program Processor.
| Tip | |
|---|---|
Alternatively, you can use the ProgramLoader class as a user-friendly frontend for loading Programs and Functions in tasks. |
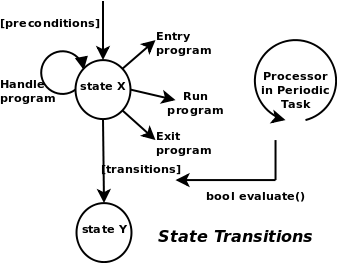
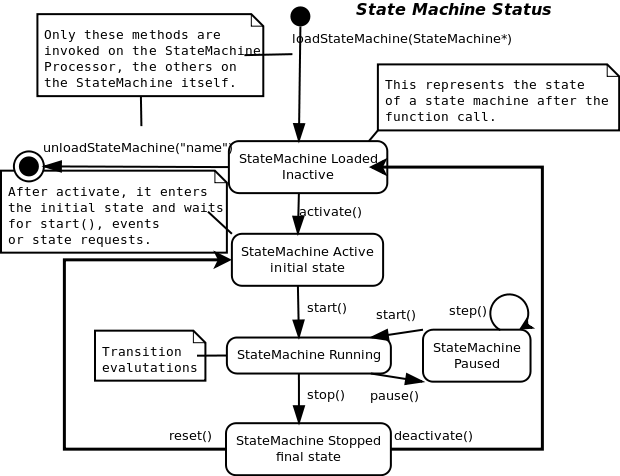
The StateMachine is a collection of states, linked to each other through transition definitions. It represents a state machine of the realtime system's logic and may access internal and external data for deciding on its state transitions. Every 'device' has some states or configurations in which a specific action must be taken (on entry, during or on exit) and transitions between states are defined by boundary conditions (guards) or triggered by events. Every such state is defined by the StateInterface. A state itself is defined by four programs : entry, run, handle and exit. They are called by the State Machine Processor when this state is entered, run or left. When no state transition took place, handle is called in a periodic execution step of the StateMachineProcessor. Otherwise, first the exit program of the current state is called, then the entry program and then the run program of the new state is called. The next periodic step will continue the run program, or when finished, evaluate transition conditions, and if none succeeds, handle will be called, and so on. Orocos Events may be processed during the run program. The exit program can check for interuption and clean up if necessary. After the exit program (if any), the transition program is executed (again, if any).
As transitions define when a state will be left, preconditions are used to define when a state should not be entered, and function as an extra condition which is checked before the transition is tried.
The Parser is able to convert Orocos State Descriptions to a State Machine wich can be loaded in the Processor.
In order to access (activate, start, stop, pause,...) a loaded state machine, use :
  StateMachine* smach = mytaskC.engine()->states()->getStateMachine("MachineName");
  if (smach == 0 ) {
      // state machine not found.
  }
  smach->activate();
  string state = smach->getCurrentStateName();
  smach->start();
  // ...
  smach->stop();
  // .. etc.
All commands are also accessible from within the interactive 'TaskBrowser'.
Loading, unloading and deleting a State Machine may throw
an exception. The program_load_exception
and program_unload_exception
should be try'ed and catch'ed on load and unload or deletion
of a State Machine in the Processor.
| Tip | |
|---|---|
Alternatively, you can use the ProgramLoader class as a user-friendly frontend for loading State Machines. |
The CommandProcessor is responsible for accepting command requests from other (realtime) tasks. It uses a non-blocking atomic queue to store incomming requests and fetch-and-execute them in its periodic step. It offers thus a thread-safe realtime means of message passing between threads, without intervention of the Operating System.
  #include <rtt/TaskContext.hpp>

  CommandInterface* com = ... // Create a command, see the next Section.

  int ticket = mytaskC.engine()->commands()->process( com );
If ticket is zero, the command was
not accepted by the processor, possibly the queue was full
or it was not running. You can query if a command has been
fetched and executed by calling :
  if ( mytaskC.engine()->commands()->isProcessed( ticket ) )
     // done !
  else
     // still busy !
Figure 4.5. Tasks Sending Commands
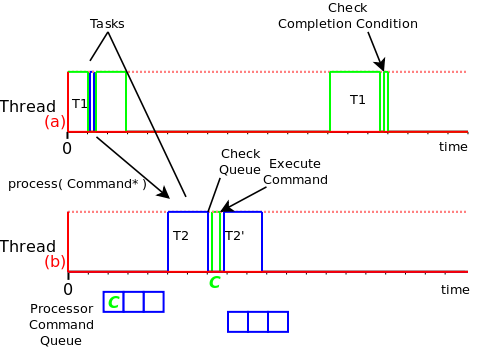
Tasks of different threads communicate by sending commands to each other's Command Processors. When Task T1, running in Thread (a), requests that T2, running in Thread (b) processes a command, the command is stored in a command queue of that task's Command Processor. When T2 runs its Command Processor, the queue is checked and the command is executed. T1 can optionally check if the command was accepted and executed, using a Completion Condition ( see TaskContext and Program Parser manuals. )
| Note | |
|---|---|
Since Orocos Version 0.22.0, it is far easier to create commands using the command factories in the TaskContext. Please see the Task Context manual for examples. This section is still valid, but harder to apply in practice. |
Apart from the Program and State Machine Commands (which are generated by the Parsers), the user can convert C/C++ functions in commands for the Processor to execute. This is usefull if a function must be called at a later moment.
Orocos uses the 'Generic Functor' paradigm to encapsulate Commands. This means that an object (the functor) is created which holds a pointer to the function to be executed. If this function needs arguments, these are also stored in the functor. The object can then be passed around until another object decides to execute the functor. Execution of a functor leads to the original function to be called, together with the arguments.
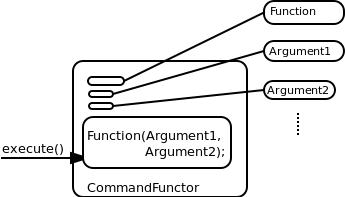
The CommandFunctor is the object used to store the function pointer in. It implements the CommandInterface such that it can be execute()'ed by the Processor :
  #include <rtt/CommandFunctor.hpp>
  void foo();

  CommandInterface* command = newCommandFunctor( &foo );

  command->execute(); // calls foo()

  delete command;
notice that we use a factory-function newCommandFunctor
in order to avoid providing a template parameter.
It is possible to wrap more complex functions in a CommandFunctor, if the boost::bind library is used :
  #include <rtt/CommandFunctor.hpp>
  #include <boost/bind.hpp>

  void foo( int x, int y );
  int a1 = 1, a2 = 2;

  ActionInterface* command = newCommandFunctor( boost::bind( &foo, a1, a2 ) );

  command->execute(); // calls foo(a1,a2)

  delete command;
Argument 'binding' is a very powerful feature of C++. It allows to provide the arguments of a function in advance and execute the function lateron.
It is also possible to call the memberfunction of an object. In that case, the first parameter of the function becomes the pointer to the object, followed by the arguments of the function ( which must all be variables ) :
  #include <rtt/CommandFunctor.hpp>
  #include <boost/bind.hpp>

  class X {
  public:
    void foo( int x, int y );
  };

  X x_object;
  int a1 = 1, a2 = 2;
  ActionInterface* command = newCommandFunctor( boost::bind( &X::foo, x_object, a1, a2 ) );

  command->execute(); // calls x_object.foo(a1,a2)

  delete command;
notice that the foo function is now prefixed by the class scope 'X::'.
The CommandFunctor allows us to bind a function to a CommandInterface. Since the Program Processor can execute CommandInterface objects, it is a powerfull way to delay calling of a function to a later moment.
Using the CommandFunctor from the previous section, we can pass the command to the processor :
  CommandInterface* command = ...
  Processor* proc = ...

  int nr = proc->process( command );
If nr is non-zero, the command was accepted, if zero, the command fifo is full and a new process attempt must be made.
Another thread instructs the processor to execute all queued commands (and programs) synchronically calling the
proc->step();
function. The easiest way to do this is to create a Task which runs the Processor.
The CommandFunctor can be used when a separate thread of execution wants to execute a function in the Processor thread. In Orocos, this happens when an external commando must be processed by the realtime control kernel. In one thread, the CommandFunctor is created (which contains the function to be called) and is passed to the Processor of the ExecutionExtension, which is part of the control kernel. The control kernel thread executes all queued commands in the Processor after the control calculations are done. In this way, safe data access can be guaranteed.
| Note | |
|---|---|
This section gives a short description of the inside of Programs and StateMachines, and can be skipped by most users. |
The ConditionEdge defines an edge of the state diagram. It contains a condition on which a next state is entered. The ConditionInterface encapsulates that logic. Conditions can be ordered by priority, so that it is defined in which order they are checked. A multiple of conditions can lead to the same state.
The CommandNode contains a
Command and is connected by edges of
the type ConditionEdge, these edges
connect one node with another and allow the transition
if the contained condition evaluates to true. When a program
is executed, it executes the command and runs through the
list of edges of that node. When a
Condition is found valid, the next program
node to be executed is found. If no condition is
fulfilled, the same command node will be executed again.
Also a line number can be associated with each command node,
as a reference to the input file formatted by the user.
The Command is the abstraction of a
user directive that has to be executed. A Command can be
execute()'ed and reset()'ed. For each action exists one
Command, but a Command can be composed of other Commands.
The basic interface, CommandInterface, is provided by the
Orocos CoreLib.
The Condition is the abstraction of a
user expression that has to be evaluated. A Condition can be
evaluated()'ed and reset()'ed. Many primitive expressions
can be evaluated and a Condition can be composed of other
Conditions. The basic interface, ConditionInterface, is
provided by the Orocos CoreLib
Table of Contents
Abstract
This document describes the insides Orocos Parser system, in the different ways it can be used and extended.
The Orocos Parser allows users of the Orocos system to write programs and state machines controlling the system in a user-friendly realtime script language. The advantage of scripting is that it is easily extendible and does not need recompilation of the main program. It is implemented using the Boost.Spirit parser library, and should be fairly easy to work with.
This document is about extending the Orocos parser to support extra types, overload existing operators, and/or add new operators.
| Note | |
|---|---|
This Section is only relevant to persons willing to extend the internals of the Orocos Parser framework. |
For various reasons, during the development of the Orocos parser, it has proven necessary to hard-code various things, mostly relating to the defined types, and the operations supported on them. The parser supports using different types of objects than the predefined ones, but the major limitations are:
For some types like vectors, rotations and frames, special syntax was added. Currently, this is limited to the so-called constructors, that allow you to construct e.g. a vector from three doubles.
We will address the ways to address the various limitations.
This section will explain how to add a custom constructor, or a custom operator, that you will then be able to use in expressions.. The operator can take one to three arguments of any type, and can return any type..
You need to do two things in order to do this:
make the parser know about the new syntax
tell the parser what the new syntax means
You should make the parser aware of the new syntax in the file rtt/program-parser/src/ExpressionParser.cxx. There, in the ExpressionParser constructor, the syntax of an expression is defined. There, you should add the new syntax. I'm afraid I can't explain you other than either copying from an existing syntax or reading the Boost.spirit documentation. You need to couple your new syntax with a semantic action like "bind( &ExpressionParser::seen_binary, this, "%" ) for a binary action that you want to give the name "%". The name "%" is just an identifier that should be unique to your new operator, it can be any string you want.
Next, you need to define the operator in Operators.cpp, in much the same way as you should do for overloading an existing operator. However, instead of then using an existing string like "+", you should use the string you chose while defining your new syntax above.