Open RObot COntrol Software
1.12.1
Copyright © 2002,2003,2004,2005,2006,2007 Peter Soetens, FMTC
Orocos Real-Time Toolkit Version 1.12.1.
Permission is granted to copy, distribute and/or modify this document under the terms of the GNU Free Documentation License, Version 1.1 or any later version published by the Free Software Foundation, with no Invariant Sections, with no Front-Cover Texts, and with no Back-Cover Texts. A copy of this license can be found at http://www.fsf.org/copyleft/fdl.html.
Abstract
This document gives an introduction to building your own components for the Orocos ( Open RObot COntrol Software ) project.
Table of Contents
- 1. How to Read this Manual
- 2. Setting up the Component Interface
- 1. Introduction
- 2. Hello World !
- 3. Setting Up a Basic Component
- 3.1. Task Application Code
- 3.2. Starting a Component
- 3.3. A TaskContext's Error and Active states
- 3.4. A TaskContext's Run-Time Errors
- 3.5. Error States Example
- 3.6. Interfacing the TaskContext
- 3.7. Introducing the TaskContext's Interface
- 3.8. The Data Flow Interface
- 3.9. The Method Interface
- 3.10. Method Argument and Return Types
- 3.11. The Attributes and Properties Interface
- 3.12. The Command Interface
- 3.13. The Event Interface
- 4. Connecting TaskContexts
- 5. Using Tasks
- 6. Deploying Components
- 7. Advanced Techniques
- 3. Orocos Scripting Reference
- 4. Distributing Orocos Components with CORBA
- 5. Core Library Reference
- 6. OS Abstraction Reference
- 7. Hardware Device Interfaces
List of Figures
- 1.1. Orocos as Middleware
- 1.2. Real-Time Toolkit Layers
- 2.1. Components Run in Threads
- 2.2. Schematic Overview of a TaskContext
- 2.3. Schematic Overview of the Hello Component.
- 2.4. Schematic Overview of a TaskContext
- 2.5. TaskContext State Diagram
- 2.6. Executing a TaskContext
- 2.7. Extended TaskContext State Diagram
- 2.8. Possible Run-Time failure states.
- 2.9. TaskContext Interface
- 2.10. Component Deployment Levels
- 2.11. Example Component Deployment.
- 3.1. State Change Semantics in Reactive Mode
- 3.2. State Change Semantics in Automatic Mode
- 5.1. Tasks Sending Commands
- 5.2. Event Handling
- 5.3. DataObjects versus Buffers
- 6.1. OS Interface overview
- 7.1. Device Interface Overview
List of Tables
List of Examples
- 2.1. TaskContext Data Flow Topology Example
- 2.2. TaskContext Peer Disconnection Example
- 3.1. string and array creation
- 3.2. StateMachine Definition Format
- 3.3. StateMachine Example (state.osd)
- 3.4. Program example (program.ops)
- 5.1. Example Periodic Thread Interaction
- 5.2. Using Events
- 5.3. Event Types
- 5.4. Creating attributes
- 5.5. Using properties
- 5.6. Accessing a Buffer
- 5.7. Accessing a DataObject
- 5.8. Using the Logger class
- 6.1. Locking a Mutex
- 7.1. Using the name service
Table of Contents
This manual is for Software developers who wish to write their own software components using the Orocos Real-Time Toolkit. There is also a CoreLib Reference Chapter at the end to find out the precise semantics of our communication primitives and other important classes. The Orocos hardware abstraction is included as well. The HTML version of this manual links to the API documentation of all classes.
The most important Chapters to get started building a component are presented first. Orocos components are implemented using the 'TaskContext' class and the following Chapter explains step by step how to define the interface of your component, such that you can interact with your component from a user interface or other component.
For implementing algorithms within your component, various C++ function hooks are present in wich you can place custom C++ code. As your component's functionality grows, you can extend its scripting interface and call your algorithms from a script.
The Orocos Scripting Chapter details how to write programs and state machines. "Advanced Users" may benefit from this Chapter as well since the scripting language allows to 'program' components without recompiling the source.
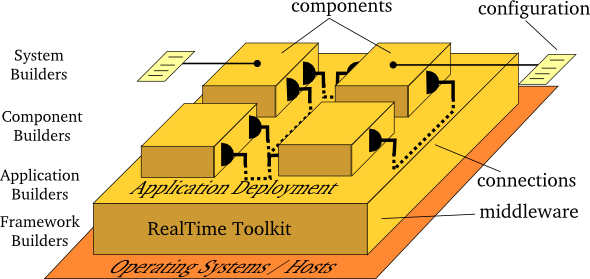
The Real-Time Toolkit allows setup, distribution and the building of real-time software components. It is sometimes refered to as 'middleware' because it sits between the application and the Operating System. It takes care of the real-time communication and execution of software components.
Orocos provides a limited set of components for application development. The Orocos Component Library (OCL) is a collection of components ranging from general purpose to hardware specific components. They serve as an example, although some are using complex constructs of the Real-Time Toolkit. Two noteworthy components are the TaskBrowser and the DeploymentComponent. The former provides a console which allows you to manipulate remote or in-process components and lets you browse the component network. The latter is a component which can load other components into the same process. For beginners, the TaskBrowser is used to instruct the DeploymentComponent to load, connect and configure a given list of components, but for matured applications, the DeploymentComponent is given an XML file which describes which components to load, connect and start in the current application.
The components of the Orocos Component Library are documented seperately on the OCL webpage.
The Real-Time Toolkit is structured in layers on top of the Operating System and the devices (IO).
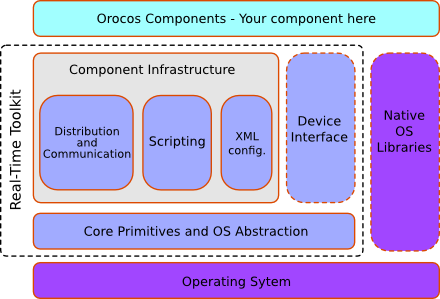
An Orocos component is built upon the Real-Time Toolkit (RTT) library. It allows you to build components which are accessible over a network, configurable using XML files and listen to a scripting interface, which allows components to be controlled using text commands. A component which accesses IO devices can use the Orocos Device Interface as well which defines how to interact with analog and digital IO and encoders. Of course, components can make use of external, non-Orocos libraries as well.
Orocos components which only use the Real-Time Toolkit are portable over different Operating Systems (OS) and processor architectures. Orocos has an internal OS abstraction which allows the components to run on any supported architecture. When your component uses an external library, for example a camera or vision library, portability depends on these libraries.
Table of Contents
- 1. Introduction
- 2. Hello World !
- 3. Setting Up a Basic Component
- 3.1. Task Application Code
- 3.2. Starting a Component
- 3.3. A TaskContext's Error and Active states
- 3.4. A TaskContext's Run-Time Errors
- 3.5. Error States Example
- 3.6. Interfacing the TaskContext
- 3.7. Introducing the TaskContext's Interface
- 3.8. The Data Flow Interface
- 3.9. The Method Interface
- 3.10. Method Argument and Return Types
- 3.11. The Attributes and Properties Interface
- 3.12. The Command Interface
- 3.13. The Event Interface
- 4. Connecting TaskContexts
- 5. Using Tasks
- 6. Deploying Components
- 7. Advanced Techniques
Abstract
This document describes the Orocos Component Model, which allows to design Real-Time software components which transparently communicate with each other.
This manual documents how multi-threaded components can be defined in Orocos such that they form a thread-safe robotics/machine control application. Each control component is defined as a "TaskContext", which defines the environment or "context" in which an application specific task is executed. The context is described by the five Orocos primitives: Event, Property, Command, Method and Data Port. This document defines how a user can write his own task context and how it can be used in an application.
Figure 2.1. Components Run in Threads
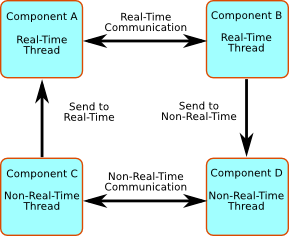
Components run in (periodic) threads and can communicate transparently. The Orocos RTT does a 'best effort' to deliver the highest performance to the highest priority threads.
A component is a basic unit of functionality which executes one or more (real-time) programs in a single thread. The program can vary from a mere C function over a real-time program script to a real-time hierarchical state machine. The focus is completely on thread-safe time determinism. Meaning, that the system is free of priority-inversions, and all operations are lock-free (also data sharing and other forms of communication such as events and commands). Real-time components can communicate with non real-time components (and vice verse) transparently.
| Note | |
|---|---|
In this manual, the words task and component are used as equal words, meaning a software component built using the C++ TaskContext class. |
The Orocos Component Model enables :
Lock free, thread-safe, inter-thread function calls.
Communication between hard Real-Time and non Real-Time threads.
Deterministic execution time during communication for the higher priority thread.
Synchronous and asynchronous communication between threads.
Interfaces for component distribution.
C++ class implementations for all the above.
This chapter relates to other chapters as such :
- Core Library
provides the Command and Event infrastructure, activity to thread mapping, Properties and lock-free data exchange implementations.
- Execution Engine
executes the commands, events, real-time programs and scripts in a component.
- Orocos Scripting
provides a real-time scripting language which is convertible to a form which can be accepted by the Execution Engine.
The Scripting chapter gives more details about script syntax for state machines and programs.
Figure 2.2. Schematic Overview of a TaskContext
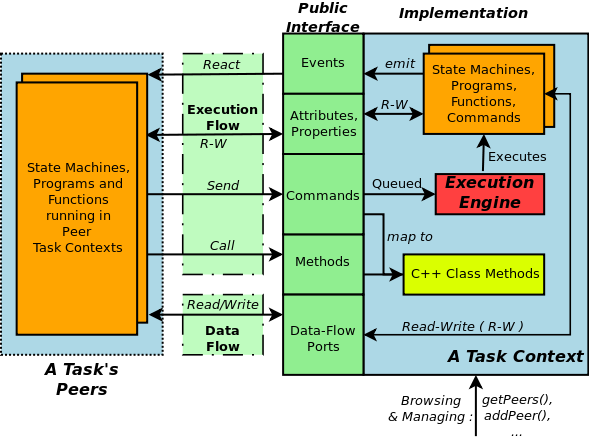
The Execution Flow is formed by Programs and State Machines sending commands, events,... to Peer Tasks. The Data Flow is the propagation of data from one task to another, where one producer can have multiple consumers and vice verse.
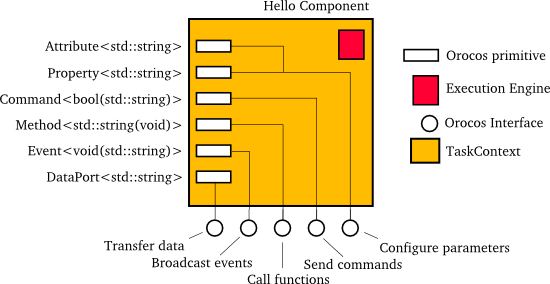
A component's interface consists of : Attributes and Properties, Commands, Methods, Events and Data Flow ports which are all public. The class TaskContext groups all these interfaces and serves as the basic building block of applications. A component developer 'builds' these interfaces using the instructions found in this manual.
This section introduces tasks through the "hello world" application, which is included in the Orocos Component Library. It contains one TaskContext component, HelloWorld, which has one instance of each communication primitive.
The way we interact with TaskContexts during development of an Orocos application is through the Task Browser. The TaskBrowser is a powerful console tool which helps you to explore, execute and debug TaskContexts in running programs. All you have to do is to create a TaskBrowser and call its loop() method. When the program is started from a console, the TaskBrowser takes over user input and output. The TaskBrowser uses the GNU readline library to easily enter commands to the tasks in your system. This means you can press TAB to complete your commands or press the up arrow to scroll through previous commands.
| Note | |
|---|---|
The TaskBrowser is a component of its own which is found in the Orocos Component Library (OCL). |
  #include <ocl/TaskBrowser.hpp>
  #include <rtt/os/main.h>
  // ...

  using namespace Orocos;

  int ORO_main( int, char** )
  {
      // Create your tasks
      TaskContext* task = ...

      // when all is setup :
      TaskBrowser tbrowser( task );

      tbrowser.loop();
      return 0;
  }
Now let's start the helloworld application. If you downloaded OCL and compiled it from source, You can do this by entering the helloworld subdirectory of your OCL build directory and running ./helloworld
In case you got OCL as a binary package, enter loadComponent("Hello","orocos-helloworld") at the prompt of the deployer application for your target: ORO_LOGLEVEL=5 deployer-gnulinux for example. This command loads the Orocos-HelloWorld component library and creates a component with name "Hello" (Requires OCL 1.4.1 or later). Finally, type cd Hello to start with the exercise.
0.016 [ Info   ][main()] ./helloworld manually raises LogLevel to 'Info' (5). See also file 'orocos.log'.
0.017 [ Info   ][main()] **** Creating the 'Hello' component ****
0.018 [ Info   ][ConnectionC] Creating Asyn connection to the_event.
0.018 [ Info   ][ExecutionEngine::setActivity] Hello is periodic.
0.019 [ Info   ][main()] **** Starting the 'Hello' component ****
0.019 [ Info   ][main()] **** Using the 'Hello' component    ****
0.019 [ Info   ][main()] **** Reading a Property:            ****
0.019 [ Info   ][main()]      the_property = Hello World
0.019 [ Info   ][main()] **** Sending a Command:             ****
0.020 [ Info   ][main()]      Sending the_command : 1
0.020 [ Info   ][main()] **** Calling a Method:              ****
0.020 [ Info   ][main()]      Calling the_Method : Hello World
0.020 [ Info   ][main()] **** Emitting an Event:             ****
0.021 [ Info   ][main()] **** Starting the TaskBrowser       ****
0.021 [ Info   ][TaskBrowser] Creating a BufferConnection from the_buffer_port to the_buffer_port with size 13
0.021 [ Info   ][TaskBrowser] Connected Port the_buffer_port to peer Task Hello.
0.022 [ Info   ][Hello] Creating a DataConnection from the_data_port to the_data_port
0.022 [ Info   ][Hello] Connected Port the_data_port to peer Task TaskBrowser.
   Switched to : Hello
0.023 [ Info   ][main()] Entering Task Hello
0.023 [ Info   ][Hello] Hello Command: World
0.023 [ Info   ][Hello] Receiving Event: Hello World

  This console reader allows you to browse and manipulate TaskContexts.
  You can type in a command, event, method, expression or change variables.
  (type 'help' for instructions)
    TAB completion and HISTORY is available ('bash' like)

 In Task Hello. (Status of last Command : none )
 (type 'ls' for context info) :
The first [ Info ] lines are printed by the Orocos Logger, which has been configured to display informative messages to console. Normally, only warnings or worse are displayed by Orocos. You can always watch the log file 'orocos.log' in the same directory to see all messages. After the [Log Level], the [Origin] of the message is printed, and finally the message itself. These messages leave a trace of what was going on in the main() function before the prompt appeared.
Depending on what you type, the TaskBrowser will act differently. The built-in commands cd, help, quit and ls are seen as commands to the TaskBrowser itself, if you typed something else, it tries to evaluate your command to an expression and will print the result to the console. If you did not type an expression, it tries to parse it as a command to a (peer) task. If that also fails, it means you made a typo and it prints the syntax error to console.
 In Task Hello. (Status of last Command : none )
 (type 'ls' for context info) :1+1
      Got :1+1
   = 2
To display the contents of the current task, type ls, and switch to one of the listed peers with cd, while cd .. takes you one peer back in history. Since there are no peers other than the TaskBrowser itself, one can not cd anywhere in this example.
 In Task Hello. (Status of last Command : none )
 (type 'ls' for context info) :ls

 Listing Hello :

 Attributes   :
 (Attribute)      string the_attribute      = Hello World
 (Attribute)      string the_constant       = Hello World
 (Property )      string the_property       = Hello World          (Hello World Description)

 Interface    :
  Methods      : the_method isRunning start stop trigger update
  Commands     : the_command
  Events       : the_event

 Objects      :
            this (  )
   the_data_port ( A Task Object. )
 the_buffer_port ( A Task Object. )

 Ports        : the_data_port the_bufferPort
 Peers        : TaskBrowser
| Note | |
|---|---|
To get a quick overview of the commands, type help. |
First you get a list of the Properties and Attributes (alphabetical) of the current component. Properties are meant for configuration and can be written to disk. Attributes are solely for run-time values. Each of them can be changed (except constants.)
Next, the interface of this component is listed: One method is present the_method, one command the_command and one event the_event. They all print a 'Hello World' string when invoked.
In the example, the current task has only three objects: this, the_data_port and the_buffer_port. The this object serves as the public interface of the Hello component. These objects contain methods, commands or events. The the_data_port and the_buffer_port objects are created to represent the data ports of the Hello component. They allow you to to send or receive data to these ports and check if they are connected.
Last, the peers are shown, that is, the components which are known, and may be used, by this component. The HelloWorld component is a stand-alone component and has only the TaskBrowser as a peer.
To get a list of the Task's interface, you can always type an object name, for example this.
 In Task Hello. (Status of last Command : none )
 (type 'ls' for context info) : this
      Got :this

Printing Interface of 'Hello' :

  Command    : bool the_command( string the_arg )
   Hello Command Description
   the_arg : Use 'World' as argument to make the command succeed.
  Method     : string the_method( )
   Hello Method Description
  Event     : void the_Event( string the_data )
   Hello Event Description
   the_data : The data of this event.
Now we get more details about the commands, methods and events registered in the public interface. We see now that the the_command command takes one argument as a string, or that the the_method method returns a string. One can invoke each one of them.
 In Task Hello. (Status of last Command : none )
 (type 'ls' for context info) :the_method()
      Got :the_method()
 = Hello World
Methods are called directly and the TaskBrowser prints the result. The return value of the_method() was a string, which is "Hello World". This works just like calling a 'C' function.
When a command is entered, it is sent to the Hello component, which will execute it in its own threadon behalf of the sender. The different stages of its lifetime are displayed by the prompt. Hitting enter will refresh the status line:
 In Task Hello. (Status of last Command : none )
 (type 'ls' for context info) :the_command("World")
      Got :the_command("World")

 In Task Hello. (Status of last Command : queued)
1021.835 [ Info   ][Hello] Hello Command: World
 (type 'ls' for context info) :

1259.900 [ Info   ][main()] Checking Command: World
 In Task Hello. (Status of last Command : done )
 (type 'ls' for context info) :
A Command might be rejected (return false) in case it received invalid arguments:
 In Task Hello. (Status of last Command : done )
 (type 'ls' for context info) :the_command("Belgium")
      Got :the_command("Belgium")

 In Task Hello. (Status of last Command : queued )
 (type 'ls' for context info) :
1364.505 [ Info   ][Hello] Hello Command: Belgium


 In Task Hello. (Status of last Command : fail )
 (type 'ls' for context info) :
Besides sending commands to tasks, you can alter the attributes of any task, program or state machine. The TaskBrowser will confirm validity of the assignment with 'true' or 'false' :
 In Task Hello. (Status of last Command : none )
 (type 'ls' for context info) :the_attribute
      Got :the_attribute
 = Hello World
 In Task Hello. (Status of last Command : none )
 (type 'ls' for context info) :the_attribute = "Veni Vidi Vici !"
      Got :the_attribute = "Veni Vidi Vici !"
 = true

 In Task Hello. (Status of last Command : none )
 (type 'ls' for context info) :the_attribute
      Got :the_attribute
 = Veni Vidi Vici !
Finally, let's emit an Event. The Hello World Event requires a payload. A callback handler was registered by the component, thus when we emit it, it can react to it:
 In Task Hello. (Status of last Command : none )
 (type 'ls' for context info) :the_event(the_attribute)
      Got :the_event(the_attribute)
 = true
 In Task Hello. (Status of last Command : none )
 (type 'ls' for context info) :
354.592 [ Info   ][Hello] Receiving Event: Veni Vidi Vici !
The example above passed the the_attribute object as an argument to the event, and it was received by our task correctly. Events are related to commands, but allow broadcasting of data, while a command has a designated receiver.
The Data Ports can be accessed through the the_data_port and the_buffer_port object interfaces.
Initially, these ports are unconnected, as the HelloWorld component did not connect its ports to another component. Unconnected ports can hardly be used. In order to test them, you can instruct the TaskBrowser to connect to them. This is done by entering the .connect command (note the '.').
Since each port has an associated object, we can inspect the interface of a port by typing its name:
 In Task Hello. (Status of last Command : none )
 (type 'ls' for context info) :the_data_port
      Got :the_data_port

Printing Interface of 'the_data_port' :

  Method     : string Get( )
   Get the current value of this Data Port
  Method     : void Set( string const& Value )
   Set the current value of this Data Port
   Value : The new value.
The the_data_port object has two methods: Get() and Set(). Since data ports are used for sending unbuffered data packets between components, this makes sense. One can interact with the ports as such:
 In Task Hello. (Status of last Command : none )
 (type 'ls' for context info) :the_data_port.Set("World")
      Got :the_data_port.Set("World")
 = (void)

 In Task Hello. (Status of last Command : none )
 (type 'ls' for context info) :the_data_port.Get()
      Got :the_data_port.Get()
 = World
When a value is Set(), it is sent to whatever is connected to that port, when we read the port using Get(), we see that the previously set value is present. The advantage of using ports is that they are completely thread-safe for reading and writing, without requiring user code. The Hello component also contains a the_buffer_port for buffered data transfer. You are encouraged to play with that port as well.
Remember that the TaskBrowser was a component as well ? When a user enters ls, the interface of the visited component is listed. It is also possible to get an 'outside' view of the visited component, through the eyes of an external component. The leave allows a view from within the TaskBrowser itself:
 In Task Hello. (Status of last Command : none )
 (type 'ls' for context info) :leave
1001.607 [ Info   ][main()] Watching Task Hello

 Watching Task Hello. (Status of last Command : none )
 (type 'ls' for context info) :ls

 Listing TaskBrowser :

 Attributes   : (none)

 Interface    :
  Methods      : isRunning start stop trigger update
  Commands     : (none)
  Events       : (none)

 Objects      :
            this (  )
        the_data_port ( A Task Object. )
      the_buffer_port ( A Task Object. )

 Ports        : the_data_port the_buffer_port
 Hello Peers : TaskBrowser
The following things are noteworthy: 'ls' shows now the contents of the TaskBrowser itself and no longer of the Hello Component. In this example, the TaskBrowser has the same ports as the component it visits: the_data_port and the_buffer_port. These were created when we issued the .connect previously. Otherwise, there would be no data ports.
One can return to the 'inside' view again by typing enter:
 Watching Task Hello. (Status of last Command : none )
 (type 'ls' for context info) :enter
1322.653 [ Info   ][main()] Entering Task Hello

 In Task Hello. (Status of last Command : none )
 (type 'ls' for context info) :
Last but not least, hitting TAB twice, will show you a list of possible completions, such as peers or commands :
 In Task Hello. (Status of last Command : none )
 (type 'ls' for context info) :
the_attribute     the_event         cd ..         quit
the_buffer_port.  the_method        help          this.
the_command       the_property      leave
the_constant      TaskBrowser.  list
the_data_port.     cd            ls
 (type 'ls' for context info) :
TAB completion works even across peers, such that you can type a TAB completed command to another peer than the current peer.
In order to quit the TaskBrowser, enter quit:
 In Task Hello. (Status of last Command : none )
 (type 'ls' for context info) :quit

1575.720 [ Info   ][ExecutionEngine::setActivity] Hello is disconnected from its activity.
1575.741 [ Info   ][Logger] Orocos Logging Deactivated.
The TaskBrowser Component is application independent, so that your end user-application might need a more suitable interface. However, for testing and inspecting what is happening inside your real-time programs, it is a very useful tool. The next sections show how you can add properties, commands, methods etc to a TaskContext.
| Note | |
|---|---|
If you want a more in-depth tutorial, see the 'task-intro' example for a TaskBrowser which visits a network of three TaskContexts. |
Components are implemented by the TaskContext class. It is useful speaking of a context because it defines the context in which an activity (a program) operates. It defines the interface of the component, its properties, its peer components and uses its ExecutionEngine to execute its programs and to process commands and events.
This section walks you through the definition of an example component in order to show you how you could build your own component.
| Important | |
|---|---|
The ready-to-execute code of this section can be found in the 'simple-task' RTT example on the RTT Source code page of the Orocos.org website. |
A TaskContext is constructed as :
  #include <rtt/TaskContext.hpp>

  // we assume this is done in all the following code listings :
  using namespace RTT;

  TaskContext a_task("ATask");
The argument is the (unique) name of the component.
A task's interface consists of : Commands, Methods, Ports, Attributes and Properties and Events, which are all public. We will refer to them as members.
Figure 2.4. Schematic Overview of a TaskContext
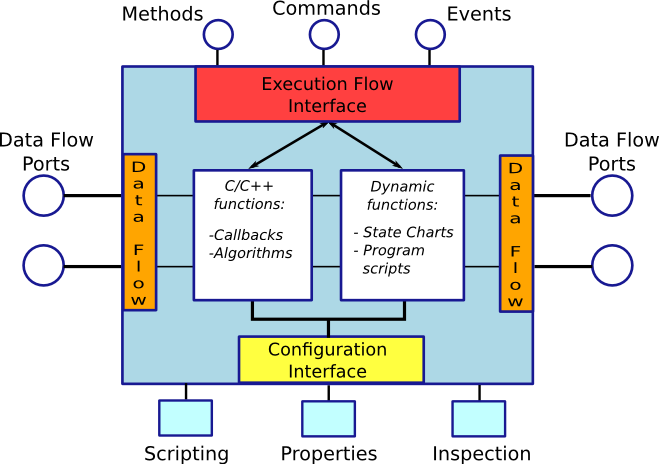
The Execution Flow is formed by the processing of commands, methods and events (which call in turn user functions). The Data Flow is the propagation of data from one task to another, where one producer can have multiple consumers.
When a TaskContext is running, it accepts commands or events using its Execution Engine. The Execution Engine will check periodically for new commands in it's queue and execute programs which are running in the task. When a TaskContext is started, the ExecutionEngine is running. The complete state flow of a TaskContext is shown in Figure 2.5, “ TaskContext State Diagram ”.
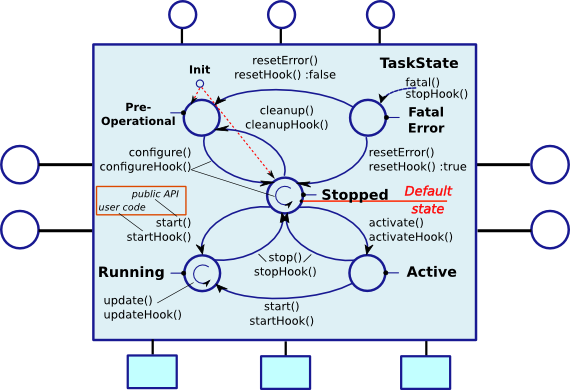
Figure 2.5. TaskContext State Diagram
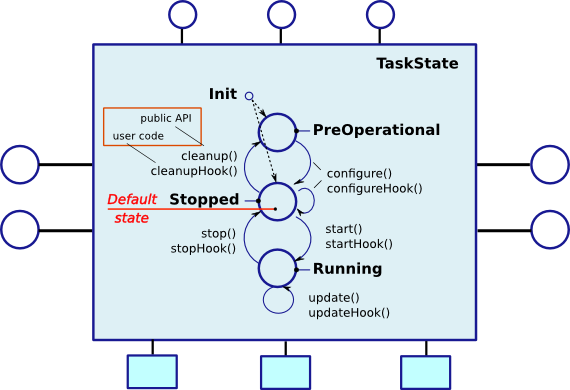
During creation, a component is in the
Init state. When constructed, it
enters the PreOperational or
Stopped (default) state. If it enters
the PreOperational state after construction, it requires
an additional configure() call before
it can be start()'ed. The figure
shows that for each API function, a user 'hook' is
available.
The first section goes into detail on how to use these hooks.
The user application code is filled in by inheriting from the TaskContext and implementing the 'Hook' functions. There are five such functions which are called when a TaskContext's state changes.
The user may insert his configuration-time setup/cleanup code in the
configureHook() (read XML, print status
messages etc.) and cleanupHook() (write
XML, free resources etc.).
The run-time (or: real-time) application code belongs in the
startHook(),
updateHook() and
stopHook() functions.
class MyTask
    : public TaskContext
  {
  public:
       MyTask(std::string name)
         : TaskContext(name)
       {
          // see later on what to put here.
       }

       /**
        * This function is for the configuration code.
	* Return false to abort configuration.
	*/
       bool configureHook() {
          // ...
	  return true;
       }

       /**
        * This function is for the application's start up code.
	* Return false to abort start up.
	*/
       bool startHook() {
          // ...
	  return true;
       }

       /**
        * This function is called by the Execution Engine.
	*/
       void updateHook() {
          // Your component's algorithm/code goes in here.
       }

       /**
        * This function is called when the task is stopped.
	*/
       void stopHook() {
          // Your stop code after last updateHook()
       }

       /**
        * This function is called when the task is being deconfigured.
	*/
       void cleanupHook() {
          // Your configuration cleanup code
       }
};| Important | |
|---|---|
By default, the TaskContext enters the
|
If you want to force the user to call configure() of your TaskContext, set the TaskState in your constructor as such:
class MyTask
    : public TaskContext
  {
  public:
       MyTask(std::string name)
         : TaskContext(name, PreOperational) // demand configure() call.
       {
          //...
       }
  };
When configure() is called, the
configureHook() (which you
must implement!) is executed and must return
false if it failed. The TaskContext drops to the
PreOperational state in that case.
When configureHook() succeeds, the
TaskContext enters the Stopped state
and is ready to run.
A TaskContext in the Stopped state
(Figure 2.5, “
TaskContext State Diagram
”)
may be start()'ed upon which
startHook() is called once and may abort
the start up sequence by returning false. If true, it enters the
Running state and
updateHook() is called (a)periodically by
the ExecutionEngine, see below. When the task is
stop()'ed, stopHook()
is called after the last updateHook() and
the TaskContext enters the Stopped state
again. Finally, by calling cleanup(), the
cleanupHook() is called and the TaskContext
enters the PreOperational state.
The functionality of a component, i.e. its algorithm, is executed
by its internal Execution Engine. To run a TaskContext, you
need to use one of the
ActivityInterface classes from the
RTT, most likely Activity
or SlaveActivity create a threaded
or non-threaded activity which executes your task. This
relation is shown in Figure 2.6, “
Executing a TaskContext
”.
The RTT::Activity class allocates a thread which executes the
Execution Engine. The chosen
ActivityInterface object will invoke
the Execution Engine, which will in turn invoke the
application's hooks above. When created, the TaskContext is assigned
the default Activity by default.
This means it has an internal thread which can receive commands
and process events but does not execute user code in
updateHook() periodically.
Figure 2.6. Executing a TaskContext
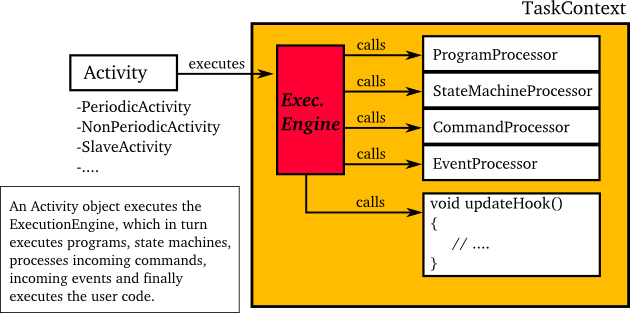
You can make a TaskContext 'active' by creating an Activity object which executes its Execution Engine. The Execution Engine delegates all work to specific 'Processors' and user code in updateHook().
A common task in control is executing an algorithm periodically. This is done by attaching an activity to the Execution Engine which has a periodic execution time set.
  #include <rtt/Activity.hpp>

  using namespace RTT;

  TaskContext* a_task = new MyTask("the_task");
  // Set a periodic activity with priority=5, period=1000Hz
  a_task->setActivity( new Activity( 5, 0.001 ));
  // ... start the component:
  a_task->start();
  // ...
  a_task->stop();
Which will run the Execution Engine of "ATask" with a
frequency of 1kHz. This is the frequency at which state
machines are evaluated, program steps taken, commands and
events are accepted and executed and the application code in
updateHook() is run. When the periodic
activity is stopped again, all programs are stopped, state
machines are brought into the final state and no more commands
or events are accepted.
You don't need to create a new Activity if you want to switch
to periodic execution, you can also use the setPeriod
function:
  // In your TaskContext's configureHook():
  bool configureHook() {
      return this->setPeriod(0.001); // set to 1000Hz execution mode.
  }
An updateHook() function of a periodic
task could look like:
  class MyTask
    : public TaskContext
  {
  public:
       // ...

       /**
        * This function is periodically called.
	*/
       void updateHook() {
          // Your algorithm for periodic execution goes inhere
	  outPort.Set( inPort.Get() * 2.0 );
       }

  };
You can find more detailed information in ??? in the CoreLib reference.
A TaskContext is run by default by a non periodic RTT:Activity object. This
is useful when updateHook() only needs
to process data when it arrives or must wait on
network connections or does any other blocking operation.
Upon start(), the Execution Engine waits for new Commands or Events to
come in to be executed. Each time such an event happens, the user's
application code (updateHook()) is called each
time an event or command arrives.
An updateHook() function of a non periodic
task could look like:
  class MyTask
    : public TaskContext
  {
  public:
       // ...

       /**
        * This function is only called by the Execution Engine
	* when 'trigger()' is called or an event or command arrives.
	*/
       void updateHook() {
            // Your blocking algorithm goes inhere
            char* data;
            double timeout = 0.02; // 20ms
            int rv = my_socket_read(data, timeout);

            if (rv == 0) {
	       // process data
               this->stateUpdate(data);
            }

            // This is special for non periodic activities, it makes
            // the TaskContext call updateHook() again after
            // commands and events are processed.
            this->getActivity()->trigger();
       }

};| Warning | |
|---|---|
Non periodic activities should be used with care and with much thought in combination with scripts (see later). The ExecutionEngine will do absolutely nothing if no commands or asynchronous events or no trigger comes in. This may lead to surprising 'bugs' when program scripts or state machine scripts are executed, as they will only progress upon these events and seem to be stalled otherwise. |
You can find more detailed information in ??? in the CoreLib reference.
In addition to the PreOperational,
Stopped and Running
TaskContext states, you can use two additional states for more
advanced component behaviour: the FatalError
and the Active states, as in
Figure 2.7, “
Extended TaskContext State Diagram
”
Figure 2.7. Extended TaskContext State Diagram
This figure shows the complete state diagram of a
TaskContext. This is Figure 2.5, “
TaskContext State Diagram
”
extended with two more states: Active
and FatalError.
The FatalError state is entered whenever
the TaskContext's fatal() function is
called, and indicates that an unrecoverable error occured,
possibly in the updateHook() or in any
other component function. The ExecutionEngine is immediately
stopped and stopHook() is called when
this state is entered.
In order to leave the FatalError state,
one needs to call resetError() which calls
resetHook(), the user function, in turn.
When resetHook() returns true, error
recovery was possible and the component becomes
Stopped again. In case
resetHook() returns false, the
TaskContext becomes PreOperational and
requires configuration.
The Active state is for processing
incomming commands and events, but not yet running the
updateHook() user function. It is
used for components that require to accept commands
before they are running. The Active
state is optional and can be skipped.
The Active state is entered when
activate() is called from the
Stopped state. In order to check this
transition the user function
activateHook() is called which must
return true to let the transition succeed, otherwise, the
TaskContext remains Stopped. Once the
TaskContext is Active, it can be
start()'ed (continue to
Running) or stop()'ed
(go back to Stopped).
It is possible that non-fatal run-time errors occur which
may require user action on one hand, but do not prevent
the component from performing it's task, or allow degraded
performance.
Therefor, in the Running state, one can
make a transition to the
RunTimeWarning and RunTimeError
sub-states by calling warning() and
error() respectively. See
Figure 2.8, “
Possible Run-Time failure states.
”
Figure 2.8. Possible Run-Time failure states.

This figure shows the sub-states of the Running state as a UML state chart.
When the application code calls error(),
the RunTimeError state is entered and
errorHook() is executed instead of
updateHook(). If at some moment the
component detects that it can resume normal operation, it
calls the recovered() function, which
leads to the Running state again and in the next iteration,
updateHook() is called again. When
warning() is called, the RunTimeWarning
state is entered and updateHook() is
still executed (there is no
warningHook()). Use
recovered() again to go back to the
Running state.
Use getErrorCount() and
getWarningCount() to read the number of
times the error and warning states were entered. Using these
functions, you can track if any intermittent problem has
occured. The counters are reset when the
cleanup() method is called in the
Stopped state.
Here is a very simple use case, a TaskContext communicates over a socket with a remote device. Normally, we get a data packet every 10ms, but sometimes one may be missing. This is signaled as a run time warning, but we just continue. When we don't receive 5 packets in a row, we signal this as a run time error. From the moment packets come in again we go back to run time warning. Now if the data we get is corrupt, we go into fatal error mode, as we have no idea what the current state of the remote device is, and shouldn't be updating our state, as no one can rely on the correct functioning of the TaskContext.
Here's the pseudo code:
 class MyComponent : public TaskContext
 {
       int faults;
 public:
       MyComponent(const std::string &name)
         : TaskContext(name), faults(0)
       {}

 protected:
       // Read data from a buffer.
       // If ok, process data, otherwise, trigger
       // a runtime warning. When to many faults occur,
       // trigger a runtime error.
       void updateHook()
       {
            Data_t data;
            bool rv = mybuf.Pop( data );
            if ( rv ) {
               this->stateUpdate(data);
               faults = 0;
            } else {
               faults++;
               if (faults > 4)
                   this->error();
               else
                   this->warning();
            }

       }

       // Called instead of updateHook() when in runtime error state.
       void errorHook()
       {
            this->updateHook(); // just call updateHook anyway.
       }

       // Called by updateHook()
       void stateUpdate(Data_t data)
       {
            // Check for corrupt data
            if ( checkData(data) == -1 ) {
                 this->fatalError(); // we will enter the FatalError state.
            } else {
                 // data is ok: update internal state...
            }
       }
 };
Finally, you start this component with a non periodic Activity, which allows you to wait in updateHook() for as long as you want. Commands and events are processed when you leave the function, that's why you can not use a while(1) {} loop within updateHook(), but re-trigger the activity again for a next run.
When you want to discard the 'warning' state of the component, call mycomp.recovered(). If your component went into FatalError, call mycomp.reset() and mycomp.start() again for processing updateHook() again.
During development of your TaskContext, it is handy to connect the TaskBrowser to your task such that you can interactively manipulate it and it's properties:
  #include <ocl/TaskBrowser.hpp>
  // ... see above
  TaskBrowser browser(a_task);

  // Start the interactive console:
  browser.loop();
In which you can start/stop the task and manipulate every aspect of it's interface, as was seen in the previous section.
A TaskContext exists of a number of access or methods which expose a specific part of the interface. These methods are:
  a_task.ports();
  a_task.methods();
  a_task.attributes();
  a_task.properties();
  a_task.commands();
  a_task.events();
The meaning of these methods are explained in the following sections.
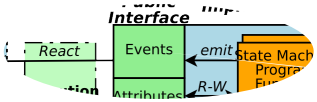
Figure 2.9. TaskContext Interface
The Execution Flow is formed by the processing of commands, methods and events (which call in turn user functions). The Data Flow is the propagation of data from one task to another using ports. Configuration is done using properties and attributes.
| Purpose | |
|---|---|
The 'Data Flow' is a 'stream of data' between tasks which are used to perform calculations. A classical control loop can be implemented using the Data Flow interface. The data is passed buffered or unbuffered from one task to others. A Task can be woken up if data arrives at one or more ports or it can 'poll' for new data on its ports. Reading and writing data ports is always real-time and thread-safe, on the condition that copying your data (i.e. your copy constructor) is as well. |

The Orocos Data Flow is implemented with the Port-Connector software pattern. Each task defines its data exchange ports and inter-task connectors transmit data from one port to another. A Port is defined by a name, unique within that task, the data type it wants to exchange and the buffered or un-buffered method of exchanging. Buffered exchange is done by "Buffer" Ports and un-buffered exchange is done by "Data" Ports.
A Data Port can offer read-only, write-only or read-write access to the unbuffered data. A Buffer Port can offer read-only, write-only and read-write access to the buffered data. Finally, you can opt that new data on selected ports wakes up your task. The example below shows all these possibilities.
| Important | |
|---|---|
The ready-to-execute code of this section can be found in the 'dataflow-task' package on the RTT Source code page of the Orocos.org website. |
Any kind of data can be exchanged (also user defined types) but for readability, only the 'double' C type is used here.
  #include <rtt/Ports.hpp>
  using namespace RTT;

  class MyTask
    : public TaskContext
  {
    // Read-only data port:
    ReadDataPort<double> indatPort;
    // Write-only data port:
    WriteDataPort<double> outdatPort;
    // Read-Write data port:
    DataPort<double> rwdatPort;

    // Read-only buffer port:
    ReadBufferPort<double> inbufPort;
    // Write-only buffer port:
    WriteBufferPort<double> outbufPort;
    // Read-Write buffer port:
    BufferPort<double> rwbufPort;
  public:
    // ...
    MyTask(std::string name)
      : TaskContext(name),
        indatPort("Data_R"),
	outdatPort("Data_W", 1.0),  // note: initial value
	rwdatPort("Data_RW", 1.0),

	inbufPort("SetPoint_X"),
	outbufPort("Packet_1", 15), // note: buffer size
	rwbufPort("Packet_2", 30)
    {
       // an 'EventPort' wakes our task up when data arrives.
       this->ports()->addEventPort( &indatPort, "Event driven Input Data Port" );

       // These ports do not wake up our task
       this->ports()->addPort( &outdatPort, "Output Data Port" );
       this->ports()->addPort( &rwdatPort, "Read-Write Data Port" );

       this->ports()->addPort( &inbufPort, "Read-Only Buffer Port" );
       this->ports()->addPort( &outbufPort, "Write-Only Buffer Port" );
       this->ports()->addPort( &rwbufPort, "Read-Write Buffer Port" );

       // more additions to follow, see below
     }

     // ...
  };
The example starts with declaring all the ports of MyTask. A template parameter '<double>' specifies the type of data the task wants to exchange through that port. Logically, if two ore more tasks are connected, they must agree on this type. The constructor of MyTask initialises each port with a name. This name can be used to 'match' ports between connected tasks ( using 'connectPorts', see Section 4, “Connecting TaskContexts” ), but it is possible to connect Ports with different names as well.
There are two ways to add a port to the TaskContext interface:
using addPort()
or addEventPort(). In the latter case,
new data arriving on the port will wake up ('trigger') the
activity of our TaskContext and updateHook() get's executed.
If you want to know which port caused the wake-up, do not implement
updateHook() (ie remove this function from your component) and use
updateHook(const std::vector<PortInterface*>& updatedPorts)
which provides you a list of all ports having received new data.
| Note | |
|---|---|
Only ReadDataPort, DataPort,
ReadBufferPort and BufferPort
added with
Adding a WriteDataPort or WriteBufferPort
with In the current implementation, addEventPort() must happen before you start() the TaskContext the first time. Any ports added after your component has been started the first time will not cause them to wake up your component. So even stopping and starting wil not solve this. Therefor, it is recommended to only use addEventPort in your component's contructor (as shown in the example above). This issue is being looked at. |
Write and read-write Buffers take besides a name, the prefered
buffer size as a parameter. In the example, these are the
values 15 and 30. Before the task is connected to its peers,
you can still change this value with the
setBufferSize() function of the Port, for
example in the configureHook() function
of your TaskContext.
Finally, a 'write' port can take an initial value in the constructor as well. This value will be used when the connection between two ports is created in order to initialise the connection ( using 'connectPorts', see Section 4, “Connecting TaskContexts” for a full example). If a 'write' port is connected to an existing connection, the initial value (and buffer size) are ignored and the settings of the existing connection are not touched. You can modify the initial value with the 'Set( value )' function in both Buffer and Data write ports.
The Data Flow interface is used by your task from within
the program scripts or its updateHook()
method. Logically the script or method reads the inbound
data, calculates something and writes the outbound data.
  #include <rtt/Ports.hpp>
  using namespace RTT;

  class MyTask
    : public TaskContext
  {
     // ...Constructor sets up Ports, see above.

     bool startHook() {
       // Check validity of (all) Ports:
       if ( !indatPort.connected() ) {
          // No connection was made !
	  return false;
       }
       if ( !outdatPort.connected() ) {
          // ...
       }
       return true;
     }

     /**
      * Note: use updateHook(const std::vector<PortInterface*>&)
      * instead for having information about the updated event
      * driven ports.
      */
     void updateHook() {
       // Read and write the Data Flow:
       // Unbuffered:
       double val = indatPort.Get();
       // calculate...
       outdatPort.Set( val );

       // Buffered:
       if ( inbufPort.Pop( val ) ) {
          // calculate...
       } else {
          // buffer empty.
       }

       if ( outbufPort.Push( val ) ) {
          // ok.
       } else {
          // buffer full.
       }
     }
     // ...
  };
It is wise to check in the startHook()
( or earlier: in configureHook() )
function if all necessary ports are connected()
( or ready() ).
At this point, the task start up can still be aborted by
returning false. Otherwise, a write to a port
will be discarded, while a read returns the initial value
or the default value. A Pop of a disconnected port will
always return false.
When a Port is connected, it becomes available to the Orocos scripting system such that (part of) the calculation can happen in a script. Also, the TaskBrowser can then be used to inspect the contents of the DataFlow on-line.
| Note | |
|---|---|
In scripting, it is currently not yet possible to know which event port woke your task up. |
A small program script could be loaded into MyTask with the following contents:
  program MyControlProgram {
    double the_K  = K        // read task property, see later.
    double setp_d

    while ( true ) {
      if ( SetPoint_X.Pop( setp_d ) ) { // read Buffer Port
        double in_d = Data_R.Get()      // read Data Port
        double out_d = (setp_d - in_d) * K  // Calculate
        do Data_W.Set( out_d )          // write Data Port
      }
      do nothing       // this is a 'wait' point.
    }
  }
The program "MyControlProgram" starts with declaring two variables and reading the task's Property 'K'. Then it goes into an endless loop, trying to Pop a set point value from the "SetPoint_X" Buffer Port. If that succeeds (buffer not empty) the "Data_R" Data Port is read and a simple calculation is done. The result is written to the "Data_W" Data Port and can now be read by the other end. Alternatively, the result may be directly used by the Task in order to write it to a device or any non-task object. You can use methods (below) to send data from scripts back to the C++ implementation.
Remark that the program is executed within the Execution
Engine. In order to avoid the endless loop, a 'wait' point
must be present. The "do nothing" command inserts such a
wait point and is part of the Scripting syntax. If you plan
to use Scripting state machines, such a
while(true) loop (and hence wait point)
is not necessary. See the Scripting Manual for a full
overview of the syntax.
| Purpose | |
|---|---|
A task's methods are intended to be called 'synchronously' by the caller, i.e. are directly executed like a function in the thread of the caller. Use it to 'calculate' a result or change a parameter. Calling methods is real-time but not thread-safe and should for a running component be guarded with a Mutex if it's functionality requires so. |

The easiest way to access a TaskContext's interface is through Methods. They resemble very much normal C or C++ functions, but they have the advantage to be usable in scripting or can be called over a network connection. They take arguments and return a value. The return value can in return be used as an argument for other Methods or stored in a variable. For all details, we refer to the Orocos Scripting Manual.
To add a TaskContext's method to the method interface, one proceeds similarly as when creating Data Ports. The data type is now replaced by a function signature, for example '
void(int, double)
' which is the signature of a function returning 'void' and having two arguments: an 'int' and a 'double'.
#include <rtt/Method.hpp>
using namespace RTT;
class MyTask
: public TaskContext
{
public:
void reset() { ... }
string getName() const { ... }
double changeParameter(double f) { ... }
// ...
Method<void(void)> resetMethod;
Method<string(void)> nameMethod;
Method<double(double)> paramMethod;
MyTask(std::string name)
: TaskContext(name),
resetMethod("reset", &MyTask::reset, this),
nameMethod("name", &MyTask::getName, this),
paramMethod("changeP", &MyTask::changeParameter, this)
{
// Add the method objects to the method interface:
this->methods()->addMethod( &resetMethod, "Reset the system.");
this->methods()->addMethod( &nameMethod, "Read out the name of the system.");
this->methods()->addMethod( ¶mMethod,
"Change a parameter, return the old value.",
"New Value", "The new value for the parameter.");
// more additions to follow, see below
}
// ...
};
In the above example, we wish to add 3 class functions to the method interface: reset, getName and changeParameter. This can be done by constructing a Method object with the correct function signature for each such class function. Each Method object is initialised in the constructor with a name ("reset"), a pointer to the class function (&MyTask::reset) and a pointer to the class object (this). This setup allows the method objects resetMethod, nameMethod and paramMethod to be invoked just like one would call the functions directly.
After the method objects are constructed, we add methods to the method interface using the addMethod() function. The addMethod() function requires a a method object (&resetMethod), a description ("Reset the system.") and a name, description pair for each argument (such as in changeParameter).
Using this mechanism, any method of any class can be added to a task's method interface.
In order to easily invoke a task's methods from a C++ program, only only needs a pointer to a TaskContext object, for example using the 'getPeer()' class function.
  // create a method:
  TaskContext* a_task_ptr;
  Method<void(void)> my_reset_meth
       = a_task_ptr->methods()->getMethod<void(void)>("reset");

  // Call 'reset' of a_task:
  reset_meth();
Methods can also be given arguments and collect return values. Both constant arguments and variable arguments are supported.
  // used to hold the return value:
  string name;
  Method<string(void)> name_meth =
    a_task_ptr->methods()->getMethod<string(void)>("name");

  // Call 'name' of a_task:
  name = name_meth();

  cout << "Name was: " << name << endl;

  // hold return value.
  double oldvalue;
  Method<double(double)> mychange_1 =
      a_task.methods()->create("changeP");

  // Call 'changeParameter' of a_task with argument '1.0'
  oldvalue = mychange_1( 1.0 );
  // oldvalue now contains previous value.
Up to 4 arguments can be given. If the signature was not correct, the method invocation will be ignored. One can check validity of a method object with the 'ready()' function:
  Method<double(double)> mychange_1 = ...;
  assert( mychange_1.ready() );
The arguments can be of any class type and type qualifier (const, &, *,...). However, to be compatible with the Orocos Program Parser variables, it is best to follow the following guidelines :
Table 2.1. Method Return & Argument Types
| C++ Type | In C++ functions passed by | Maps to Parser variable type |
|---|---|---|
| Primitive C types : double, int, bool, char | value (no const, no reference ) | double, int, bool, char |
| C++ Container types : std::string, std::vector<double> | const & | string, array |
| Orocos Fixed Container types : RTT::Double6D, KDL::[Frame | Rotation | Twist | ... ] | const & | double6d, frame, rotation, twist, ... |
Summarised, every non-class argument is best passed by value, and every class type is best passed by const reference. The parser does handle references (&) in the arguments or return type as well.
| Purpose | |
|---|---|
A task's attributes and properties are intended to configure and tune a task with certain values. Properties have the advantage of being writable to an XML format, hence can store 'persistent' state. For example, a control parameter. Attributes are lightweight values which can be read and written during run-time, and expose C++ class members to the scripting layer. Reading and writing properties and attributes is real-time but not thread-safe and should for a running component be limited to the task's own activity. |

A TaskContext may have any number of attributes or properties, of any type. They can be used by programs in the TaskContext to get (and set) configuration data. The task allows to store any C++ value type and also knows how to handle Property objects. Attributes are plain variables, while properties can be written to and updated from an XML file.
An attribute can be added in the task's interface (AttributeRepository) like this :
#include <rtt/Property.hpp>
#include <rtt/Attribute.hpp>
class MyTask
: public TaskContext
{
Attribute<bool> aflag;
Attribute<int> max;
Constant<double> pi;
Property<std::string> param;
Property<double> value;
public:
// ...
MyTask(std::string name)
: TaskContext(name),
param("Param","Param Description","The String"),
value("Value","Value Description", 1.23 ),
aflag("aflag", false),
max( "max", 5 ),
pi( "pi", 3.14 )
{
// other code here...
this->attributes()->addAttribute( &aflag );
this->attributes()->addAttribute( &max );
this->attributes()->addConstant( &pi );
this->properties()->addProperty( ¶m );
this->properties()->addProperty( &value );
}
// ...
};
Which inserts an attribute of type bool and int, name 'aflag' and 'max' and initial value of false and 5 to the task's interface. A constant 'pi' is added as well. The methods return false if an attribute with that name already exists. Adding a Property is also straightforward. The property is added in a PropertyBag.
To get a value from the task, you can use the set() and get() methods :
  bool result = aflag.get();
  assert( result == false );

  param.set("New String");
  assert( param.get() == "New String" );
While another task can access it through the attributes() interface:
  Attribute<bool> the_flag = a_task->attributes()->getAttribute<bool>("aflag");
  assert( the_flag.ready() );

  bool result = the_flag.get();
  assert( result == false );

  Attribute<int> the_max = a_task->attributes()->getAttribute<int>("max");
  assert( the_max.ready() );
  the_max.set( 10 );
  assert( the_max.get() == 10 );
The attributes 'the_flag' and 'the_max' are called 'mirrors' of the original attributes of the task.
See also Section 7, “Properties” in the Orocos CoreLib reference.
A program script can access the above attributes as in
  // a program in "ATask" does :
  var double pi2 = pi * 2.
  var int    myMax = 3
  set max = myMax

  set Param = "B Value"
  // an external (peer task) program does :
  var double pi2 = ATask.pi * 2.
  var int    myMax = 3
  set ATask.max = myMax
When trying to assign a value to a constant, the script parser will throw an exception, thus before the program is run. You must always specify the task's name (or 'task') when accessing a task's attribute, this is different from methods and commands, which may omit the task's name if the program is running within the task.
| Important | |
|---|---|
The same restrictions of Section 3.10, “Method Argument and Return Types” hold for the attribute types, when you want to access them from program scripts. |
See also Section 6, “Attributes” in the Orocos CoreLib reference.
See Section 5.1, “Task Property Configuration and XML format” for storing and loading the Properties to and from files, in order to store a TaskContext's state.
| Purpose | |
|---|---|
A task's command functions are intended to be executed 'in the owner's thread', thus are executed asynchronously with respect to the caller. Use it to 'reach a goal' or do a lengthy calculation in the receiver. Command functions are, in contrast with methods, executed by the receiver's thread Calling and executing commands is real-time and thread-safe with respect to updateHook, scripting etc running in the receiving component. |

The command interface is very similar to the Method interface above. The diffence with methods are:
The 'command function' of the TaskContext is executed in the thread of the receiving TaskContext. Is is an asynchronous function call.
The arguments of the 'command function' are stored in a command object which makes them available when the function is finally executed in the receiving thread. This allows multiple commands to be queued at the same time with different arguments.
The return value of a command function must always be a bool.
There is a second function, the 'completion condition' which is called to check if the command's effect is done. Take a command to move to a position for example. The 'command function' programs the target position, while the 'completion condition' will check if the target position has been reached, long after the command function has been executed. Commands will often work together with the
updateHook()function which further processes the command's data.
To add a command to the Command Interface, one must create Command, objects :
  #include <rtt/Command.hpp>

  class MyTask
    : public TaskContext
  {
  protected:
    /**
     * The first command starts a 'cycle'.
     */
    bool startCycle() { ... }
    /**
     * The completion condition checks if updateHook() has
     * finished processing this command.
     */
    bool cycleDone() const { ... }

    Command<bool(void)> cycleCommand;

    /**
     * This command programs the Task to go to a position.
     */
    bool gotoPosition(double p) { ... }
    /**
     * The completion condition checks if updateHook() has
     * finished processing this command.
     */
    bool positionReached(double p) const { return p == cur_pos; }

    Command<bool(double)> gotoCommand;

    /**
     * The commands 'program' the TaskContext, the
     * updateHook function, finishes off the command
     * over a period of time.
     */
    void updateHook() {
       if ( inCycleMode() ) {
         nextCycleStep();
       }
       if ( inGotoMode() ) {
         incrementPosition();
       }
    }

  public:
    MyTask(std::string name)
      : TaskContext(name),
        cycleCommand("startCycle",
	             &MyTask::startCycle,
                     &MyTask::cycleDone, this),
        gotoCommand( "gotoPosition",
                     &MyTask::gotoPosition,
                     &MyTask::positionReached, this)
    {
      // ... other startup code here

      this->commands()->addCommand( &cycleCommand,
                                    "Start a new cycle.");
      this->commands()->addCommand( &gotoCommand,
                                    "Goto a position.",
	                            "pos", "A position endpoint.");
    }
  };
Clearly, commands differ from Methods in that they take an extra function which is called the completion condition. It is a function which returns true when the command's effect is done. The command itself also returns a boolean which indicates if it was accepted or not. Reasons to be rejected can be faulty arguments or that the system is not ready to accept a new command.
The Command object requires two function
pointers instead of one, which must both return a 'bool'. The
first one is the command function that does the actual work,
and the completion condition is a function having :
exactly the same arguments as the command,
OR only the first argument of the command,
OR no arguments at all.
Analogous to addMethod(),
addCommand adds the Command objects to
the TaskContext interface and also requires a string
describing the command, and two strings giving a name and
description for every argument.
Once a command is added to a TaskContext's interface, other tasks can make use of that command.
The Command class can be used to invoke commands as well. You can get such object from a task's interface:
  Command<bool(void)> mycom
     = a_task.commands()->getCommand<bool(void)>("startCycle");
  // check if the command is ok:
  assert( mycom.ready() );

  // Send 'startCycle' to a_task (asynchronous).
  bool result = mycom();
  // next, check its status:
  bool accepted = mycom.accepted(); // accepted by execution engine?
  bool valid = mycom.valid();       // command was valid (well-formed)?
  bool done = mycom.done();         // command was done?
Such commands can also be given arguments. Both constant arguments and variable arguments are supported:
  // get a command:
  Command<bool(double)> myGoto_1 =
      a_task.commands()->getCommand<bool(double)>("gotoPosition");

  bool d_arg = 5.0;
  // Send 'gotoPosition' to a_task, reads contents of d_arg.
  bool result_2 = myGoto_1(d_arg);
The current implementation supports up to 4 arguments. Since the use of 'structs' is allowed, this is enough for most applications.
The above lets you write in a program script :
  do startCycle()
  do gotoPosition( -3.0 )
when the program is loaded in a_task.
Commands returning false will propagate that error to the program or function calling that command, which will cause the program script to enter an error state, i.e. it stops its execution.
| Important | |
|---|---|
The same restrictions of Section 3.10, “Method Argument and Return Types” hold for the command and condition types, when you want to access them from program scripts. |
See also Section 3, “Commands” in the Orocos CoreLib reference.
| Purpose | |
|---|---|
A task's events are intended to be 'emitted', thus published by the task to subscribers. Use it to 'notify' interested parties of a change in the system. It allows you to have one or more functions called when an event happens. Publishing and reacting to an event is real-time. Only 'asynchronous' callbacks are thread-safe with respect to updateHook, scripting etc running in the receiving component. |
A task may register its events in its interface in order to be used by its state machines and other tasks as well. Events are defined and explained in the Orocos CoreLib reference, Section 4, “Events”.
Events can be easily added to a task's interface, much like methods are:
  #include <rtt/Event.hpp>

  class MyTask
    : public TaskContext
  {
    // An event with a bool argument:
    Event< void(bool) > turnSwitch;
    // An event with three arguments:
    Event< bool(double, double, double) > moveAxis;
  public:
    MyTask(std::string name)
      : TaskContext(name),
        turnSwitch( "turnSwitch" ),
	moveAxis( "move" )
    {
      // ... other startup code here

      // add it to the task's interface:
      this->events()->addEvent( &turnSwitch,
                                "Turn switch description",
                                "d","Direction" );
      this->events()->addEvent( &moveAxis,
                                "Move the axis."
                                "x","X axis position",
				"y","Y axis position",
				"z","Z axis direction");
    }
  };
An Event object has the signature ('void(bool)') of the 'callback function' it will call when the event is 'emitted' (or 'fired'). The object is initialised with a name ("turnSwitch") and added to the interface ('addEvent').
Once events are added, they can be emitted using the Event object.
  Event< bool(double, double, double) > move_event
    = a_task.events()->getEvent( "move" );
  assert( move_event.ready() );

  // emit the event 'move' with given args:
  move_event(1.0, 2.0, 3.0);

  // or with variable arguments:
  double a = 0.3, b = 0.2, c = 0.1;
  move_event(a, b, c);
Analogous to emitting an event, one can also react to an event in C++, using the Event interface. Event connections can be accessed through the Handle object. The first example shows how to setup a synchronous connection to the event of the previous examples:
   #include <boost/bind.hpp>
  /**
   * Example: Connect a class method to an Event.
   */
  class Reactor
  {
  public:
     bool react_callback(double a1, double a2, double a3) {
        // use a1,a2, a3
	return false; // return value is ignored.
     }
  };

  /**
   * Example: Connect a 'C' function to an Event.
   */
  bool foo_callback( double a1, double a2, double a3 ) {
      // use a1, a2, a3
      return false; // ignored.
  }

  // Class callback:
  Reactor r;

  // WARNING: this requires events to be registered to
  // the scripting interface (see warning note below).
  Handle h
    = a_task.events()->setupConnection("move")
                 .callback( &r, &Reactor::react_callback )
                 .handle();
  assert( h.ready() );

  h.connect(); // connect to event "move"

  move_event(1.0, 2.0, 3.0); // see previous example.

  // now Reactor::callback() was called.

  h.disconnect(); // disconnect again.

  // 'C' Function callback:
  // WARNING: this requires events to be registered to
  // the scripting interface (see warning note below).
  h = a_task.events()->setupConnection("move")
                 .callback( &foo_callback )
                 .handle();

  h.connect();
  move_event(4.0, 5.0, 6.0)

// now foo_callback is called with arguments. | Warning | |
|---|---|
The RTT makes the distinction between adding a primitive to
the C++ interface and adding to the C++ & scripting
interface. For using the event callback mechanism, you
always need to add to the C++ & scripting interface,
since it requires that functionality. You must use
|
| Note | |
|---|---|
Using the |
Analogous to the event example in the CoreLib reference
(Section 4, “Events”),
a class funcion is made to react to the event. A connection
is setup between the "move" event and the react_callback
function of "r". The connection can be controlled using
the handle to connect or disconnect the reaction to events.
When connect() is called, every
event invocation will call react_callback()
with the given arguments. Using a 'C' function works analogous as shown
above.
A second example continues, but uses an asynchronous connection. First a new task (b_task) is created which will handle the event asynchronously. During setup, the EventProcessor of b_task's Execution Engine is used to process the event.
  TaskContext b_task("BTask");
  b_task.setActivity( new Activity(5, 0.1) ); // priority, period
  ptask_b.run( &b_task );
  ptask_b.start();

  // WARNING: see the warning above about using callback
  Handle h3
    = a_task.events()->setupConnection("move")
                            .callback(&r, &react_callback,
                                      b_task.engine()->events() ).handle();

  assert( h3.ready() );

  h3.connect(); // connect asynchronously to event "move"

  move_event.emit(); // see previous example.

  // wait a bit...

  // now react_callback() was called from within b_task's execution engine.
Note that after passing the object and function, the EventProcessor
of b_task is added in the callback method, such
that the callback is executed in b_task's thread.
Events are as easy to use as methods (above) from within scripts, using the keyword do:
do ATask.move( 1.0, 2.0, 3.0 )
It is also possible to react to events from within a state machine in order to change state. We refer to the Program Parser Manual for syntax and examples.
A Real-Time system exists of multiple concurrent tasks which must communicate to each other. TaskContext can be connected to each other such that they can communicate Real-Time data.

The addPeer and connectPeers
functions are used to connect TaskContexts and allow them
to use each other's interface. The connectPorts
function sets up the data flow between tasks.
We call connected TaskContexts "Peers" as there is no fixed
hierarchy. A connection from one TaskContext to its
Peer can be uni- or bi-directional. In a uni-directional connection (addPeer ),
only one peer can use the interface of the other, while
in a bi-directional connection (connectPeers), both can use
each others interface.
This allows to build strictly hierarchical topological
networks as well as complete flat or circular networks or any
kind of mixed network.
Peers are connected as such (hasPeer takes a string
argument ):
  // bi-directional :
  connectPeers( &a_task, &b_task );
  assert( a_task.hasPeer( &b_task.getName() )
          & b_task.hasPeer( &a_task.getName() ) );
  // uni-directional :
  a_task.addPeer( &c_task );
  assert( a_task.hasPeer( &c_task.getName() )
          & ! c_task.hasPeer( &a_task.getName() ) );

  // Access the interface of a Peer:
  Method<bool(void) m = a_task.getPeer( "CTask" )->methods()->getMethod<bool(void)>("aMethod");
  // etc. See interface usage in previous sections.
Both connectPeers and addPeer
allow scripts or C++ code to use the interface of a connected Peer. connectPeers
does this connection in both directions.
From within a program script, peers can be accessed by merely prefixing their name to the member you want to access. A program within "ATask" could access its peers as such :
var bool result = CTask.aMethod()
The peer connection graph can be traversed at arbitrary depth. Thus you can access your peer's peers.
Data Flow between TaskContexts is setup by using connectPorts.
The direction of the data flow is imposed by the read/write direction of
the ports. The connectPorts(TaskContext* A, TaskContext* B) function
creates a connection between TaskContext ports when both ports
have the same name and type. It will never disconnect existing connections
and only tries to add ports to existing connections or create new
connections.
Before calling connectPorts, one may connect individual ports,
e.g., when the portnames do not match or when complexer data
flow networks need to be formed. Suppose that Task A has a
port a_port, Task B a b_port and Task C a c_port (all are of type PortInterface*). Then
(shared) connections are made as follows:
  b_port->connectTo( a_port );
  c_port->connectTo( a_port );
Note that the order of ports matters; the following would NOT work:
  a_port->connectTo( b_port ); // ok...
  a_port->connectTo( c_port ); // returns false !
It would leave c_port unconnected, because a_port already has a connection and refuses to connect in that case.
| Note | |
|---|---|
Only use this note if you're an advanced user: In case you want to override buffer/port parameters when you connect ports, you can connect ports in your main() program by writing: #include <rtt/ConnectionFactory.hpp> // ... int buf_size = 100; ConnectionFactory<double> cf; // creates an 'unconnected' connection object: ConnectionInterface::shared_ptr con = cf.createBuffer(a_task->ports()->getPort("SetPoint_X"), b_task->ports()->getPort("SetPoint_X"), buf_size); // use createDataObject() for data ports. // if all went well, 'connect' the connection object: if (con) con->connect(); // this is mandatory ! Do this before the ports are connected. Then connect all other necessary ports to that connection, using c_port.connectTo( con ); . |
Example 2.1. TaskContext Data Flow Topology Example
This diagram shows some possible topologies. Four tasks, "A", "B", "C" and "D" have each a port "MyData" and a port "MyData2". The example demonstrates that connections are always made from writer (sender) to reader (receiver).

Example data flow networks.
The first network has two writers and two readers for "MyData". It can be formed starting from "A" and adding "B","C" and "D" as peers of "A" respectively. Since the network started from "A" all peers share the same connection. The same network could have been formed starting from "B". The second diagram connects "A" to "C" and then "B" to "D". Two connections are now made and if the application tries to connect "B" to "C", this will fail since the "MyData" Port of "C" already participates in a connection.
The third network has one writer and three readers for "MyData2". It can now only be formed starting from "D" and adding "A","B" and "C" as peers to "D". Combining both network one and three is possible by merely invoking all the 'addPeer' methods in the correct order.
connectPorts tries to create connections in
both directions. If a task's Port already has a connection, any
task with compatible, unconnected ports will be added to that
connection. For example, if "a_task" and "b_task" exchange a
Data type "Data_X", and "c_task" reads "Data_X", the
connectPorts will forward "Data_X" to "c_task"
as well.
Tasks can be disconnected from a network by invoking
disconnect() on that task. It will
inform all its peers that it has left the network and
disconnect all its ports. This does not mean that
all data flow connections are deleted. As long as one task's
port still participates in a connection, the connections
exist. When the last port disconnects, the data flow connection
is cleaned up as well.
Example 2.2. TaskContext Peer Disconnection Example
(1) shows what would happen if tasks "A" and "B" are disconnected from the network. (2) shows what would happen if the connection itself is disconnected.

Disconnecting tasks: one can disconnect a whole task or disconnect only a port or connection of a task.
When A.disconnect() is called (1),
it removes its participation from the "MyData" connection.
The same happens for B.disconnect().
"C" and "D" read then from a connection which has no more
writers. Adding "A" again to the network would make "A"
again a writer of "MyData". If both "C" and "D" call disconnect
as well, the "MyData" connection is cleaned up.
  a_task.disconnect();
  assert( !a_task.hasPeer( &b_task.getName() )
          && !b_task.hasPeer( &a_task.getName() );

  b_task.disconnect();
  assert( !c_task.hasPeer( &b_task.getName() )
          && ! d_task.hasPeer( &b_task.getName() );
Data Flow connections can be disconnected (2) as well, in which case all ports are disconnected.
  ConnectionInterface::shared_ptr con = a_task.ports()->getPort("MyData")->connection();
  if (con)
    con->disconnect();

  assert( !a_task.ports()->getPort("MyData").connected() );
  assert( !b_task.ports()->getPort("MyData").connected() );
  assert( !c_task.ports()->getPort("MyData").connected() );
  assert( !d_task.ports()->getPort("MyData").connected() );
This section elaborates on the interface all Task Contexts have from a 'Task user' perspective.
As was seen in Section 3.11, “The Attributes and Properties Interface”, Property objects can be added to a task's interface. To read and write properties from or to files, you can use the MarshallingAccess class' methods. It creates or reads files in the XML Component Property Format such that it is human readable and modifiable.
  // ...
  TaskContext* a_task = ...
  a_task->marshalling()->readProperties( "PropertyFile.cpf" );
  // ...
  a_task->marshalling()->writeProperties( "PropertyFile.cpf" );
Where readProperties() reads the file and updates the
task's properties and writeProperties() writes the
given file with the properties of the task. Other functions allow to
share a single file with multiple tasks or update the task's
properties from multiple files.
The PropertyFile.cpf file syntax can be easily learnt by
using writeProperties() and looking at
the contents of the file. It will contain elements for each
Property or PropertyBag in your task. Below is a
component with five properties. There are three properties at
the top level of which one is a PropertyBag, holding two
other properties.
  #include <rtt/Property.hpp>

  class MyTask
    : public TaskContext
  {

     Property<int> i_param;
     Property<double> d_param;
     Property<PropertyBag> sub_bag;
     Property<std::string> s_param;
     Property<bool> b_param;
  public:
    // ...
    MyTask(std::string name)
      : TaskContext(name),
        i_param("IParam","Param Description", 5 ),
        d_param("DParam","Param Description", -3.0),
        sub_bag("SubBag","Bag Description"),
        s_param("SParam","Param Description","The String"),
        b_param("BParam","Param Description", false)
    {
       // other code here...

       this->properties()->addProperty( &i_param );
       this->properties()->addProperty( &d_param );
       this->properties()->addProperty( &sub_bag );

       // we need to call addProperty on the PropertyBag object
       // contained within the Property object, hence value(),
       // which returns a reference, is used.
       sub_bag.value().addProperty( &s_param );
       sub_bag.value().addProperty( &b_param );
     }
     // ...
  };
Using writeProperties() would produce the following XML file:
<?xml version="1.0" encoding="UTF-8"?>
<!DOCTYPE properties SYSTEM "cpf.dtd">
<properties>

  <simple name="IParam" type="short">
    <description>Param Description</description>
    <value>5</value>
    </simple>
  <simple name="DParam" type="double">
    <description>Param Description</description>
    <value>-3.0</value>
  </simple>

  <struct name="SubBag" type="PropertyBag">
    <simple name="SParam" type="string">
      <description>Param Description</description>
      <value>The String</value>
    </simple>
    <simple name="BParam" type="boolean">
      <description>Param Description</description>
      <value>0</value>
    </simple>
  </struct>

</properties>
PropertyBags (nested properties) are represented as <struct> elements in this format. A <struct> can contain another <struct> or a <simple> property.
The following table lists the conversion from C++ data types to XML Property types.
Table 2.2. C++ & Property Types
| C++ Type | Property type | Example valid XML <value> contents |
|---|---|---|
| double | double | 3.0 |
| int | short or long | -2 |
| bool | boolean | 1 or 0 |
| float | float | 15.0 |
| char | char | c |
| std::string | string | Hello World |
| unsigned int | ulong or ushort | 4 |
Orocos supports two types of scripts:
An Orocos Program Script (ops) contains a Real-Time functional program which calls methods and sends commands to tasks, depending on classical functional logic.
An Orocos State machine Description (osd) script contains a Real-Time (hierarchical) state machine which dictates which program script snippets are executed upon which event.
Both are loaded at run-time into a task. The scripts are parsed to an object tree, which can then be executed by the ExecutionEngine of a task.
Program can be finely controlled once loaded in the ProgramProcessor, which is part of the Execution Engine. A program can be paused, it's variables inspected and reset while it is loaded in the Processor. A simple program script can look like :
  program foo
  {
    var int i = 1
    var double j = 2.0
    do changeParameter(i,j)
  }
Any number of programs may be listed in a file.
Orocos Programs are loaded as such into a TaskContext :
  TaskContext* a_task = ...

  a_task->scripting()->loadPrograms( "ProgramBar.ops" );
When the Program is loaded in the Task Context, it can also be controlled from other scripts or a TaskBrowser. Assuming you have loaded a Program with the name 'foo', the following commands are available :
  do foo.start()
  do foo.pause()
  do foo.step()
  do foo.stop()
While you also can inspect its status :
  foo.isRunning()
  foo.inError()
  foo.isPaused()
You can also inspect and change the variables of a loaded program, but as in any application, this should only be done for debugging purposes.
  set foo.i = 3
  var double oldj = foo.j
Program scripts can also be controlled in C++. Take a look at the ProgramInterface class reference for more program related functions. One can get a pointer to a program by calling:
  ProgramInterface* foo = this->engine()->programs()->getProgram("foo");
  if (foo != 0) {
    bool result = foo->start(); // try to start the program !
    if (result == false) {
       // Program could not be started.
       // Execution Engine not running ?
    }
}Hierarchical state machines are modelled in Orocos with the StateMachine class. They are like programs in that they can call a peer task's members, but the calls are grouped in a state and only executed when the state machine is in that state. This section limits to showing how an Orocos State Description (osd) script can be loaded in a Generic Task Context.
  TaskContext* a_task = ...

  a_task->scripting()->loadStateMachines( "StateMachineBar.osd" );
When the State Machine is loaded in the Task Context, it can also be controlled from your scripts or TaskBrowser. Assuming you have instantiated a State Machine with the name 'machine', the following commands are available :
  do machine.activate()
  do machine.start()
  do machine.pause()
  do machine.step()
  do machine.stop()
  do machine.deactivate()
  do machine.reset()
  do machine.reactive()
  do machine.automatic() // identical to start()
  do machine.requestState("StateName")
As with programs, you can inspect and change the variables of a loaded StateMachine.
set machine.myParam = ...
The Scripting Manual goes in great detail on how to construct and control State Machines.
An Orocos component can be used in both embedded (<1MB RAM) or big systems (128MB RAM), depending on how it is created or used. This is called Component Deployment as the target receives one or more component implementations. The components must be adapted as such that they fit the target.
Figure 2.10, “ Component Deployment Levels ” shows the distinction between the three levels of Component Deployment.
Figure 2.10. Component Deployment Levels
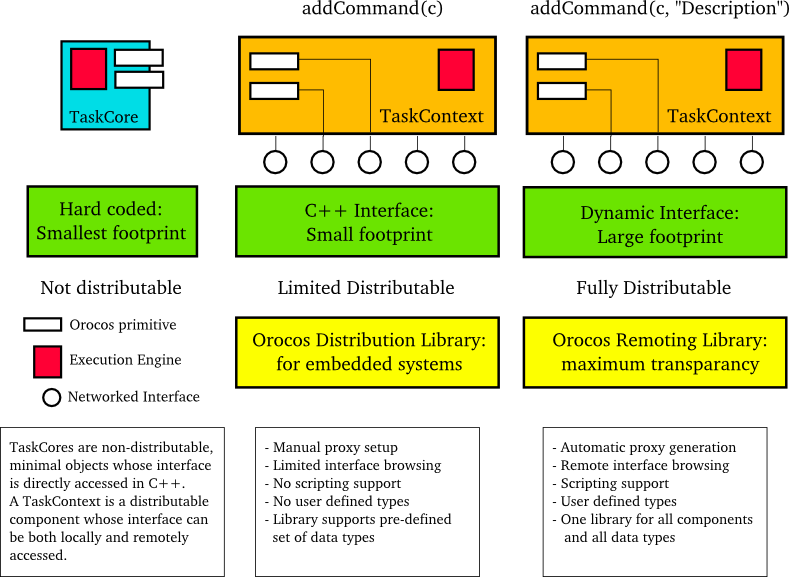
Three levels of using or creating Components can be accomplished in Orocos: Not distributed, embedded distributed and fully distributed.
If your application will not use distributed components and requires a very small footprint, the TaskCore can be used. The Orocos primitives appear directly in the interface and are called upon in a hard-coded way.
If you application requires a small footprint and distributed components, the C++ Interface of the TaskContext can be used in combination with a Distribution Library which does the network translation. It handles a predefined set of data types (mostly the 'C' types) and needs to be adapted if other data types need to be supported.
If footprint is of no concern to your application and you want to distribute any component completely transparently, the TaskContext can be used in combination with a Remoting Library which does the network translation. A CORBA implementation of such a library is being developed on. It is a write-once, use-many implementation, which can pick up user defined types, without requiring modifications. It uses the Orocos Type System to manage user defined types.
A TaskCore is nothing more than a place holder for the
Execution Engine and application code functions
(configureHook(), cleanupHook(),
startHook(), updateHook()
and stopHook() ). The Component
interface is built up by placing the Orocos primitives
as public class members in a TaskCore subclass. Each
component that wants to use this TaskCore must get a
'hard coded' pointer to it (or the interface it implements)
and invoke the command, method etc. Since Orocos is by
no means informed of the TaskCore's interface, it can not
distribute a TaskCore.
Instead of putting the Orocos primitives in the public interface of a subclass of TaskCore, one can subclass a TaskContext and register the primitives to the C++ Interface. This is a reduced interface of the TaskContext, which allows distribution by the use of a Distribution Library.
| Note | |
|---|---|
The code presented is for commands, but can be equally applied for methods by using methods()->addMethod( & method ) for events and for each other Orocos primitive. |
The process goes as such: A component inherits from TaskContext and has some Orocos primitives as class members. Instead of calling:
commands()->addCommand(&com, "Description", "Arg1","Arg1 Description",...);and providing a description for the primitive as well as each argument, one writes:
commands()->addCommand( &com );This is no more than a pointer registration, but already allows all C++ code to use the added primitive.
In order to access the interface of such a Component, the user code may use:
taskA->commands()->getCommand("Name");In order to distribute this component, an implementation of the Distribution Library is required. The specification of this library, and the application setup is in left to another design document.
In case you are building your components as instructed in this manual, your component is ready for distribution as-is, given a Remoting library is used. The Orocos CORBA package implements such a Remoting library.
Using the three levels of deployment in one application is possible as well. To save space or execution efficiency, one can use TaskCores to implement local (hidden) functionality and export publicly visible interface using a TaskContext. Figure 2.11, “ Example Component Deployment. ” is an small example of a TaskContext which uses two TaskCores to delegate work to. The Execution Engines may run in one or multiple threads.
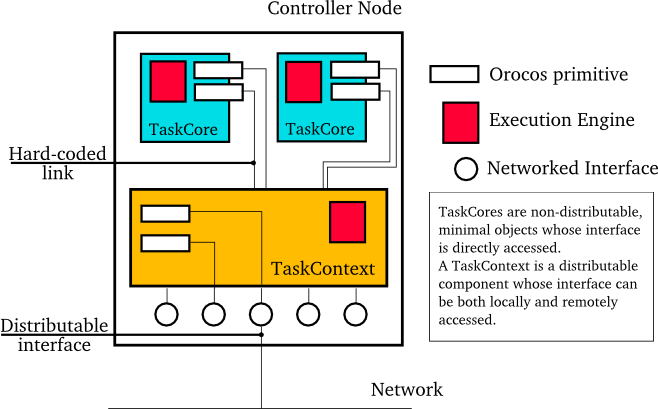
If you master the above methods of setting up tasks, this section gives some advanced uses for integrating your existing application framework in Orocos Tasks.
To help users in setting up quickly a TaskContext, the TaskContext class has been made available which adds some standard methods and commands to its interface which are common to many tasks. It supports loading Programs and StateMachines, saving Properties to disk and reading them back in and stopping and starting the Task. You can download an introduction to setting up TaskContexts which uses this class from the 'task-intro' RTT example on the RTT Source code page of the Orocos.org website.
Methods are always executed in the thread of the caller. If a method does non-real-time operations, like writing data to disk, it should not be called by a real-time thread. However, if the thread which owns the method is itself not real-time, it can execute the method as a command in its own thread. This can easily be accomplished by writing a wrapper function ( or alternatively, register the method as a command too ).
  export function domethod( int arg ) {
     do mymethod( arg )
  }
Load this function with the ProgramLoader in the TaskContext having 'mymethod', and hard real-time tasks can instruct it to execute that method, without jeopardizing their own real-time behaviour.
When tasks need to synchronise, you have a wide range of options to use.
A (sub-)State Machine can pause itself and an extra function in the task's interface can provide the key to progress to another state. First the StateMachine is loaded in an .osd file :
  StateMachine X {
     // ...
     state y {
        entry {
           // pause myself, no transitions are checked.
           do this.pause()
        }
        transitions {
	   // guard this transition.
           if checkSomeCondition() then
              select z
        }
     }
     state z {
       // ...
     }
  }

  RootMachine X x
Then, load an ops file which contains :
  export function progress() {
    // Check if we may progress :
    if this.x.inState("y") then {
        // continue :
        do this.x.start()
        // OR try single transition :
        do this.x.step()
    }
  }
A peer task then calls progress()
which in turn checks if the function is applicable.
But even then, the responsibility of the transition
lies within the State Machine.
Of course, the example can be simplified by setting/ resetting a boolean flag between function and State Machine.
  StateMachine X {
     // ...
     state y {
        transitions {
           if progressflag == true then
                select z
        }
     }
     state z {
       // ...
     }
  }

  RootMachine X x
Then, load an ops file which contains :
  export function progress() {
    // Check if we may progress :
    if this.x.inState("y") then {
          set progressflag = true
    }
  }
When the user or another program calls the progress() command, the flag will be set.
A State Machine can be used such that it waits for state change requests instead of discovering itself to which state it makes a transition. This requires the State Machine to run in another mode, the requestState mode ( as opposed to the automatic mode, which is entered by start() ).
  StateMachine X {
     // ...
     state y {
        entry {
	   // ...
        }
        transitions {
	   // guard this transition.
           if checkSomeCondition() then
              select z
	   // always good to go to states :
	   select ok_1
           select ok_2
        }
     }
     state z {
       // ...
     }
     state ok_1 {
       // ...
     }
     state ok_2 {
       // ...
     }
  }

  RootMachine X x
Then, load an ops file which contains :
  export function progress() {
       // request to enter anther state :
       do this.x.requestState("z")
    }
  export function progress_Ok() {
       // this will succeed always from state 'x' :
       do this.x.requestState("ok1")
    }
This command will fail if the transition is not possible ( for example, the state machine is not in state y, or checkSomeCondition() was not true ), otherwise, the state machine will make the transition and the command succeeds and completes when the z state is fully entered (it's init program completed).
To merely request that a state is handled, one can call requestState on the current state :
  export function handleState() {
       // request to handle current state :
       do this.x.requestState( this.x.getState() )
    }
To request to go to the next possible state (or call handle if none) and then wait again for requests, use 'step()' :
  export function evaluate() {
       // request go to the next state and wait :
       do this.x.step()
    }
Note that if the StateMachine happened to be paused, step() would only progress one single statement. To check if the StateMachine is waiting for requests, use the 'inRequest()' method :
  export function progress() {
       if ( this.x.inRequest() ) {
           // ... it's waiting
       } else {
          // was not waiting, possibly running, paused or non active
       }
    }
All these methods can of course also be called from parent to child State Machine, or across tasks.
Most projects have define their own task interfaces in C++. Assume you have a class with the following interface :
  class DeviceInterface
  {
  public:
    /**
     * Set/Get a parameter. Returns false if parameter is read-only.
     */
    virtual bool setParameter(int parnr, double value) = 0;
    virtual double getParameter(int parnr) const = 0;

    /**
     * Get the newest data.
     * Return false on error.
     */
    virtual bool updateData() = 0;
    virtual bool updated() const = 0;

    /**
     * Get Errors if any.
     */
    virtual int getError() const = 0;
  };
Now suppose you want to do make this interface available, such that program scripts of other tasks can access this interface. Because you have many devices, you surely want all of them to be accessed transparently from a supervising task. Luckily for you, C++ polymorphism can be transparently adopted in Orocos TaskContexts. This is how it goes.
We construct a TaskContext, which exports your C++ interface to a task's interface.
  #include <rtt/TaskContext.hpp>
  #include <rtt/Command.hpp>
  #include <rtt/Method.hpp>
  #include "DeviceInterface.hpp"

  class TaskDeviceInterface
    : public DeviceInterface,
      public TaskContext
  {
  public:
      TaskDeviceInterface()
        : TaskContext( "DeviceInterface" )
      {
         this->setup();
      }

      void setup()
      {
         // Add Methods :
         this->methods()->addMethod(method("setParameter",
                    &DeviceInterface::setParameter, this),
	                   "Set a device parameter.",
	                   "Parameter", "The number of the parameter.",
	                   "New Value", "The new value for the parameter.");

         this->methods()->addMethod(method("getParameter",
                     &DeviceInterface::getParameter, this),
	                  "Get a device parameter.",
                          "Parameter", "The number of the parameter.");
         this->methods()->addMethod(method("getError",
                     &DeviceInterface::getError, this),
	                 "Get device error status.");

         // Add Commands :
         this->commands()->addCommand(method("updateData",
                          &DeviceInterface::updateData, this),
                                 &DeviceInterface::updated,
                                 "Command data acquisition." );
      }
  };
The above listing just combines all operations which were introduced in the previous sections. Also note that the TaskContext's name is fixed to "DeviceInterface". This is not obligatory though.
Your DeviceInterface implementations now
only need to inherit from TaskDeviceInterface
to instantiate a Device TaskContext :
  #include "TaskDeviceInterface.hpp"

  class MyDevice_1
    : public TaskDeviceInterface
  {
  public:

    bool setParameter(int parnr, double value) {
      // ...
    }
    double getParameter(int parnr) const {      // ...
    }
    // etc.
  };
The new TaskContext can now be added to other tasks. If needed, an alias can be given such that the peer task knows this task under another name. This allows the user to access different incarnations of the same interface from a task.
	  // now add it to the supervising task :
  MyDevice_1 mydev;
  supervisor.addPeer( &mydev, "device" );
From now on, the "supervisor" task will be able to access "device". If the implementation changes, the same interface can be reused without changing the programs in the supervisor.
A big warning needs to be issued though : if you change a peer at run-time (after parsing programs), you need to reload all the programs, functions, state contexts which use that peer so that they reference the new peer and its C++ implementation.
To make the example complete, here is an example script which could run in the supervisor task :
  program ControlDevice
  {
     const int par1 = 0
     const int par2 = 1
     do device.setParameter(par1, supervisor.par1 )
     do device.setParameter(par2, supervisor.par2 )

     while ( device.getError() == 0 )
     {
	if ( this.updateDevice("device") == true )
           do device.updateData() until {
	        if done || ( device.getError() != 0 ) then
	           continue
	   }
     }
     do this.handleError("device", device.getError() )
  }
To start this program from the TaskBrowser, browse to supervisor and type the command :
ControlDevice.start()
When the program "ControlDevice" is started, it initialises some parameters from its own attributes. Next, the program goes into a loop and sends updateData commands to the device as long as underlying supervisor (i.e. "this") logic requests an update and no error is reported. This code guarantees that no two updateData commands will intervene each other since the program waits for the commands completion or error. When the device returns an error, the supervisor can then handle the error of the device and restart the program if needed.
The advantages of this program over classical C/C++ functions are :
If any error occurs (i.e. a command or method returns false), the program stops and other programs or state contexts can detect this and take appropriate action.
The "
device.updateData()" call waits for completion of the remote command, but can be given other completion or error conditions to watch for.While the program waits for
updateData()to complete, it does not block other programs, etc within the same TaskContext and thread.There is no need for additional synchronisation primitives between the supervisor and the device since the commands are queued and executed in the thread of the device, which leads to :
The command is executed at the priority of the device's thread, and not the supervisor's priority.
The command can never corrupt data of the device's thread, since it is serialised(executed after) with the programs running in that thread.
Table of Contents
Abstract
This document describes the Orocos Scripting system.
The Orocos Scripting language allows users of the Orocos system to write programs and state machines controlling the system in a user-friendly realtime script language. The advantage of scripting is that it is easily extendible and does not need recompilation of the main program.
Before starting to explain Program Syntax, it is necessary to explain some general concepts that are used throughout the program syntax.
Various sorts of comments are supported in the syntax. Here is a small listing showing the various syntaxes:
  # A perl-style comment, starting at a '#', and running until
  # the end of the line.

  // A C++/Java style comment, starting at '//', and running
  // until the end of the line.

  /* A C-style comment, starting at '/*', and running until
     the first closing */ /* Nesting is not allowed, that's
     why I have to start a new comment here :-)
  */
Whitespace is in general ignored, except for the fact that it is used to separate tokens.
Identifiers are names that the user can assign to variables, constants, aliases, labels. The same identifier can only be used once, except that for labels you can use an identifier that has already been used as a variable, constant or alias. However, this is generally a bad idea, and you shouldn't do it.
Some words cannot be used as identifiers, because they are reserved by the Orocos Scripting Framework, either for current use, or for future expansions. These are called keywords. The current list of reserved keywords is included here:
| alias | done | int | time |
| and | double | next | to |
| break | else | not | true |
| bool | end | nothing | try |
| char | false | or | uint |
| catch | for | return | until |
| const | foreach | set | var |
| define | if | string | while |
| do | include | then |
These, and all variations on the (upper- or lower-) case of each of the letters are reserved, and cannot be used as identifiers.
Expressions are a general concept used throughout the Parser system. Expressions represent values that can be calculated at runtime (like a+b). They can be used as arguments to functions, conditions and whatmore. Expressions implicitly are of a certain type, and the Parser system does strong type-checking. Expressions can be constructed in various ways, that are described below...
Literal values of various types are supported: string, int, double, bool. Boolean literals are either the word "true" or the word "false". Integer literals are normal, positive or negative integers. Double literals are C/C++ style double-precision floating point literals. The only difference is that in order for the Parser to be able to see the difference with integers, we require a dot to be present. String literals are surrounded by double quotes, and can contain all the normal C/C++ style escaped characters. Here are some examples:
  // a string with some escaped letters:
  "\"OROCOS rocks, \" my mother said..."
  // a normal integer
  -123
  // a double literal
  3.14159265358979
  // and another one..
  1.23e10
Constants, variables and aliases allow you to work with data in an easier way. A constant is a name which is assigned a value at parse time, and keeps that value throughout the rest of the program. A variable gets its value assigned at runtime and can be changed at other places in the program. An alias does not carry a value, it is defined with an expression, for which it acts as an alias or an abbreviation during the rest of the program. All of them can always be used as expressions. Here is some code showing how to use them.
  // define a variable of type int, called counter,
  // and give it the initial value 0.
  var int counter = 0
  // add 1 to the counter variable
  set counter = counter + 1

  // make the name "counterPlusOne" an alias for the
  // expression counter + 1.  After this, using
  // counterPlusOne is completely equivalent to writing
  // counter + 1
  alias int counterPlusOne = counter + 1
  // you can assign an arbitrarily complex expression
  // to an alias
  alias int reallycomplexalias = ( ( counter + 8 ) / 3 )*robot.position

  // define a constant of type double, with name "pi"
  const double pi = 3.14159265358979
  const double pi2 = 2*pi       // ok, pi2 is 6.28...
  const int turn = counter * pi // warning ! turn will be 0 !

  // define a constant at _parse-time_ !
  const totalParams = table.getNbOfParams()
Variables, constants and aliases are defined for the following types: bool, int, double, string and array. The Orocos Toolkit System allows any application or library to extend these types.
For convenience, two variable size types have been added to the parser : string and array. They are special because their contents have variable size. For example a string can be empty or contain 10 characters. The same holds for an array, which contains doubles. String and array are thus container types. They are mapped on std::string and std::vector<double>. To access them safely from a task method or command, you need to to pass them by const reference : const std::string& s, const std::vector<double>& v.
Container types can be used in two ways : with a predefined capacity (ie the possibility to hold N items), or with a free capacity, where capacity is expanded as there is need for it. The former way is necessary for real-time programs, the latter can only be used in non real-time tasks, since it may cause a memory allocation when capacity limits are exceeded. The following table lists all available constructors:
Table 3.1. array and string constructors
| Constructor Syntax | Real-Time Initialising | Notes |
|---|---|---|
var string x = string() | var string x | Creates an empty string. (std::string) |
var string x = string("Hello World") | var string x("Hello World") | Creates a string with contents "Hello World". |
var array x = array() | var array x | Creates an empty array. (std::vector<double>) |
var array x = array(10) | var array x(10) | Creates an array with 10 elements, all equal to 0.0. |
var array x = array(10, 3.0) | var array x(10, 3.0) | Creates an array with 10 elements, all equal to 3.0. |
var array x = array(1.0, 2.0, 3.0) | var array x(1.0, 2.0, 3.0) | Creates an array with 3 elements: {1.0, 2.0, 3.0}. Any number of arguments may be given. |
| Warning | |
|---|---|
The 'Constructor Syntax' syntax leads to not real-time scripts ! See the examples below. |
Example 3.1. string and array creation
  // A free string and free array :
  // applestring is expanded to contain 6 characters (Non real-time!)
  var string applestring = "apples"

  // values is expanded to contain 15 elements (Non real-time!)
  var array  values      = array(15)

  // A fixed string and fixed array :
  var string fixstring(10)  // may contain a string of maximum 10 characters

  set fixstring  = applestring   // ok, enough capacity
  set fixstring  = "0123456789x" // runtime program error, not enough room.


  var array  fixvalues(10)  // fixvalues may never contain more than 10 elements
  var array  morevalues(20) // arrays are initialised with n doubles of value 0.0

  set fixvalues  = morevalues  // will cause program error
  set morevalues = fixvalues   // ok, morevalues has enough capacity, now contains 10 doubles

  set fixvalues  = morevalues  // ok, since morevalues only contains 10 items.

  set values     = array(20)   // expand values to contain 20 doubles. (Non real-time!)

  var array list(1.0, 2.0, 3.0, 4.0) // list contains {1.0, 2.0, 3.0, 4.0}
  var array biglist;                 // creates an empty array
  set biglist = list           // 'biglist' is now equal to 'list' (Non real-time!)
As the example above demonstrates, a fixed string or array may only be assigned from another string or array with equal or less elements, while a free string or array may be assigned any number of elements.
| Important | |
|---|---|
The 'size' value given upon construction (array(10) or string(17)) must be a legal expression at parse time and is only evaluated once. The safest method is using a literal integer ( i.e. (10) like in the examples ), but if you create a Task constant or variable which holds an integer, you can also use it as in : var array example( 5 * numberOfItems ) The expression may not contain any program variables, these will all be zero upon parse time ! The following example is a common mistake also : set numberOfItems = 10 var array example( 5 * numberOfItems ) Which will not lead to '50', but to '5 times the value of numberOfItems, being still zero, when the program is parsed. |
Another property of container types is that you can index (use []) their contents. The index may be any expression that return an int.
  // ... continued
  // Set an item of a container :
  for (int i=0; i < 20; set i = i+1)
       set values[i] = 1.0*i

  // Get an item of a container :
  var double sum
  for (int i=0; i < 20; set i = i+1)
       set sum = sum + values[i]
If an assignment tries to set an item out of range, the command will fail, if you try to read an item out of range, the result will return 0.0, or for strings, the null character.
Expressions can be combined using the C-style operators that you are already familiar with if you have ever programmed in C, C++ or Java. All operators are supported, except for the if-then-else operator ("a?b:c"), and the precedence is the same as the one used in C, C++, Java and similar languages. In general all that you would expect, is present.
Some value types, like array and string in the Parser framework are actually containing values or useful information themselves. For accessing these values, a value type can have a 'dot' operator which allows you to read-only contents of the container :
  var string s1 = "abcdef"

  // retrieve size and capacity of a string :
  var int size = s1.size
  var int cap  = s1.capacity
  var array a1( 10 )
  var array a2(20) = a1

  // retrieve size and capacity of a array :
  var int size = a2.size      // 10
  var int cap  = a2.capacity  // 20
Before we go on describing the details of the programs syntax, we show how you can load a program in your Real-Time Task.
You have constructed a TaskContext
which has some methods and is connected to its Peer
TaskContexts. The program script
programs.ops contains a program
with the name "progname". Parsing the program is then
straightforward :
  #include <rtt/PeriodicActivity.hpp>
  #include <rtt/TaskContext.hpp>

  using namespace RTT;

  TaskContext   tc;
  tc.setActivity( new PeriodicActivity(5, 0.01) );

  // Watch Logger output for errors :
  tc.scripting()->loadPrograms("program.ops");

  // start the task :
  tc.start();

  // start a program :
  tc.engine()->programs()->getProgram("progname")->start();
The loader will load all programs and functions into 'tc'. Next we start the task's execution engine and finally, the program "progname" is started. Programs can also be started from within other scripts.
An Orocos program script is a list of statements, quite similar to a C program. Programs can call C/C++ functions and functions can be loaded into the system, such that other programs can call them. Program scripts are executed by the Execution Engine.
In general, program statements are executed immediately one after the other. However, when the program needs to wait for a result, the Execution Engine temporarily postpones program execution and will try again in the next execution period. This happens typically when the statement was a Task Command. Task Methods and expressions on the other hand typically do not impose a wait, and thus are executed immediately after each other.
A program is formed like this:
  program progname {
    // an arbitrary number of statements
  }
The statements are executed in order, starting at the first and following the logical execution path imposed by your program's structure. If any of the statements causes a run-time error, the Program Processor will put the program in the error state and stop executing it. It is the task of other logic (like state machines, see below) to detect such failures.
A variable set statement is a statement that sets a variable to a certain value. It looks like this:
set variablename = expression
Variablename is the name of the variable you want to assign to. It should already have been defined. Expression is an expression of the same type as the type of the variable.
A Program script can contain if..then..else blocks, very similar to C syntax.
  if condition then statement
  [ else statement ]
  // or :
  if condition then {
    statement
    // ...
  } [ else {
    statement
    // ...
  } ]
It is thus possible to group statements. Each statement can be another if clause. An else is always referring to the last if, just like in C/C++. If you like, you can also write parentheses around the condition. The else statement is optional.
The for statement is almost equal to the C language. The first statement initialises a variable or is empty. The condition contains a boolean expression (use 'true' to simulate an empty condition). The second statement changes a variable or is empty.
  for ( statement; condition; statement )
        statement
  // or :
  for ( statement; condition; statement ) {
        statement
        // ...
  }
The while statement is another looping primitive in the Orocos script language. A do statement is not ( yet ) implemented
  while condition
      statement
  // or :
  while condition {
      statement
      // ...
  }
As with the if statement, you can optionally put parentheses around the condition.
To break out of a while or for loop, the break statement is available. It will break out of the innermost loop, in case of nesting.
  var int i = 0
  while true  {
      set i = i + 1
      if i == 50 then
          break
      // ...
  }
It can be used likewise in a for loop.
Methods behave like calling C functions. They take arguments and return a value immediately. They can be used in expressions or stand alone :
  // ignore the return value :
  do comp.method( args )

  // this will only work if the method returns a boolean :
  if ( comp.method( args ) ) {
  	    // ...
  }

  // use another method in an expression :
  set data = comp.getResult( args ) * 20. / comp.dataValue
Methods are executed directly one after the other.
| Warning | |
|---|---|
A method returning a boolean result, will cause a run-time program error if it returns false. If this is not wanted, use 'try' instead of 'do'. If the method returns nothing or something else than bool, the result will be ignored in a do statement. |
A command statement is a statement that calls a certain command, and defines some reactions. It looks like:
  do comp.action( args ) until {
    if condition then continue
    if condition2 then call func()
    if condition3 then return
  }
It calls the command "action", on the task "comp", with the comma-separated list of expressions args as the arguments. The Program Processor executes the command once, and then checks where to go next using the "completion clauses" in the until part. If none are true, then it waits another tick, and checks them again..
| Note | |
|---|---|
These if .. then clauses are different from the if/then/else statement later in this text and purely meant to detect alternative end conditions of a command. |
A completion clause always looks like
  if condition then continue
  // or
  if condition then call func_name
  // or
  if condition then return
condition can be any kind of expression, that is of type boolean. One special condition is provided, the keyword "done". Every command has an associated "implicit completion condition", and the condition "done" is equivalent to that condition. You can also combine the "done" condition with other expressions, as if it were a normal boolean expression. "continue" means to go to the next statement, return means to end the current program or function. The "call func_name" statement calls a function and is explained in the next section
If a completion list is left out, then an implicit one is generated. This means that the two following statements are equivalent:
  do comp.action( args )
  // the implicitly generated completion list always looks like
  // "if done then continue"
  do comp.action( args ) until { if done then continue }
A command can be accepted or rejected by a task. When it returns false, this is seen as a reject and the program goes into an error state. The user can then stop the program or try to continue the program again, which will lead to a re-issuing of the command, which may lead again to the error state.
When a command is rejected ( the C++ method returns false ), the program goes into an error state and waits for user intervention. This can be bypassed by using a try...catch statement. It tries to execute the command, and if it is rejected, the optional catch clause is executed :
  // just try it :
  try comp.action( args )

  // When rejected, execute the catch clause :
  try comp.action( args ) catch {
      // statements...
  }
You may place completion conditions between try and catch :
  try comp.action( args )
  until {
      if comp.evaluate() then continue
  }
  catch {
      // statements...
  }
  // next statement
If the command was accepted, the next statement is executed.
When it is desired to execute commands as one command ( in one time ), they can be combined with an 'and' operator :
do comp.action1() and comp.action2() and comp.action3()
The implicit completion condition (i.e. 'done') is when all listed actions are done. This can be overridden by defining a completion condition with 'until'.
The 'and' operator can also be used with 'try'. In that case, the catch clause will be executed in case any of the listed commands fails.
Events are called as methods and commands.
  // emitting an event:
  do sometask.eventname( argument1, argument2, ..., argumentN )
In this case, the task 'sometask' has an event 'eventname' which takes 'N' arguments. Other tasks subscribed to this event will receive the event synchronously or asynchronously with these arguments. More information about events can be found in the CoreLib manual. This event must be part of the task interface.
Task attributes/Properties are set in the same way as ordinary script variables.
  // Setting a property named MyProp of type double
  var double d
  set TC.MyProp = d
Statements can be grouped in functions. A function can only call a function which is earlier defined. Thus recursive function calling is not allowed.
  function func_name( int arg1, double arg2 ) {
    // an arbitrary number of statements
  }

  export function func_nameN(bool arg) {
    // ...
  }
A function can have any number of arguments, which are passed by value, but it returns no value. A function can be exported, in which case it becomes a public available command, which will fail if one of its statements fails. Hence, this allows to extend the command interface with exported functions of a task at runtime.
A function can be called by writing :
  do foo(arg)   // see 'exported' functions
  call foo(arg) // local functions
The arguments are passed by value and no return value is possible. If one of the commands of the functions returns error, the calling program goes in error. A function may also be called in a completion clause. If the function returns, the next statement of the calling function or program is executed.
A special command 'nothing' is provided. It is useful to implement statements, where the completion list is really the only useful thing to do. The nothing command's completion condition will pause execution exactly one execution step, it can thus also be inserted between methods to force execution to pause and resume in the next execution period.
Once a program is parsed and loaded into the Execution Engine, it can be manipulated from another script. This can be done through the programs subtask of the TaskContext in which the program was loaded. Assume that you loaded "progname" in task "ATask", you can write
  do ATask.progname.start()
  do ATask.progname.pause()
  do ATask.progname.step()
  do ATask.progname.step()
  do ATask.progname.stop()
The first line starts a program. The second line pauses it. The next two lines executes one command each of the program (like stepping in a debugger). The last line stops the program fully (running or paused).
Some basic properties of the program can be inspected likewise :
  var bool res =  ATask.progname.isRunning()
  set res = ATask.progname.inError()
  set res = ATask.progname.isPaused()
which all return a boolean indicating true or false.
A StateMachine is the state machine used in the Orocos system. It contains a collection of states, and each state defines a Program on entry of the state, when it is run and on exit. It also defines all transitions to a next state. Like program scripts, a StateMachine must be loaded in a Task's Execution Engine.
A StateMachine is composed of a set of states. A running StateMachine is always in exactly one of its states. One time per period, it checks whether it can transition from that state to another state, and if so makes that transition. By default, only one transition can be made in one Execution Engine step.
Besides a list of the possible transitions, every state also keeps record of programs to be executed at certain occasions. There can be up to four (all optional) programs in every state: the entry program ( which will be executed each time the state is entered ), the run program ( which will be executed every time the state is the active state ), the handle program ( which will be executed right after run, if no transition succeeds ) and the exit program ( which will be executed when the state is left).
There can be more than one StateMachine. They separately keep track of their own current state, etc.
A StateMachine can have any number of states. It needs to have exactly one "initial state", which is the state that will be entered when the StateMachine is first activated. There is also exactly one final state, which is automatically entered when the StateMachine is stopped. This means that the transition from any state to the final state must always be meaningful.
A State Machine can run in two modes. They are the automatic mode and the reactive (also 'event' or 'request') mode. You can switch from one mode to another at run-time.
In order to enter the reactive mode, the State Machine must be 'activated'. When active, two possible causes of state transitions can exist: because an event occured or because a transition was requested.
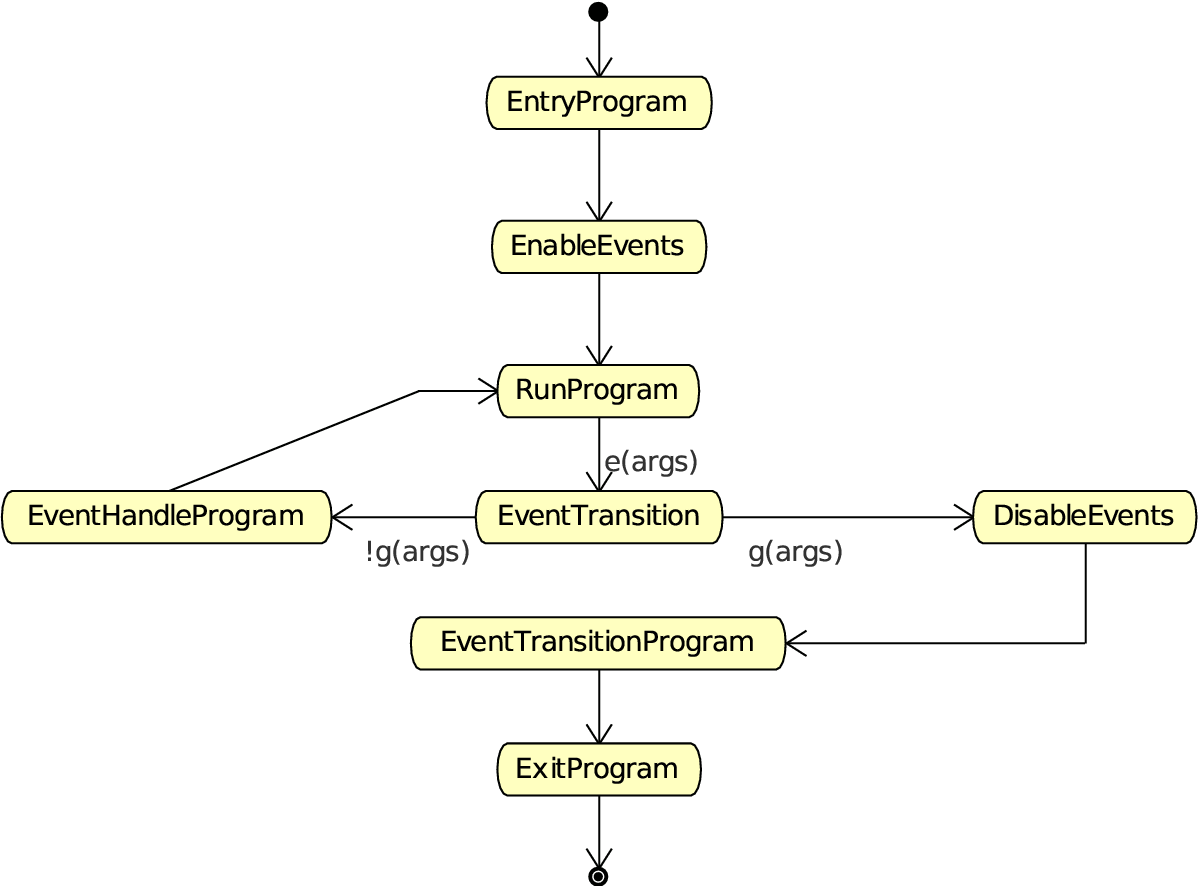
A state can list to which Orocos (CoreLib) events it reacts, and under which conditions it will make a transition to another state. A state only reacts to events when its entry program is fully executed (done) and an event may be processed when the run program is executed, thus interrupt the run program. The first event that triggers a transition will 'win' and the state reacts to no more events, executes the event's transition program, then the state's exit program, and finally, the next state is entered and its entry program is executed. The next state now listens for events (if any) to make a transition or just executes its run program.
Another program can request a transition to a particular state as well. When the request arrives, the current state checks its transition conditions and evaluates if a transition to that state is allowed. These conditions are separately listed from the event transitions above. If a transition condition is valid, the exit program of the current state is called, the transition program and then the entry program of the requested state is called and the requested state's run program is executed. If a transition to the current state was requested, only the run program of the current state is executed.
In this mode, it is also possible to request a single transition to the 'best' next state. All transition conditions are evaluated and the first one that succeeds makes a transition to the target state. This mechanism is similar to automatic mode below, but only one transition is made ( or if none, handle is executed ) and then, the state machine waits again. The step() command triggers this behaviour.
In order to enter automatic mode, the State Machine must be first reactive and then started with the start() command (see later on).
| Note | |
|---|---|
This mechanism is in addition to 'reactive' mode. A state machine in automatic mode still reacts to events. |
Figure 3.2. State Change Semantics in Automatic Mode
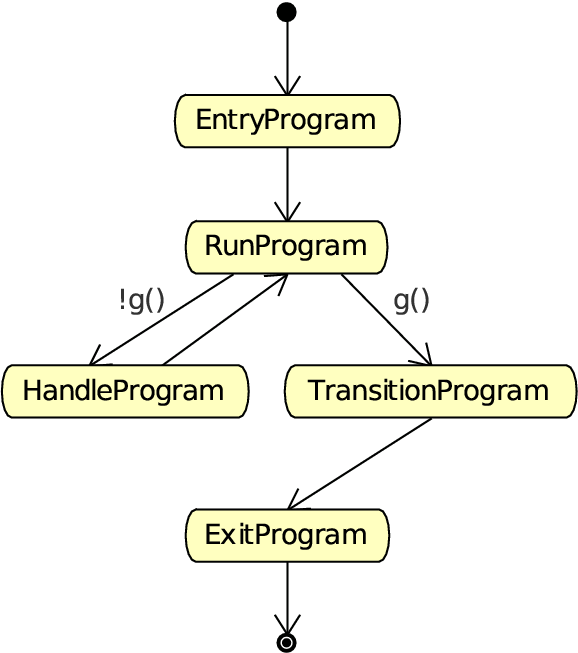 |
The automatic mode additionally actively evaluates guard conditions. Event reaction remains in effect, but is not shown in this diagram.
In automatic mode, after the run program of the current state finishes, the transition table (to other states) of the current state is evaluated. If a transition succeeds, the transition program is executed, then the exit program of the current state is called and then the entry program of the next state is called. If no transition evaluated to true, the handle program (if any) of the current state is called. This goes on until the automatic mode is left, using the pause, stop or reactive command.
Analogous to the Program section, we first show how you can load a StateMachine in your Real-Time Task.
Assume that you have a StateMachine "statename"
in a file state-machine.osd.
You've read the Orocos Task Infrastructure manual and constructed
a TaskContext which has some methods and is connected to its
Peer TaskContexts. Parsing the StateMachine is very analogous
to parsing Programs:
  #include <rtt/PeriodicActivity.hpp>
  #include <rtt/TaskContext.hpp>

  using namespace RTT;

  TaskContext   tc;
  tc.setActivity( new PeriodicActivity(5, 0.01) );

  tc.scripting()->loadStateMachines( "state-machine.osd" );

  // start the task's processor :
  tc.start();

  // activate a state machine :
  tc.engine()->states()->getStateMachine("MachineInstanceName")->activate();
  // start a state machine (automatic mode) :
  tc.engine()->states()->getStateMachine("MachineInstanceName")->start();
The loader loads all instantiated state machines in tc. Next we start the task's Execution Engine. StateMachines have a more complex lifetime than Programs. They need first to be activated, upon which they enter a fixed initial state. When they are started, they enter automatic mode and state transitions to other states can take place. StateMachines can also be manipulated from within other scripts.
You can think of StateMachines somewhat like C++ classes. You first need to define a type of StateMachine, and you can then instantiate it any number of times afterwards. A StateMachine ( the type ) can have parameters, so every instantiation can work differently based on the parameters it got in its instantiation.
A StateMachine definition looks like this :
Example 3.2. StateMachine Definition Format
  StateMachine MyStateMachineDefinition
  {
    initial state myInit
    {
        // all these programs are optional and can be left out:
        entry {
	    // entry program
	}
	run {
	    // run program
	}
	handle {
	    // handle program
	}
	exit {
	    // exit program
	}
	// Ordered event based and conditional select statements
	transition ... { /* transition program */ } select ...
	transition ...

    }

    final state myExit {
	entry {
	    // put everything in a safe state.
	}
	// leave out empty programs...

	transition ...
    }

    state Waiting {
        // ...
    }

    // ... repeat
  }

  // See Section 4.5, “Instantiating Machines: SubMachines and RootMachines” :
  RootMachine MyStateMachineDefinition MachineInstanceName
A StateMachine definition: a StateMachine can have any number of states. It needs to have exactly one "initial state" ( which is the state that will be entered when the StateMachine is first started ). Within a state, any method is optional, and a state can even be defined empty.
A state machine can have an unlimited number of states. A state contains optionally 4 programs : entry, run, handle, exit. Any one of them is optional, and a state can even conceivably be defined empty.
When a state is entered for the first time, the entry program is executed. When it is left, the exit program is called. The execution semantics are identical to the program scripts above.
The run program serves to define which activity is done within the state. After the entry program finishes, the run program is immediately started. It may be interrupted by the events that state reacts to. In event mode, the run program is executed once (although it may use an infinite loop to repeatedly execute statements). In automatic mode, when the run program completes, and no transitions to another state can be made (see below) it is started again (in the next execution step).
When the run program finishes in automatic mode, the
state evaluates its transitions to other states.
The handle program is called only when no transition can be found to another state.
The transitions section defines one or more select
state statements. These can be guarded by if...then clauses
(the transition conditions):
  // In state XYZ :
  // conditionally select the START state
  transition if HMI.startPushed then {
        // (optional)
        // transition program: HMI.startPushed was true
        // when finished, go to START state
  } select START

  // next transition condition, with a transition failure program:
  transition if HMI.waiting then
      select WAIT else {
        // (optional)
        // transition failure program: HMI.startPushed was false
  }

  handle {
     // only executed if no transition above could be made
     // if startPushed and waiting were false:
     // ...
  }
The transitions are checked in the same order as listed. A transition is allowed to select the current state, but the exit and entry functions will not be called in that case. Even more, a transition to the current state is always considered valid and this can not be overridden.
Often it's useful to specify some preconditions that need to hold before entering a state. Orocos states explicitly allow for this. A state's preconditions will be checked before the state is entered.
Preconditions are specified as follows:
  state X {
    // make sure the robot is not moving axis 1 when entering this state
    // and a program is loaded.
    precondition  robot.movingAxis( 1 ) == false
    precondition  programLoaded == true
    // ...
  }
They are checked in addition to transitions to that state and can make such a transition fail, hence block the transition, as if the transition condition in the first place did not succeed.
An important property of state machines is that they can react to external (asynchronous) events. Since Orocos defined an Event framework in the CoreLib, this framework is used to react to events in this package.
Event transitions are an extension to the transitions above and cite an event between the transition and the if statement. They are specified as:
  state X {
    var int a, b
    var double d
    transition othertask.the_event(a, b, d) if (a+b & 10 && d >1.3) then {
       // transition succeeds, transition program:
       // ...
    } select ONE_STATE else {
       // transition fails, failure program:
       // ...
    } select OTHER_STATE

    // other events likewise...
  }
Both the transition programs and the the select statements
are optional, but at least a program or select statement
must be given. In this example,
othertask contains an event
the_event. When the event
the_event is emitted, our state
machine reacts to it and the event arguments are stored in
a, b and d. The if ... then statement
may check these variables and any other state variables
and methods to evaluate the transition. If it succeeds, an
optional transition program may be given and a target
state selected (ONE_STATE). if the
transition fails, an optional failure program may be given
and an optional select (OTHER_STATE)
statement may be given. The number of arguments must
match the number of arguments of the used event. The
event is processed as an asynchronous callback, thus in
the thread or task of the StateMachine's processor.
Event transitions are enabled after the entry program and before the exit program (also in automatic mode). All events are processed in a state until the first event that leads to a valid state transition. In the mean time, the run program or handle programs may continue, but will be interrupted if an event occurs. The event transition program and/or exit program may or must thus perform the necessary cleanup.
As mentioned before: you can look at a SubMachine definition as the definition of a C++ class. It is merely the template for its instantiations, and you have to instantiate it to actually be able to do anything with it. There is also a mechanism for passing parameter values to the StateMachines on instantiation.
Note that you always need to write the instantiation after the definition of the StateMachine you're instantiating.
A Root Machine is a normal instantiation of a StateMachine, one that does not depend on a parent StateMachine ( see below ). They are defined as follows:
  StateMachine SomeStateMachine
  {
      initial state initState
      {
        // ...
      }
      final state finalState
      {
        // ...
      }
  }

  RootMachine SomeStateMachine someSMinstance
This makes an instantiation of the StateMachine type SomeStateMachine by the name of 'someSMinstance', which can then be accessed from other scripts (by that name).
You can define variables at the StateMachine level. These variables are then accessible to the StateMachine methods (entry, handle, exit), the preconditions, the transitions and ( in the case of a SubMachine, see below ) the parent Machine.
You can define a StateMachine public variable as follows:
  StateMachine SomeStateMachine
  {
    // a public constant
    const double pi = 3.1415926535897
    var int counter = 0

    initial state initState
    {
	handle
	{
            // change the value of counter...
            set counter = counter + 1
        }
        // ...
    }
    final state finalState
    {
	entry
        {
            do someTask.doSomethingWithThisCounter( counter )
        }
        // ...
    }
  }

  Rootmachine SomeStateMachine mymachine
This example creates some handy public variables in the StateMachine SomeStateMachine, and uses them throughout the state machine. They can also be read and modified from other tasks or programs :
  var int readcounter = 0
  set readcounter = taskname.mymachine.counter

  set taskname.mymachine.counter = taskname.mymachine.counter *  2
A StateMachine can have parameters that need to be set on its instantiation. Here's an example:
  StateMachine AxisController
  {
      // a parameter specifying which axis this Controller controls
      param int axisNumber
      initial state init
      {
          entry
          {
              var double power = someTask.getPowerForAxis( axisNumber )
  	    // do something with it...
          }
      }
  }

  RootMachine AxisController axiscontroller1( axisNumber = 1 )
  RootMachine AxisController axiscontroller2( axisNumber = 2 )
  RootMachine AxisController axiscontroller3( axisNumber = 3 )
  RootMachine AxisController axiscontroller4( axisNumber = 4 )
  RootMachine AxisController axiscontroller5( axisNumber = 5 )
  RootMachine AxisController axiscontroller6( axisNumber = 6 )
This example creates an AxisController StateMachine with one integer parameter called axisNumber. When the StateMachine is instantiated, values for all of the parameters need to be given in the form "oneParamName= 'some value', anotherParamName = 0, yetAnotherParamName=some_other_expression + 5". Values need to be provided for all the parameters of the StateMachine. As you see, a StateMachine can of course be instantiated multiple times with different parameter values.
A SubMachine is a StateMachine that is instantiated within another StateMachine ( which we'll call the parent StateMachine ). The parent StateMachine is owner of its child, and can decide when it needs to be started and stopped, by invoking the respective methods on its child.
An instantiation of a SubMachine is written as follows:
  StateMachine ChildStateMachine
  {
      initial state initState
      {
          // ...
      }
      final state finalState
      {
          // ...
      }
  }

  StateMachine ParentStateMachine
  {
      SubMachine ChildStateMachine child1
      SubMachine ChildStateMachine child2
      initial state initState
      {
  	entry
          {
	      // enter initial state :
  	    do child1.activate()
  	    do child2.activate()
          }
          exit
          {
	      // enter final state :
              do child2.stop()
          }
      }

      final state finalState
      {
          entry
          {
	      // enter final state :
              do child1.stop()
          }
      }
  }
Here you see a ParentStateMachine which has two ChildStateMachines. One of them is started in the initial state's entry method and stopped in its exit method. The other one is started in the initial state's entry method and stopped in the final state's entry method.
In addition to starting and stopping a SubMachine, a parent StateMachine can also inspect its public variables, change its parameters, and check what state it is in...
Inspecting StateMachine public variables is simply done using the syntax "someSubMachineInstName.someValue", just as you would do if someSubMachineInstName were an Orocos task. Like this, you can inspect all of a subcontext's public variables.
Setting a StateMachine parameter must be done at its instantiation. However, you can still change the values of the parameters afterwards. The syntax is: "set someSubMachine.someParam = someExpression". Here's an elaborate example:
  StateMachine ChildStateMachine
  {
      param int someValue
      const double pi = 3.1415926535897
      initial state initState
      {
          // ...
      }
      final state finalState
      {
          // ...
      }
  }

  StateMachine ParentStateMachine
  {
      SubMachine ChildStateMachine child1( someValue = 0 )
      SubMachine ChildStateMachine child2( someValue = 0 )

      var int counter = 0
      initial state initState
      {
  	  entry
          {
  	      do child1.start()
  	      do child2.start()
              // set the subcontext's parameter
              set child1.someValue = 2
          }
          run
          {
              set counter = counter + 1
              // set the subcontext's parameters
              set child2.someValue = counter
              // use the subcontext's public variables
              do someTask.doSomethingCool( child1.someValue )
          }
          exit
          {
              do child2.stop()
          }
      }

      final state finalState
      {
          entry
          {
              do child1.stop()
          }
      }
  }
You can also query if a child State Machine is in a certain state. The syntax looks like:
someSubMachine.inState( "someStateName" )
Once a state machine is parsed and loaded into the State Machine Processor, it can be manipulated from another script. This can be done through the "states" subtask of the TaskContext in which the state machine was loaded. Assume that you loaded "machine" with subcontexts "axisx" and "axisy" in task "ATask", you can write
  do ATask.machine.activate()
  do ATask.machine.axisx.activate()
  // now in reactive mode...

  do ATask.machine.axisx.start()
  do ATask.machine.start()
  // now in automatic mode...

  do ATask.machine.stop()
  // again in reactive mode, in final state

  do ATask.machine.reset()
  do ATask.machine.deactivate()
  // deactivated.
  // etc.
The first line activates a root StateMachine, thus it enters the initial state and is put in reactive mode , the next line actives its child, the next starts its child, then we start the parent, which bring both in automatic mode. Then the parent is stopped again, reset back to its initial state and finally deactivated.
Thus both RootMachines and SubMachines can be controlled. Some basic properties of the states can be inspected likewise :
  var bool res =  ATask.machine.isActive()      // Active ?
  set res = ATask.machine.axisy.isRunning()     // Running ?
  set res =  ATask.machine.isReactive()          // Waiting for requests or events?
  var string current = ATask.machine.getState() // Get current state
  set res = ATask.machine.inState( current )    // inState ?
which makes it possible to monitor state machines from other scripts or an operator console.
Consider the following StateMachine :
  StateMachine X {
     // ...
     initial state y {
        entry {
	   // ...
        }
       // guard this transition.
       transition if checkSomeCondition() then
              select z
       transition if checkOtherCondition() then
              select exit
     }
     state z {
       // ...
       // always good to go to state :
       transition select ok_1
	  select ok_1
     }
     state ok_1 {
       // ...
     }
     final state exit {
       // ...
     }
  }

  RootMachine X x
A program interacting with this StateMachine can look like this :
   program interact {
       // First activate x :
       do x.activate()  // activate and wait.

       // Request a state transition :
       try x.requestState("z") catch {
           // failed !
       }

       // ok we are in "z" now, try to make a valid transition :
       do x.step()

       // enter pause mode :
       do x.pause()
       // Different ! Executes a single program statement :
       do x.step()

       // unpause, by re-entering reactive Mode :
       do x.reactive()

       // we are in ok_1 now, again waiting...
       do x.stop()      // go to the final state

       // we are in "exit" now
       do reset()

       // back in state "y", handle current state :
       do this.x.requestState( this.x.getState() )
       // etc.
    }
The requestState command will fail if the transition is not possible ( for example, the state machine is not in state y, or checkSomeCondition() was not true ), otherwise, the state machine will make the transition and the command succeeds and completes when the z state is fully entered (it's init program completed).
The next command, step(), lets the state machine decide which state to enter, and since a transition to state "ok_1" is unconditionally, the "ok_1" state is entered. The stop() command brings the State Machine to the final state ("exit"), while the reset command sends it to the initial state ("y"). These transitions do not need to be specified explicitly, they are always available.
The last command, is a bit cumbersome request to execute the handle program of the current state.
At any time, the State Machine can be paused using pause(). The step() command changes to execute a single program statement or transition evaluation, instead of a full state transition.
All these methods can of course also be called from parent to child State Machine, or across tasks.
Consider the following StateMachine, as in the previous section :
  StateMachine X {
     // ...
     initial state y {
        entry {
	   // ...
        }
        // guard this transition.
        transition if checkSomeCondition() then
              select z
        transition if checkOtherCondition() then
              select exit
     }
     state z {
       // ...
       // always good to go to state :
       transition select ok_1
     }
     state ok_1 {
       // ...
     }
     final state exit {
       // ...
     }
  }

  RootMachine X x
A program interacting with this StateMachine can look like this :
   program interact {
       // First activate x :
       do x.activate()  // activate and wait.

       // Enter automatic mode :
       do x.start()

       // pause program execution :
       do x.pause()

       // execute a single statement :
       do x.step()

       // resume automatic mode again :
       do x.start()

       // stop, enter final state, in request mode again.
       do x.stop()

       // etc...
    }
After the State Machine is activated, it is started, which lets the State Machine enter automatic mode. If checkSomeCondition() evaluates to true, the State Machine will make the transition to state "z" without user intervention, if checkOtherCondition() evaluates to true, the "exit" state will be entered.
When running, the State Machine can be paused at any time using pause(), and a single program statement ( a single line ) or single transition evaluation can be executed with calling step(). Automatic mode can be resumed by calling start() again.
To enter the reactive mode when the State Machine is in automatic mode, one can call the reactive() command, which will finish the program or transition the State Machine is making and will complete if the State Machine is ready for requests.
All these methods can of course also be called from parent to child State Machine, or across tasks.
This sections shows the listings of an Orocos State Description and an Orocos Program Script. They are fictitious examples (but with valid syntax) which may differ from actual available tasks. The example tries to exploit most common functions.
  StateMachine MachineMachine
  {
      var bool error = false

      /**
       * This state is entered when the StateMachine is loaded.
       * The kernel is not running yet...
       */
      initial state init_state {
          transition select startup_state
      }

      /**
       * Kernel is running, select the components.
       */
      state startup_state {
          entry {
              do Kernel.startComponent("HWSensor")
              do Kernel.startComponent("MoveToGenerator")
              }
          transition select stop_state
      }

      /**
       * This state is only reached when the StateMachine
       * is stopped.
       */
      final state fini_state {
          entry {
              do Kernel.stopComponent("HWSensor")
              do Kernel.stopComponent("MoveToGenerator")
              }
      }

      /**
       * This state is the 'turn off' state of the
       * machine.
       */
      state stop_state {
          entry {
              // stop some components
              do Kernel.stopComponent("HWEffector")
              do Kernel.stopComponent("PIDController")
              do PIDController.reset()
          }
          transition if HMI.start_pushed() && error == 0 then
            select run_state
      }

      /**
       * This state puts the machine under 'control'
       * effectively accepting commands and driving
       * the machine.
       */
      state run_state {
          entry {
              // make sure we are not moving
              do MoveToGenerator.safeStop()
              // Select components controlling the machine
              do Kernel.startComponent("PIDController")
              do Kernel.startComponent("HWEffector")
              }

          transition if HMI.stop_pushed() then
            select stop_state
          transition if HMI.start_program() then
            select exec_state
      }

      /**
       * This state starts a previously loaded
       * program.
       */
      state exec_state {
          entry {
              do MyProgram.start()
              }

          exit {
            set error = MyPorgram.inError()
              do MyProgram.stop()
              }

          transition if HMI.stop_program() then
              select run_state
        // Detect Program Failure :
        transition if MyProgram.inError() then
            select stop_state
      }
  }

  RootMachine MainMachine mainMachine
  /**
   * This program is executed in the exec_state.
   */

  /**
   * Request the HMI to load the user selected
   * trajectory into the kernel.
   */
  export function HMILoadTrajectory() {
  	// request a 'push' of the next
  	// trajectory :
  	do HMI.requestTrajectory()
  	// when the HMI is done :
  	do Generator.loadTrajectory()
  }

  /**
   * Do a Homing (reset) of the axes.
   * This could also be done using a Homing state,
   * without a program.
   */
  export function ResetAxes() {
  	do Kernel.selectComponent("HomingGenerator")
  	do HomingGenerator.homeAll()
  }

  export function ResetAxis(int nr) {
  	do Kernel.selectComponent("HomingGenerator")
  	do HomingGenerator.homeAxis( nr )
  }

  /**
   * Request the Generator to use the current
   * trajectory.
   */
  function runTrajectory() {
  	do Generator.startTrajectory()
  	// this function returns when the
  	// trajectory is done.
  }

  program DemoRun {
  	do HMI.display("Program Started\n")
  	var int cycle = 0

  	// We actually wait here until a
  	// Trajectory is present in the HMI.
  	do nothing until {
  	   if HMI.trajectoryPresent then continue
  	}

  	while HMI.cycle {
  	    do HMI.display("Cycle nr: %d.\n", cycle )
  	    do ResetAxes()
  	    do HMIRequestTrajectory()
  	    do runTrajectory()

  	    do Timer.sleep( 5.0 ) // wait 5s
  	}

  	do HMI.display("Program Ended\n")
} Table of Contents
Abstract
This document explains the principles of the Corba Library of Orocos, the Open RObot COntrol Software project. It enables transparant deployment of plain Orocos C++ components.
This package allows Orocos components to live in separate processes, distributed over an ethernet network and still communicate with each other. The underlying framework (middleware) is CORBA, but no CORBA knowledge is required to distribute Orocos components.
The Corba package provides:
Connection and Communication of Orocos components over a network
Clients (like visualisation) making a connection to any running Orocos component using the IDL interface.
Transparant use: no recompilation of existing components required. The library acts as a run-time plugin.
The Corba package is work in progress and aims to make the whole Orocos Component interface available over the network. Consult the Component Builder's Manual for an overview of a Component's interface.
These Component interfaces are currently available:
Properties/Attributes interface: fully
Command interface: fully
Method interface: fully
Scripting interface: fully
Data Flow interface: fully
These interfaces are work in progress and not yet available:
Event interface
| Important | |
|---|---|
Follow these instructions carefully or your setup will not work ! |
In order to distribute Orocos components over a network, your computers must be setup correctly for using Corba.
The following must be done
Install the Ace and Tao libraries and header files on your system. Tao version 1.3, 1.4 or 1.5, OR install OmniORB 4 or later.
Configure Orocos with Corba support. See the Getting Started Manual.
Start a Corba Naming Service once with multicasting on. Using the TAO Naming Service, this would be:
$ Naming_Service -m 1 &
And your application as:
$ ./your-corba-app
OR: if that fails, start the Naming Service with the following options set:
$ Naming_Service -m 0 -ORBListenEndpoints iiop://<the-ns-ip-address>:2809 -ORBDaemonThe <the-ns-ip-address> must be replaced with the ip address of a network interface of the computer where you start the Naming Service. And each computer where your start the application:
  $ export NameServiceIOR=corbaloc:iiop:<the-ns-ip-address>:2809/NameService
  $ ./your-corba-app
With <the-ns-ip-address> the same as above.
Compile your applications with the appropriate include and linker flags. See the Getting Started/Installation Manual.
Orocos Corba components are work in progress. The following limitations apply:
Components can only communicate standard C++ types (double, int, string, etc.) and std::vector<double>. Adding user types is possible using the 'Toolkit Plugin' feature ( see also 'Orocos Type System' ).
Some Corba objects (for example 'commands') have a longer lifetime in memory than necessary. This does not cause harm in 'simple' setups, but is problematic when thousands of such objects are created. Try to re-use these objects as much as possible.
This example assumes that you have taken a look at the 'Component Builder's Manual'. It creates a simple 'Hello World' component and makes it available to the network. Another program connects to that component and starts the component interface browser in order to control the 'Hello World' component. Both programs may be run on the same or on different computers, given that a network connection exists.
In order to setup your component to be available to other components transparantly, proceed as:
  // server.cpp
  #include <rtt/corba/ControlTaskServer.hpp>

  #include <rtt/PeriodicActivity.hpp>
  #include <rtt/TaskContext.hpp>
  #include <rtt/os/main.h>

  using namespace RTT;
  using namespace RTT::Corba;

  int ORO_main(int argc, char** argv)
  {
     // Setup a component
     TaskContext mycomponent("HelloWorld");
     // Execute a component
     PeriodicActivity   myact(1, 0.01, mycomponent.engine() );
     mycomponent.start();

     // Setup Corba and Export:
     ControlTaskServer::InitOrb(argc, argv);
     ControlTaskServer::Create( &mycomponent );

     // Wait for requests:
     ControlTaskServer::RunOrb();

     // Cleanup Corba:
     ControlTaskServer::DestroyOrb();
     return 0;
  }
Next, in order to connect to your component, you need to create a 'proxy' in another file:
  // client.cpp
  #include <rtt/corba/ControlTaskServer.hpp>
  #include <rtt/corba/ControlTaskProxy.hpp>

  #include <rtt/TaskBrowser.hpp>
  #include <rtt/os/main.h>

  using namespace RTT::Corba;
  using namespace RTT;

  int ORO_main(int argc, char** argv)
  {
     // Setup Corba:
     ControlTaskProxy::InitOrb(argc, argv);

     // Setup a thread to handle call-backs to our components.
     ControlTaskProxy::ThreadOrb();

     // Get a pointer to the component above
     TaskContext* component = ControlTaskProxy::Create( "HelloWorld" );

     // Interface it:
     TaskBrowser browse( component );
     browse.loop();

     // Stop ORB thread:
     ControlTaskServer::ShutdownOrb();
     // Cleanup Corba:
     ControlTaskProxy::DestroyOrb();
     return 0;
  }
Both examples can be found in the corba-example
package on Orocos.org. You may use 'connectPeers' and the related methods
to form component networks. Any Orocos component can be 'transformed' in
this way.
By default, a remote method invocation waits until the remote end completes and returns the call, or an exception is thrown. In case the caller only wishes to spend a limited amount of time for waiting, the TAO Messaging service can be used. OmniORB to date does not support this service. TAO allows timeouts to be specified on ORB level, object (POA) level and method level. Orocos currently only supports ORB level, but if necessary, you can apply the configuration yourself to methods or objects by accessing the 'server()' method and casting to the correct CORBA object type.
In order to provide the ORB-wide timeout value in seconds, use:
	// Wait no more than 0.1 seconds for a response.
	ApplicationSetup::InitORB(argc, argv, 0.1);
ControlTaskProxy and ControlTaskServer inherit from ApplicationSetup, so you might as well use these classes to scope InitORB.
When your Corba enabled component is running, the following usage rules should be known:
The Orocos Component Library provides two CORBA enabled programs: the
cdeployerand thectaskbrowser. The first is a CORBA enabled DeploymentComponent which allows you to load components and exports their interface using CORBA. Thectaskbrowserconnects to thecdeployerand provides the TaskBrowser console which accesses this component. See also the KTaskbrowser for using a GUI to connect to thecdeployer.Components should not call remote components during real-time execution. However, real-time components may be called upon by any component, local or remote. A component may thus always receive a request from any component, but not every component should send a request to any component. If you violate this rule, it will not crash your program, but your execution timing will be worse.
If you call '.shutdown()' upon a component, the whole CORBA part of that executable is shut down. It will cause the 'RunOrb()' function to return.
You need to export at least one component. If you try to access a peer component of that component over the network, this will be detected and the peer will be automatically exported as well. This means that if you visit each peer of a component, all these peer components will be known on the network.
Orocos does not require IDL or CORBA knowledge of the user when two Orocos components communicate. However, if you want to access an Orocos component from a non-Orocos program (like a MSWindows GUI), you need to use the IDL files of Orocos.
The relevant files are:
ControlTask.idl: The main Component Interface file, providing CORBA access to a TaskContext.Operations.idl: The interface of method and command objects.OperationInterface.idl: The interface for accessing methods and commands.ScriptingAccess.idl: The interface for loading and running scripts.Attributes.idl: The interface for attributes and properties.DataFlow.idl: The interface for communicating buffered or unbufferd data.
All data is communicated with CORBA::Any types. The way of using these interfaces is very similar to using Orocos in C++, but using CORBA syntax.
Orocos uses the CORBA Naming Service such that components can find each other on the same or different networked stations.
The components are registered under the naming context path "ControlTasks/ComponentName" (id fields). The kind fields are left empty. Only the components which were explicitly exported in your code, using ControlTaskServer, are added to the Naming Service. Others write their address as an IOR to a file "ComponentName.ior", but you can 'browse' to other components using the exported name and then using 'getPeer()' to access its peer components.
Since the multicast service of the CORBA Naming_Server behaves very
unpredictable (see this link), you
shouldn't use it. Instead, it is better started via some extra lines in
/etc/rc.local:
  ################################################################################
  #  Start CORBA Naming Service
  echo Starting CORBA Naming Service
  pidof Naming_Service || Naming_Service -m 0 -ORBListenEndpoints iiop://192.168.246.151:2809 -ORBDaemon
  ################################################################################
Where 192.168.246.151 should of course be replaced by your ip adres (using a hostname may yield trouble due to the new 127.0.1.1 entries in /etc/hosts, we think).
All clients (i.e. both your application and the ktaskbrowser) wishing to connect to the Naming_Service should use the environment variable NameServiceIOR
  [user@host ~]$ echo $NameServiceIOR
  corbaloc:iiop:192.168.246.151:2809/NameService
You can set it f.i. in your .bashrc file or on the command line via
export NameServiceIOR=corbaloc:iiop:192.168.246.151:2809/NameService
See the orocos website for more information on compiling/running the ktaskbrowser.
Table of Contents
Abstract
This document explains the principles of the Core Library of Orocos, the Open RObot COntrol Software project. The CoreLib provides infrastructural support for the functional and application components of the Orocos framework.
This Chapter describes the semantics of the services available in the Orocos Core Library.
The Core Library provides:
Thread-safe C++ implementations for periodic, non periodic and event driven activities
Synchronous/Asynchronous Events
Asynchronous Commands
Synchronous Methods
Properties and XML configuration
Time measurement
Application logging framework
Lock-free data exchange primitives such as FIFO buffers or shared data.
and additionally provides interfaces which are common for all real-time services. The Core Library provides a hard real-time infrastructure:
The goal of the infrastructure is to keep applications deterministic, by avoiding the classical pitfalls of letting application programmers freely use threads and mutexes as bare tools. Practice has indeed showed that most programmers do not succeed in strictly decoupling the functional and algorithmic parts of their code from the OS-specific primitives used to execute them.
Of course, the real-time performance depends not only on the underlying operating system but also on the hardware. Hardware devices are abstracted in the Orocos Device Interface.
The following sections will first introduce the reader to creating Activities, which execute functions in a thread, in the system. Events allow callback functions to be executed when state changes occur. Commands are used to send instructions between threads. The following sections explain useful classes which are used throughout the framework such as the TimeService and Properties.
An Activity executes a function when a 'trigger' occurs. Although, ultimately, an activity is executed by a thread, it does not map one-to-one on a thread. A thread may execute ('serialise') multiple activities. This section gives an introduction to defining periodic activities, which are triggered periodically, non periodic activities, which are triggered by the user, and slave activities, which are run when another activity executes.
| Note | |
|---|---|
When you use a TaskContext, the ExecutionEngine is the function to be executed periodically and you don't need to write the classes below. |
There are two ways to run a function in a periodically. By :
Implementing the RunnableInterface in another class ( functions initialize(), step() or loop()/breakLoop() and finalize() ). The RunnableInterface object (i.e. run_impl) can be assigned to a activity using
 activity.run(
	      &run_impl )
or at construction time of an Activity :
 Activity activity(priority,
	      period, &run_impl );
.
  #include <rtt/RunnableInterface.hpp>
  #include <rtt/Activity.hpp>

  class MyPeriodicFunction
	: public RunnableInterface
  {
  public:
    // ...
    bool initialize() {
       // your init stuff
       myperiod = this->getActivity()->getPeriod();
       isperiodic = this->getActivity()->isPeriodic();

       // ...
       return true; // if all went well
    }

    // executed when isPeriodic() == true
    void step() {
       // periodic actions
    }

    // executed when isPeriodic() == false
    void loop() {
       // 'blocking' version of step(). Implement also breakLoop()
    }

    void finalize() {
       // cleanup
    }
  };

  // ...
  MyPeriodicFunction run_impl_1;
  MyPeriodicFunction run_impl_2;

  Activity activity( 15, 0.01 ); // priority=15, period=100Hz
  activity.run( &run_impl_1 );
  activity.start(); // calls 'step()'

  Activity npactivity(12); // priority=12, no period.
  npactivity.run( &run_impl_2);
  activity.start(); // calls 'loop()'

  // etc...
Inheriting from an Activity class and overriding the initialize(), step() and finalize() methods.
  class MyOtherPeriodicFunction
      : public Activity
  {
  public :
    MyOtherPeriodicFunction()
      : Activity( 15, 0.01 ) // priority=15, period=100Hz
    {
    }

    bool initialize() {
       // your init stuff
       double myperiod = this->getPeriod();
       // ...
       return true; // if all went well
    }

    void step() {
       // periodic actions
    }

    void finalize() {
       // cleanup
    }
	// ...
  };

  // When started, will call your step
  MyOtherPeriodicFunction activity;
  activity.start();
The Activity will detect if it must run an external RunnableInterface. If none was given, it will call its own virtual methods.
If you want to create an activity which reads file-IO, or displays
information or does any other possibly blocking operation, the
Activity implementation can be
used with a period of zero (0). When it is start()'ed, its loop()
method will be called exactly once and then it will wait,
after which it can be start()'ed again. Analogous to a periodic
Activity, the user can implement
initialize(), loop()
and finalize() functions in a
RunnableInterface which will be used by
the activity for executing the user's functions. Alternatively,
you can reimplement said functions in a derived class of
Activity.
  int priority = 5;

  RunnableInterface* blocking_activity = ...
  Activity activity( priority, blocking_activity );
  activity.start(); // calls blocking_activity->initialize()

  // now blocking_activity->loop() is called in a thread with priority 5.
  // assume loop() finished...

  activity.start();  // executes again blocking_activity->loop()

  // calls blocking_activity->breakLoop() if loop() is still executing,
  // when loop() returned, calls blocking_activity->finalize() :
  activity.stop();
The Activity behaves differently when being non periodic in the way start() and stop() work. Only the first invocation of start() will invoke initialize() and then loop() once. Any subsequent call to start() will cause loop() to be executed again (if it finished in the first place).
Since the user's loop() is allowed to block the user must reimplement the
RunnableInterface::breakLoop()
function. This function must do whatever necessary to let the
user's loop() function return (mostly set a flag). It must return true on
success, false if it was unable to let the loop() function
return (the latter is the default implementation's return
value). stop() then waits until loop()
returns or aborts if breakLoop() returns
false. When successful, stop() executes the finalize() function.
There are at least two scheduler types in RTT: The real-time scheduler, ORO_SCHED_RT, and the not real-time scheduler, ORO_SCHED_OTHER. In some systems, both may map to the same scheduler.
When a Activity, it runs in the default 'ORO_SCHED_OTHER' scheduler with the lowest priority. You can specify another priority and scheduler type, by providing an extra argument during construction. When a priority is specified, the Activity selects the the ORO_SCHED_RT scheduler.
  // Equivalent to Activity my_act(OS::HighestPriority, 0.001) :
  Activity my_act(ORO_SCHED_RT, OS::HighestPriority, 0.001);

  // Run in the default scheduler (not real-time):
  Activity other_act ( 0.01 );
If none of the above activity schemes fit you, you can always fall back on
the SlaveActivity, which lets the user
control when the activity is executed. A special function bool execute()
is implemented which will execute RunnableInterface::step()
or RunnableInterface::loop() when called by the user.
Three versions of the SlaveActivity can be constructed:
  #include <rtt/SlaveActivity.hpp>

  // With master
  // a 'master', any ActivityInterface (even SlaveActivity):
  Activity master_one(9, 0.001 );
  // a 'slave', takes over properties (period,...) of 'master_one':
  SlaveActivity slave_one( &master_one );

  slave_one.start();   // fail: master not running.
  slave_one.execute(); // fail: slave not running.

  master_one.start();  // start the master.
  slave_one.start();   // ok: master is running.
  slave_one.execute(); // ok: calls step(), repeat...

  // Without master
  // a 'slave' without explicit master, with period of 1KHz.
  SlaveActivity slave_two( 0.001 );
  // a 'slave' without explicit master, not periodic.
  SlaveActivity slave_three;

  slave_two.start();   // ok: start periodic without master
  slave_two.execute(); // ok, calls 'step()', repeat...
  slave_two.stop();

  slave_three.start();   // start not periodic.
  slave_three.execute(); // ok, calls 'loop()', may block !
  // if loop() blocks, execute() blocks as well.
Note that although there may be a master, it is still the
user's responsibility to get a pointer to the slave and
call execute().
There is also a trigger() function for
slaves with a non periodic
master. trigger() will in that case call
trigger() upon the master thread, which will cause it to
execute. The master thread is then still responsible to call
execute() on the slave. In constrast, calling
trigger() upon periodic slaves or periodic
activities will always fail. Periodic activities are triggered
internally by the elapse of time.
Each Orocos Activity (periodic, non periodic and event driven)
type has a thread() method in its
interface which gives a non-zero pointer to a
ThreadInterface object which provides
general thread information such as the priority and periodicity and allows to
control the real-timeness of the thread which runs this activity. A
non periodic activity's thread will return a period of zero.
A RunnableInterface can get the same information
through the this->getActivity()->thread() method calls.
Example 5.1. Example Periodic Thread Interaction
This example shows how to manipulate a thread.
#include "rtt/ActivityInterface.hpp"

using namespace RTT;

ORO_main( int argc, char** argv)
{
  // ... create any kind of Activity like above.

  ActivityInterface* act = ...

  // stop the thread and all its activities:
  act->thread()->stop();
  // change the period:
  act->thread()->setPeriod( 0.01 );
  act->thread()->start();
  // Optional :
  act->thread()->makeHardRealtime();

  // Now the activity can be started as well:
  act->start();

  // act is running...

  return 0;
}
Commands offer a thread-safe real-time means of message passing between threads.
The CommandProcessor is responsible for accepting command requests from other (real-time) tasks. It uses a non-blocking queue to store incoming requests and fetch-and-execute them in its periodic step.
Figure 5.1. Tasks Sending Commands
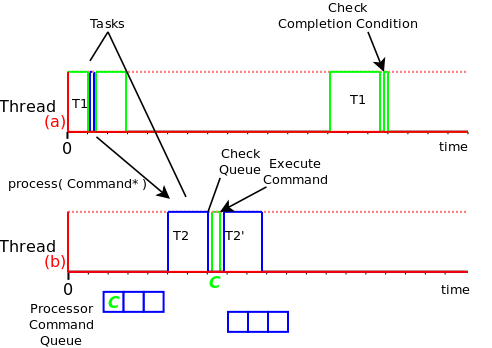
Tasks of different threads communicate by sending commands to each other's Command Processors. When Task T1, running in Thread (a), requests that T2, running in Thread (b) processes a command, the command is stored in a command queue of that task's Command Processor. When T2 runs its Command Processor, the queue is checked and the command is executed. T1 can optionally check if the command was accepted and executed, using a Completion Condition ( see TaskContext and Program Parser manuals. )
An Event is an object to which one can connect callback functions. When the Event is raised, the connected functions are called one after the other. An Event can carry data and deliver it to the function's arguments. Orocos allows two possibilities of calling the function : synchronous and asynchronous. The former means that when the event is called, all synchronous handlers are called in the same thread. The latter means that the data is stored and the callback function is called in another thread. The thread which will execute the deferred callback is chosen at connection or setup time.
Figure 5.2. Event Handling
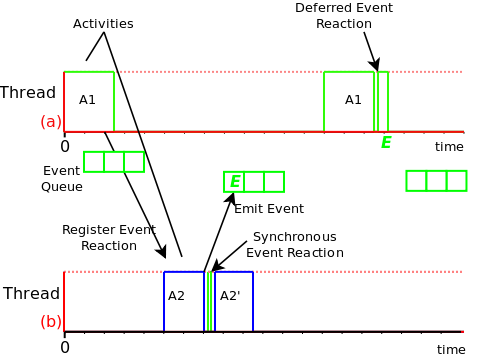
Activity A1 runs in PeriodicThread (a) while Activity A2 runs in PeriodicThread (b). At some time, A1 registers a synchronous and asynchronous callback function ( reaction ) with activity A2's Event. When A2 emits the Event, the synchronous Event callback is executed first ( within Thread (b) ), while the asynchronous ( deferred ) callback is queued and executed after A1 has run, in Thread (a).
The Orocos Event extends the signal semantics with asynchronous event handling.
Any kind of function can be connected to the event as long as it has the
same signature as the Event. 'Raising', 'firing' or 'emitting' an Orocos Event is
done by using the () operator.
Example 5.2. Using Events
An Event must always be given a name upon construction. Providing it a name tells Orocos that it should be initialised as a full functioning object. This example shows how a synchronous and asynchronous handler are connected to an Event.
 #include <rtt/Event.hpp>

 using boost::bind;

 class SafetyStopRobot {
 public:
    void handle_now() {
        // Synchronous Handler code
        std::cout << " Putting the robot in a safe state fast !" << std::endl;
    }
 };

 class NotifyUser {
 public:
    void handle_later() {
        //Asynchronous Completer code
        std::cout << "The program stopped the robot !"<<std::endl;
    }
 };

 SafetyStopRobot safety;
 NotifyUser      notify;
Now we will connect these handler functions to an event. Each event-handler connection is stored in a Handle object, for later reference and connection management.
// The <..> means the callback functions must be of type "void foo(void)" Event<void(void)> emergencyStop("EmergencyStop"); // Use ready() to see if the event is initialised. assert( emergencyStop.ready() ); Handle emergencyHandle; Handle notifyHandle; // boost::bind is a way to connect the method of an object instance to // an event. std::cout << "Register appropriate handlers to the Emergency Stop Event\n"; emergencyHandle = emergencyStop.connect( bind( &SafetyStopRobot::handle_now, &safety)); assert( emergencyHandle.connected() ); notifyHandle = emergencyStop.connect( bind( &NotifyUser::handle_later, ¬ify), CompletionProcessor::Instance() ); assert( notifyHandle.connected() );
Finally, we emit the event and see how the handler functions are called:
 std::cout << "Emit/Call the event\n";
 emergencyStop();

 // Disconnecting the notify callback...
 notifyHandle.disconnect();

 // Only synchronous callback :
 std::cout << "Doing a quiet safety stop..."<<std::endl;
 emergencyStop(); // User not notified
The program will output these messages:
     Register appropriate handlers to the Emergency Stop Event
     Emit the event
      Putting the robot in a safe state fast !
     The program stopped the robot !
     Doing a quiet safety stop...
      Putting the robot in a safe state fast !
If you want to find out how boost::bind works, see the Boost bind manual. You must use bind if you want to call C++ class member functions to 'bind' the member function to an object :
  ClassName object;
  boost::bind( &ClassName::FunctionName, &object)
Where ClassName::FunctionName must have the same signature as the Event. When the Event is called,
object->FunctionName( args )
is executed by the Event.
When you want to call free ( C ) functions, you do not need bind :
  Event<void(void)> event;
  void foo() { ... }
  event.connect( &foo );
Whether your handle() and complete()
methods contain deterministic code or not is up to you. It depends on the choice of the
Event type and in which thread it is executed. A good rule of thumb is to make
all Synchronous handling/completing deterministic time and do all the rest in
the Asynchronous part, which will be executed by the
another thread.
You must choose the type of Event upon construction. This can no longer be changed once the Event is created. The type is the same for the synchronous and asynchronous methods. If the type changes, the event() method must given other arguments. For example :
Furthermore, you need to setup the connect call differently if the Event carries one or more arguments :
  SomeClass someclass;

  Event<void(int, float)> event("event");

  // notice that for each Event argument, you need to supply _1, _2, _3, etc...
  event.connect( boost::bind( &SomeClass::foo, someclass, _1, _2 ) );

  event( 1, 2.0 );
| Important | |
|---|---|
The return type for synchronous and asynchronous callbacks is ignored and can not be recovered. |
4.2. setup() and the Handle object
Event connections can be managed by using a Handle which both connect()
and setup() return :
  Event<void(int, float)> event("event");
  Handle eh;

  // store the connection in 'eh'
  eh = event.connect( ... );
  assert( eh.connected() );

  // disconnect the function(s) :
  eh.disconnect();
  assert( !eh.connected() );

  // reconnect the function(s) :
  eh.connect();
  // connected again !
Handle objects can be copied and will all show the same status. To have a connection setup, but not connected, one can write :
  Event<void(int, float)> event)("event");
  Handle eh;

  // setup : store the connection in 'eh'
  eh = event.setup( ... );
  assert( !eh.connected() );

  // now connect the function(s) :
  eh.connect();
  assert( eh.connected() );  // connected !
If you do not store the connection of setup(), the connection will never be established and no memory is leaked. If you do not use 'eh' to connect and destroy this object, the connection is also cleaned up. If you use 'eh' to connect and then destroy 'eh', you can never terminate the connection, except by destroying the Event itself.
| Note | |
|---|---|
When you use the TaskContext, the thread of the TaskContext is automatically chosen and you do not need to supply an event processor as described below. |
As mentioned before, the asynchronous callback is executed in another thread than the event caller. The Event implementation provides one thread for asynchronous execution, the CompletionProcessor. You can intercept asynchronous events in your thread using the EventProcessor class.
| Note | |
|---|---|
For brevity, we will not use boost::bind in the following examples and only use 'free' ( C ) functions as callbacks. Asynchronous callbacks are bound in the same way as synchronous callbacks ( Example 5.2, “Using Events” ) : void syn_func( int, double ) { /* .. */ }
void asyn_func( int, double ) { /* .. */ }
|
The default thread which executes asynchronous callbacks
is called the CompletionProcessor. This is a non real-time
thread, which means that the reaction time is not bounded.
If you want to execute the callback in another thread,
an additional argument can be given in the
connect or setup method :
  EventProcessor eproc;
  Activity my_act(1, 0.01, &eproc );
  my_act.start();

  event.connect( &asyn_func, &eproc );
The above lists how the an EventProcessor will execute the asyn_func if event is emitted. The EventProcessor is not a thread itself, but an object which can be executed by an activity. If you want to both process events and insert application code in the same activity object, you'll need to call the EventProcessor's initialize(), step() and finalize() functions manually. See the RunnableInterface documentation.
| Note | |
|---|---|
Event handlers can have no more than 4 arguments in the current implementation, but more can be added upon request. Since a struct or class can be used as arguments, the need is fairly low though. |
An Event can only be emitted by one thread at the same time. The synchronous handlers will always be executed as much times as the event is emitted. This is not the case for asynchronous handlers. If an Event is emitted multiple times before the completion thread executes, the asynchronous handler will be called only once in the completion thread's execution step.
The question that rises is with which arguments this handler is called. The user can choose between the first (default) and the last. The first is chosen as default because this causes the least overhead in execution time. To choose which policy is used, an optional parameter can be given during connect :
  event.connect( &asyn_func, eproc, Event::OnlyLast );
  event.connect( &asyn_func, eproc, Event::OnlyFirst ); // default
  event.connect( &asyn_func, eproc ); // same as previous line
The CompletionProcessor is an optional lowest priority, not real-time thread in the Orocos framework. It is only created if the user did not specify a thread in which to process events.
Its purpose is to execute asynchronous event callbacks that have to be `completed' when no other work has to be done. The only constraint it imposes is that all functions it executes must require finite time to complete (it cannot detect timeouts). You can get its thread pointer like this :
 #include <rtt/CompletionProcessor.hpp>

  ActivityInterface* cp = CompletionProcessor::Instance()
The CompletionProcessor is a non periodic Activity, thus not consuming
time resources when no Events need to be processed. If you need a
hard real-time CompletionProcessor, set the scheduler of the Activity ( see
Section 2.2, “Non Periodic Activity Semantics” ),
and add an EventProcessor object in run().
If you want to process Events in your own RunnableInterface implementation, you need to manually call the step() method of the EventProcessor :
  // in your implementation :
  void loop() {
     while ( ... ) {
        // < do non periodic stuff >

        // process any pending Events :
        eproc.step();
     }
  }
// ... The TimeService is implemented using the Singleton design pattern. You can query it for the current (virtual) time in clock ticks or in seconds. The idea here is that it is responsible for synchronising with other (distributed) cores, for doing, for example compliant motion with two robots. This functionality is not yet implemented though.
When the SimulationThread is used and started, it will change the TimeService's clock with each period ( to simulate time progress). Also other threads (!) In the system will notice this change, but time is guaranteed to increase monotonously.
Also take a look at the interface documentation.
  #include <rtt/TimeService.hpp>
  #include <rtt/Time.hpp>

  TimeService::ticks timestamp = TimeService::Instance()->getTicks();
  //...

  Seconds elapsed = TimeService::Instance()->secondsSince( timestamp );
Attributes are class members which contain a (constant) value. Orocos can manipulate a classes attribute when it is wrapped in an Attribute class. This storage allows it to be read by the scripting engine, to be displayed on screen or manipulated over a network connection.
The advantages of this class come clear when building Orocos Components, since it allows a component to export internal data.
Properties are more powerful than attributes (above) since they can be stored to an XML format, be hierarchically structured and allow complex configuration.
Orocos provides configuration by properties through the Property class. They are used to store primitive data (float, strings,...) in a hierarchies (using PropertyBag). A Property can be changed by the user and has immediate effect on the behaviour of the program. Changing parameters of an algorithm is a good example where properties can be used. Each parameter has a value, a name and a description. The user can ask any PropertyBag for its contents and change the values as they see fit. Java for example presents a Property API. The Doxygen Property API should provide enough information for successfully using them in your Software Component.
| Note | |
|---|---|
Reading and writing a properties value can be done in real-time. Every other transaction, like marshaling (writing to disk), demarshaling (reading from disk) or building the property is not a real-time operation.
Example 5.5. Using properties // a property, representing a double of value 1.0: Property<double> myProp("Parameter A","A demo parameter", 1.0); // not real-time ! myProp = 10.9; // real-time double a = myProp.get(); // real-time
|
Properties are mainly used for two purposes. First, they allow an external entity to browse their contents, as they can form hierarchies using PropertyBags. Second, they can be written to screen, disk, or any kind of stream and their contents can be restored later on, for example after a system restart. The next sections give a short introduction to these two usages.
First of all, a PropertyBag is not the owner of the properties it owns, it merely keeps track of them, it defines a logical group of properties belonging together. Thus when you delete a bag, the properties in it are not deleted, when you clone() a bag, the properties are not cloned themselves. PropertyBag is thus a container of pointers to Property objects.
If you want to duplicate the contents of a PropertyBag or perform recursive
operations on a bag, you can use the helper functions we created and which
are defined in PropertyBag.hpp (see Doxygen documentation).
These operations are however, most likely not real-time.
| Note | |
|---|---|
When you want to put a PropertyBag into another PropertyBag, you need to make a Property<PropertyBag> and insert that property into the first bag. |
Use add to add Properties to a bag and
getProperty<T> to
mirror a Property<T>. Mirroring allows
you to change and read a property which is stored in a PropertyBag: the
property object's value acts like the original. The name and description
are not mirrored, only copied upon initialisation:
  PropertyBag bag;
  Property<double> w("Weight", "in kilograms", 70.5 );
  Property<int> pc("PostalCode", "", 3462 );

  struct BirthDate {
     BirthDate(int d, month m, int y) : day(d), month(m), year(y) {}
     int day;
     enum { jan, feb, mar, apr, may, jun, jul, aug, sep, oct, nov, dec} month;
     int year;
  };

  Property<BirthDate> bd("BirthDate", " in 'BirthDate' format", BirthDate(1, apr, 1977));

  bag.add( &w );
  bag.add( &pc );
  bag.add( &bd );

  // setup mirrors:
  Property<double> weight = bag.getProperty<double>("Weight");
  assert( weight.ready() );

  // values are mirrored:
  assert( weight.get() == w.get() );
  weight.set( 90.3 );
  assert( weight.get() == w.get() );

  Property<BirthDate> bd_bis;
  assert( ! bd_bis.ready() );

  bd_bis = bag.getProperty<BirthDate>("BirthDate");
  assert( bd_bis.ready() );

  // descriptions and names are not mirrored:
  assert( bd_bis.getName() == bd.getName() );
  bd_bis.setName("Date2");
  assert( bd_bis.getName() != bd.getName() );
Marshalling is converting a property C++ object to a format suitable for transportation or storage, like XML. Demarshalling reconstructs the property again from the stored format. In Orocos, the Marshaller interface defines how properties can be marshalled. The available marshallers (property to file) in Orocos are the TinyMarshaller, XMLMarshaller, XMLRPCMarshaller, INIMarshaller and the RTT::CPFMarshaller (only if Xerces is available).
The inverse operation (file to property) is currently supported by two demarshallers: TinyDemarshaller and the RTT::CPFDemarshaller (only if Xerces is available). They implement the Demarshaller interface.
The (de-)marshallers know how to convert native C++ types, but if you want
to store your own classes in a Property ( like BirthDate
in the example above ), the class must be added to the Orocos
type system.
In order to read/write portably (XML) files, use the PropertyMarshaller and PropertyDemarshaller classes which use the default marshaller behind the scenes.
The name server class in the Orocos framework stores (name, object) pairs of only one (base) class type of object in the local process. It is mainly used in the device abstraction layer such that device drivers are created in one place and can be used in different places throughout the program.
The local object server is called NameServer. The most common usage syntax is given below.
| Note | |
|---|---|
The most common use of name serving is keeping track of pointers to objects. A NameServer almost always takes pointers to an object as arguments and returns a pointer when the object is looked up again. |
  // A NameServer collecting pointers to ClassA objects
  NameServer< ClassA* > nameserver;
  ClassA my_a;
  nameserver.registerObject( &my_a, "ATeam" );
  // ...
  ClassA* an_a = nameserver.getObject( "ATeam" );
  if (an_a != 0 )
      cout << "ATeam was successfully stored and retrieved !" >> endl;
A typical use of name serving is that the nameserver is nested inside the class it is name serving itself. For convenience, the constructor of that class is then extended to take a string as argument to indicate the (optional) desired name of the object. Imagine that the above ClassA had such a nested nameserver, in that case, it would be used as follows :
  ClassA my_a( "The ATeam" ); // give name in constructor
  // ...
  // notice the scope ClassA:: the nameserver is nested in :
  ClassA* an_a = ClassA::nameserver.getObject( "The ATeam" );
  if (an_a != 0 )
    cout << "The ATeam was successfully stored and retrieved !" >> endl;
The above technique is used in many classes inside Orocos. Events, Devices, Control Kernels and Components, ... anything you wish to configure at run-time can be name served.
Orocos provides some basic inter-thread buffering mechanisms in the
rtt/buffers package.
The difference between Buffers and DataObjects is that DataObjects always contain a single value, while buffers may be empty, full or contain a number of values. Thus a DataObject always returns the last value written (and a write always succeeds), while a buffer may implement a FIFO queue to store all written values (and thus can get full).
Figure 5.3. DataObjects versus Buffers
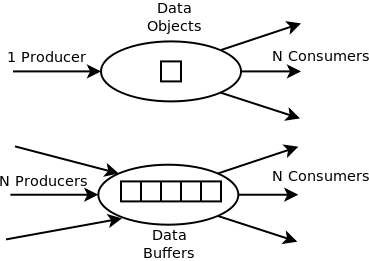
DataObjects are most suitable for single writer, many readers, and always return the last written value. Buffers have a fixed queue length and are used for processing all produced data by any number of producers and consumers.
The BufferInterface<T> provides the interface for Orocos buffers. Currently the BufferLockFree<T> is a typed buffer of type T and works as a FIFO queue for storing elements of type T. It is lock-free, non blocking and read and writes happen in bounded time. It is not subject to priority inversions.
Example 5.6. Accessing a Buffer
  #include <rtt/BufferLockFree.hpp>

  // A Buffer may also contain a class, instead of the simple
  // double in this example
  // A buffer with size 10:
  BufferLockFree<double> my_Buf( 10 );
  if ( my_Buf.Push( 3.14 ) ) {
     // ok. not full.
  }
  double  contents;
  if ( my_Buf.Pop( contents ) ) {
     // ok. not empty.
     // contents == 3.14
  }
Both Push() and Pop()
return a boolean to indicate failure or success.
The data inside the DataObjects can be any valid C++ type, so mostly people use classes or structs, because these carry more semantics than just (vectors of) doubles. The default constructor of the data is called when the DataObject is constructed. Here is an example of creating and using a DataObject :
Example 5.7. Accessing a DataObject
  #include <rtt/DataObjectInterfaces.hpp>

  // A DataObject may also contain a class, instead of the simple
  // double in this example
  DataObjectLockFree<double> my_Do("MyData");
  my_Do.Set( 3.14 );
  double  contents;
  my_Do.Get( contents );   // contents == 3.14
  contents  = my_Do.Get(); // equivalent
The virtual DataObjectInterface interface
provides the Get() and
Set() methods that each DataObject must
have. Semantically, Set() and
Get() copy all contents of the
DataObject.
Orocos applications can have pretty complex start-up and initialisation code. A logging framework, using Logger helps to track what your program is doing.
| Note | |
|---|---|
Logging can only be done in the non-real-time parts of your application, thus not in the Real-time Periodic Activities ! |
There are currently 8 log levels :
Table 5.1. Logger Log Levels
| ORO_LOGLEVEL | Logger::enum | Description |
|---|---|---|
| -1 | na | Completely disable logging |
| 0 | Logger::Never | Never log anything (to console) |
| 1 | Logger::Fatal | Only log Fatal errors. System will abort immediately. |
| 2 | Logger::Critical | Only log Critical or worse errors. System may abort shortly after. |
| 3 | Logger::Error | Only log Errors or worse errors. System will come to a safe stop. |
| 4 | Logger::Warning | [Default] Only log Warnings or worse errors. System will try to resume anyway. |
| 5 | Logger::Info | Only log Info or worse errors. Informative messages. |
| 6 | Logger::Debug | Only log Debug or worse errors. Debug messages. |
| 7 | Logger::RealTime | Log also messages from possibly Real-Time contexts. Needs to be confirmed by a function call to Logger::allowRealTime(). |
You can change the amount of log info printed on your console by setting the environment variable
ORO_LOGLEVEL to one of the above numbers :
export ORO_LOGLEVEL=5
The default is level 4, thus only warnings and errors are printed.
The minimum log level for the orocos.log
file is Logger::Info. It will get more verbose if
you increase ORO_LOGLEVEL, but will not go below Info.
This file is always created if the logging infrastructure is used. You can inspect this file
if you want to know the most useful information of what is happening inside Orocos.
If you want to disable logging completely, use
export ORO_LOGLEVEL=-1
before you start your program.
For using the Logger class in your own application, consult the API documentation.
Example 5.8. Using the Logger class
  #include <rtt/Logger.hpp>

  Logger::In in("MyModule");
  log( Error ) << "An error Occured : " << 333 << "." << endlog();
  log( Debug ) << debugstring << data << endlog();
  log() << " more debug info." << data << endlog();
  log() << "A warning." << endlog( Warning );
As you can see, the Logger can be used like the standard C++ input streams. You may change the Log message's level using the LogLevel enums in front (using log() ) or at the end (using endlog()) of the log message. When no log level is specified, the previously set level is used. The above message could result in :
  0.123 [ ERROR  ][MyModule] An error Occured : 333
  0.124 [ Debug  ][MyModule] <contents of debugstring and data >
  0.125 [ Debug  ][MyModule]  more debug info. <...data...>
  0.125 [ WARNING][MyModule] A warning.
Table of Contents
Abstract
This document gives a short overview of the philosophy and available classes for Operating System ( threads, mutexes, etc ) interaction within Orocos
The OS package makes an abstraction of the operating system on which it runs. It provides C++ interfaces to only the minimal set of operating system primitives that it needs: mutexes, semaphores and threads. This is in accordance with the general developers requirements of the project: a minimalistic approach is much easier to scale, to maintain, and to port. The abstraction also allows Orocos users to build their software on all supported systems with only a recompilation step. The OS Abstraction layer is not directly being used by the application writer. Basic OS primitives are leading programmers to often to pitfalls which can be avoided using well known solutions. These solutions are implemented in the CoreLib classes and allow the programmer to think in a more natural way about the problem.
The abstractions cause (almost) no execution overhead, because
the wrappers can be called in-line. See the OROBLD_OS_AGNOSTIC
option in CMake build tool to control in-lining.
Keeping the Orocos core portable requires an extra abstraction of some operating system (OS) functionalities. For example, a thread can be created, started, paused, scheduled, etc., but each OS uses other function calls to do this. Orocos prefers C++ interfaces, which led to the ThreadInterface which allows control and provides information about a thread in Orocos.
Three thread classes are available in Orocos: PeriodicThread houses a periodic thread and SingleThread is a non periodic thread which executes the functionality once each time it is started. The MainThread is a special case as only one such object exists and represents the thread that executes the main() function.
This drawing situates the Operating System abstraction with respect to device driver interfacing (DI) and the rest of Orocos
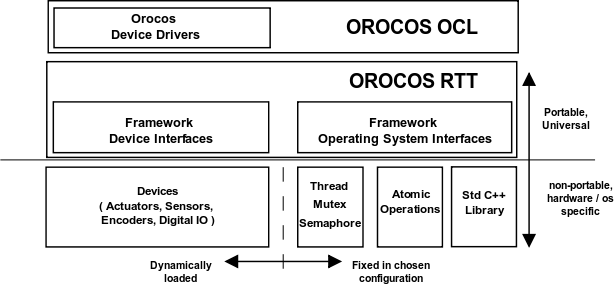
The OS directory contains C++ classes to access Operating System functionality, like creating threads or signaling semaphores. Two kinds of subdirectories are used: the CPU architecture (i386, powerpc, x86_64) and the Operating System (gnulinux, xenomai, lxrt), or target.
RTAI/LXRT is an environment that allows user programs to run with real-time determinism next to the normal programs. The advantage is that the real-time application can use normal system libraries for its functioning, like showing a graphical user interface.
An introduction to RTAI/LXRT can be found in the Porting to LXRT HOWTO, which is a must-read if you don't know what LXRT is.
The common rule when using LXRT is that any user space (GNU/Linux) library can be used and any header included as long as their non-real-time functions are not called from within a hard real-time thread. Specifically, this means that all the RTAI (and Orocos) OS functions, but not the native Linux ones, may be called from within a hard real-time thread. Fortunately these system calls can be done from a not hard real-time thread within the same program.
The OS directory is the only part of the Real-Time Toolkit that needs to be ported to other Operating Systems or processor architectures in case the target supports Standard C++. The os directory contains code common to all OSes. The oro_arch directories contain the architecture dependent headers (for example atomic counters and compare-and-swap ).
In order to start your port, look at the fosi_interface.h
and fosi_internal_interface.hpp files in
the os directory. These two files list the C/C++ function
signatures of all to be ported functions in order to support
a new Operating System. The main categories are: time reading, mutexes,
semaphores and threads.
The easiest way to port Orocos to another operating system,
is to copy the gnulinux directory into a new directory and start
modifying the functions to match those in your OS.
The following table gives a short overview of the available headers in the os directory.
Table 6.1. Header Files
| Library | Which file to include | Remarks |
|---|---|---|
| OS functionality | rtt/os/fosi.h | Include this file if you want to make system calls to the underlying operating system ( LXRT, GNU/Linux ) . |
| OS Abstraction classes | Mutex.hpp, MutexLock.hpp, Semaphore.hpp, PeriodicThread.hpp, SingleThread.hpp, main.h | The available C++ OS primitives. main.h is required to be included in your ORO_main() program file. |
All tasks in the real-time system have to be performed by some
thread. The OS abstraction expects an int
ORO_main(int argc, char** argv) function (which
the user has written) and will call that after all system
initialisation has been done. Inside ORO_main() the user
may expect that the system is properly set up and can be used.
The resulting orocos-rtt library will contain the real main()
function which will call the ORO_main() function.
| Important | |
|---|---|
Do not forget to include
|
| Note | |
|---|---|
Using global objects ( or static class
members ) which use the OS functions before ORO_main() is
entered (because they are constructed before main() ), can
come into conflict with an uninitialised system. It is
therefor advised not to use static global objects which use
the OS primitives. |
An Orocos thread, which must execute a task periodically,
is defined by the
PeriodicThread. The most
common operations are start(),
stop() and setting the periodicity.
What is executed is defined in an user object which
implements the
RunnableInterface. It
contains three methods :
initialize(),
step() and
finalize(). You can inherit from
this interface to implement your own functionality. In
initialize(), you put the code that has to be executed once
when the component is start()'ed. In step(), you put the
instructions that must be executed periodically. In
finalize(), you put the instructions that must be executed
right after the last step() when the component is stop()'ed.
However, you are encouraged NOT to use the OS classes! The CoreLib uses these classes as a basis to provide a more fundamental activity-based (as opposite to thread based) execution mechanism which will insert your periodic activities in a periodic thread.
Common uses of periodic threads are :
Running periodic control tasks.
Fetching periodic progress reports.
Running the CoreLib periodic tasks.
For non-periodic threads, which block or do lengthy calculations, the SingleThread class can be used. The RTT uses the SingleThread for the NonPeriodicActivity. Porting applications to Orocos might benefit this class in a first adaptation step. It has a start() method, which will invoke one single call to the user's loop() function ( in contrast to step() above). It can be re-started each time the loop() function returns. The initialise() functions is called when the SingleThread is started the first time. When stopped, the finalise() function is called after loop() returns.
The user himself is responsible for providing a mechanism to
return from the loop() function. The SingleThread expects
this mechanism to be implemented in the
RunnableInterface::breakLoop() function, which must return
true if the loop() function could be signaled to
return. SingleThread will call breakLoop() in its stop()
method if loop() is still being executed and, if successful,
will wait until loop() returns. The
SingleThread::isRunning() function can
be used to check if loop() is being executed or not.
| Note | |
|---|---|
The NonPeriodicActivity in CoreLib provides a better integrated implementation for SingleThread and should be favourably used. |
Common uses of non periodic threads are :
Listening for data on a network socket.
Reading a file or files from hard-disk.
Waiting for user input.
Execute a lengthy calculation.
React to asynchronous events.
The user of this class must be aware that he must provide himself the locking primitives (like RTT::OS::Mutex) to provide thread safety.
The Orocos thread priorities are set during thread
construction time and can be changed later on with
setPriority. Priorities are integer
numbers which are passed directly to the underlying OS. One
can use priorities portably by using the
LowestPriority,
HighestPriority and
IncreasePriority variables
which are defined for each OS.
OSes that support multiple schedulers can use the
setScheduler function to influence
the scheduling policy of a given thread. Orocos guarantees
that the ORO_SCHED_RT and
ORO_SCHED_OTHER variables are
defined and can be used portably. The former `hints'
a real-time scheduling policy, while the latter `hints'
a not real-time scheduling policy. Each OS may define
additional variables which map more appropriately to
its scheduler policies. When only one scheduling policy
is available, both variables map to the same scheduler.
You can configure the OS layer at compilation time using CMake to report thread execution as block-waves on the parallel port or any other digital output device. Monitoring through the parallel port requires that a parallel port Device Driver is installed, and for Linux based OSes, that you execute the Orocos program as root.
If the CoreLib Logger is active, it will log the mapping of
Threads to the device's output pins to the orocos.log
file. Just before step() is entered, the pin will be set
high, and when step() is left, the pin is set low again.
From within any RTT activity function, you may then additionally use the
ThreadScope driver as such :
  DigitalOutInterface* pp = DigitalOutInterface::nameserver.getObject("ThreadScope");
if ( pp )
    pp->setBit( this->getTask()->thread()->threadNumber(), value );
which sets the corresponding bit to a boolean value. The main thread claims pin zero, the other pins are assigned incrementally as each new Orocos thread is created.
Orocos OS only provides a few synchronisation primitives, mainly for guarding critical sections.
There are two kinds of Mutexes : Mutex
and MutexRecursive. To lock a mutex, it
has a method lock(), to unlock, the method is unlock() and to
try to lock, it is trylock().
A lock() and trylock() on a recursive mutex from the same
thread will always succeed, otherwise, it blocks.
For ease of use, there is a MutexLock which gets a Mutex as argument in the constructor. As long as the MutexLock object exists, the given Mutex is locked. This is called a scoped lock.
Example 6.1. Locking a Mutex
The first listing shows a complete lock over a function :
  Mutex m;
  void foo() {
     int i;
     MutexLock lock(m);
     // m is locked.
     // ...
  } // when leaving foo(), m is unlocked.
Any scope is valid, so if the critical section is smaller than the size of the function, you can :
  Mutex m;
  void bar() {
     int i;
     // non critical section
     {
        MutexLock lock(m);
        // m is locked.
        // critical section
     } //  m is unlocked.
     // non critical section
     //...
  }
Orocos provides a C++ semaphore abstraction class Semaphore. It is used mainly for non periodic, blocking tasks or threads. The higher level Event implementation in CoreLib can be used for thread safe signalling and data exchange in periodic tasks.
  Semaphore sem(0); // initial value is zero.
  void foo() {
     // Wait on sem, decrement value (blocking ):
     sem.wait()
     // awake : another thread did signal().

     // Signal sem, increment value (non blocking):
     sem.signal();

     // try wait on sem (non blocking):
     bool result = sem.trywait();
     if (result == false ) {
         // sem.value() was zero
     } else {
         // sem.value() was non-zero and is now decremented.
     }
  }
Table of Contents
Abstract
This document provides a short introduction to the Orocos Hardware Device Interface definitions. These are a collection of classes making abstraction of interacting with hardware components.
Designing portable software which should interact with hardware is very hard. Some efforts, like Comedi propose a generic interface to communicate with a certain kind of hardware (mainly analog/digital IO). This allows us to change hardware and still use the same code to communicate with it. Therefore, we aim at supporting every Comedi supported card. We invite you to help us writing a C++ wrapper for this API and port comedilib (which adds more functionality) to the real-time kernels.
We do not want to force people into using Comedi, and most of us have home written device drivers. To allow total implementation independence, we are writing C++ device interfaces which just defines which functionalities a generic device driver should implement. It is up to the developers to wrap their C device driver into a class which implements this interface. You can find an example of this in the devices package. This package only contains the interface header files. Other packages should always point to these interface files and never to the real drivers actually used. It is up to the application writer to decide which driver will actually be used.
The Device Interface can be structured in two major parts : physical device interfaces and logical device interfaces. Physical device interfaces can be subdivided in four basic interfaces: AnalogInput, AnalogOutput, DigitalInput, DigitalOutput. Analog devices are addressed with a channel as parameter and write a ranged value, while digital devices are addressed with a bit number as parameter and a true/false value.
Logical device interfaces represent the entities humans like to work with: a drive, a sensor, an encoder, etc. They put semantics on top of the physical interfaces they use underneath. You just want to know the position of a positional encoder in radians for example. Often, the physical layer is device dependent (and thus non-portable) while the logical layer is device independent.
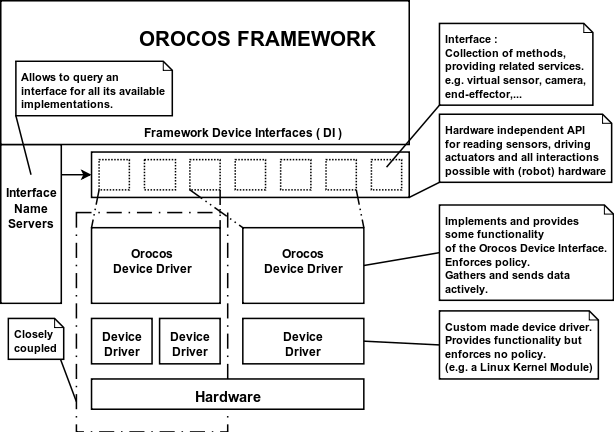
An example of the
interactions between the logical and the physical layer is the
logical encoder with its physical counting card. An encoder is
a physical device keeping track of the position of an axis of
a robot or machine. The programmer wishes to use the encoder
as a sensor and just asks for the current position. Thus a
logical encoder might choose to implement the
SensorInterface which provides
a read(DataType & ) function.
Upon construction of the logical sensor, we supply the real
device driver as a parameter. This device driver implements
for example AnalogInInterface
which provides read(DataType & data, unsigned
int chan) and allows to read the position of a
certain encoder of that particular card.
The most common used interfaces for machine control
are already implemented and tested on multiple setups.
All the Device Interface classes reside in the
RTT namespace.
There are several classes for representing different kinds of IO. Currently there are:
Table 7.1. Physical IO Classes
| Interface | Description |
|---|---|
| AnalogInInterface | Reading analog input channels |
| AnalogOutInterface | Writing analog output channels |
| DigitalInInterface | Reading digital bits |
| DigitalOutInterface | Writing digital bits |
| CounterInterface | Not implemented yet |
| EncoderInterface | A position/turn encoder |
From a logical point of view, the generic SensorInterface<T> is an easy to use abstraction for reading any kind of data of type T.
You need to look in the Orocos Component Library
for implementations of the Device Interface.
Examples are Axis and
AnalogDrive.
The methods in each interface are well documented and porting existing drivers (which mostly have a C API) to these should be quite straight forward. It is the intention that the developer writes a class that inherits from one or more interfaces and implements the corresponding methods. Logical Devices can then use these implementations to provide higher level functionalities.
Name Serving is introduced in the Orocos CoreLib documentation.
The Device Interface provides name serving on interface level. This means that one can ask a certain interface by which objects it is implemented and retrieve the desired instance. No type-casting whatsoever is needed for this operation. For now, only the physical device layer can be queried for entities, since logical device drivers are typically instantiated where needed, given an earlier loaded physical device driver.
Example 7.1, “Using the name service” shows how one could query the DigitalOutInterface.
Example 7.1. Using the name service
  FancyCard* fc = new FancyCard("CardName"); // FancyCard implements DigitalOutInterface

  // Elsewhere in your program:
  bool value = true;
  DigitalOutInterface* card = DigitalOutInterface::nameserver.getObject("CardName");
  if (card)
      card->setBit(0, value);    // Set output bit to 'true'.