- Development
- European Robotics Forum 2011 Workshop on the Orocos Toolchain
- European Robotics Forum 2012: workshops
- Geometric relations semantics
- KDL wiki
- Kuka LBR user group
- Links of Orocos components
- OCL v1.x wiki
- RTT v1.x wiki
- Toolchain v2.x
- Wiki for site admins
- iTaSC wiki
Youbot lissajous tracing tutorial (Cartesian VKC)
Table of Contents
- Summary
- Installation
- The tutorial
- List of all tasks/motions to be executed
- Draw the kinematic loops for each task
- Draw the behavior of the application at runtime
- Create or download all necessary packages
- Create the FSM on the iTaSC level
- Create the FSM on the application level
- Check, create or adapt the configuration files of your components
- Create a deploy script
- Create the FSMs that coordinate the behavior at runtime
- Configuration of the solution of the tutorial
- Execution of the solution of the tutorial
- FAQ
Summary
This tutorial explains how to create an application to trace a Lissajous figure with a Kuka Youbot, starting from existing packages (itasc_core, robots, tasks, solvers, trajectory generators...). The code was developed by the Leuven team during the BRICS research camp 2011.Installation
Dependencies
- itasc and it's dependencies
- trajectory_generators
- youbot drivers
- ROS Electric
The easiest way to install all needed dependencies: (How to find the debian packages on ros.org)
- ROS Electric
- Orocos toolchain
sudo apt-get install ros-electric-rtt-common-msgssudo apt-get install ros-electric-rtt-ros-commsudo apt-get install ros-electric-rtt-ros-integrationgit clone http://git.mech.kuleuven.be/robotics/rtt_geometry.git
- Orocos kinematics and dynamics
sudo apt-get install ros-electric-orocos-kinematics-dynamics
- rFSM
- needs lua:
sudo aptitude install liblua5.1-0-devsudo aptitude install liblua5.1-0sudo aptitude install lua5.1git clone git://gitorious.org/orocos-toolchain/rttlua_completion.git
git clone https://github.com/kmarkus/rFSM.git
- needs lua:
- Trajectory Generators
git clone http://git.mech.kuleuven.be/robotics/trajectory_generators.git
- youbot hardware stack
git clone http://git.mech.kuleuven.be/robotics/youbot_hardware.git -b devel- this depends on:
git clone http://git.mech.kuleuven.be/robotics/soem.git
- this depends on:
git clone git://git.mech.kuleuven.be/robotics/motion_control.git -b devel
- youbot_description package of the youbot-ros-pkg (=a stack), no need to compile it! WARNING: there are two repos around, make sure you have this one!
git clone https://github.com/smits/youbot-ros-pkg.git
- iTaSC
git clone http://git.mech.kuleuven.be/robotics/itasc.gitgit clone http://git.mech.kuleuven.be/robotics/itasc_core.gitgit clone http://git.mech.kuleuven.be/robotics/itasc_solvers.gitgit clone http://git.mech.kuleuven.be/robotics/itasc_tasks.gitgit clone http://git.mech.kuleuven.be/robotics/itasc_robots_objects.git(+switch to devel branch)
Download the solution of the tutorial
git clone http://git.mech.kuleuven.be/robotics/itasc_examples.git
Setup
- It is strongly recommended that you add the following to a setup script or your .bashrc
- Make sure that all packages are added to you ROS_PACKAGE_PATH variable
- Source env.sh in the orocos_toolchain stack
- Set the LUA_PATH variable:
if [ "x$LUA_PATH" == "x" ]; then LUA_PATH=";;"; fi
if [ "x$LUA_CPATH" == "x" ]; then LUA_CPATH=";;"; fi

export LUA_PATH="$LUA_PATH;`rospack find ocl`/lua/modules/?.lua"
export LUA_PATH="$LUA_PATH;`rospack find kdl`/?.lua"
export LUA_PATH="$LUA_PATH;`rospack find rFSM`/?.lua"
export LUA_PATH="$LUA_PATH;`rospack find rttlua_completion`/?.lua"
export LUA_PATH="$LUA_PATH;`rospack find youbot_master_rtt`/lua/?.lua"
export LUA_PATH="$LUA_PATH;`rospack find kdl_lua`/lua/?.lua"

export LUA_CPATH="$LUA_CPATH;`rospack find rttlua_completion`/?.so"

export PATH="$PATH:`rosstack find orocos_toolchain`/install/bin"
- Create the youbot.urdf file out of the youbot.urdf.xacro file
cd `rospack find youbot_description`/robots/(part of the youbot-ros-pkg)rosrun xacro xacro.py youbot.urdf.xacro -o youbot.urdf
Make
rosmake itasc_youbot_lissajous_app
The tutorial
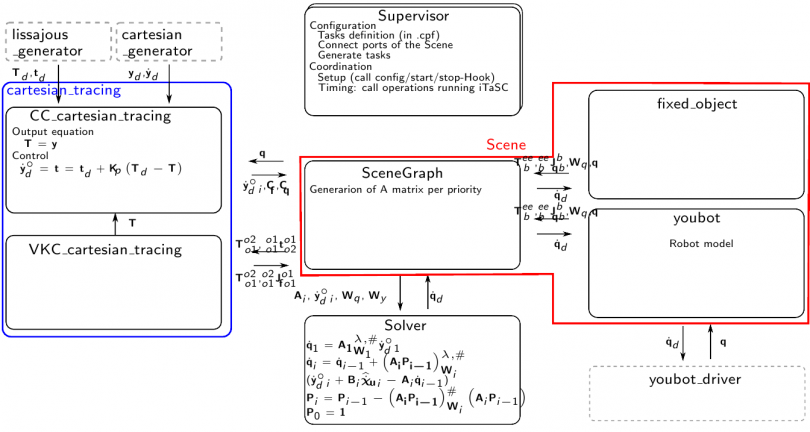
Note: The solution doesn't make use of the templates of the application and itasc level FSMs yet. The behavior should be the same, but you'll find more (copied) files in the scripts folder, than you will have created in your folder, when following this tutorial. (Don't worry, you'll notice what is copied and what not).'This tutorial explains how to create an iTaSC application, starting from existing packages. The scheme we want to create is depicted in following figure:
 itasc_youbot_app scheme
The tutorial will follow the design workflow as explained here.
List of all tasks/motions to be executed
- Let the end effector go to a start position, with respect to a certain point in space
- Let the end effector trace a lissajous figure in the air, with respect to a certain point in space
Draw the kinematic loops for each task
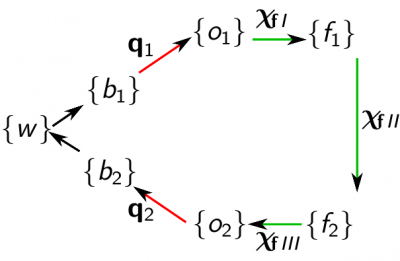
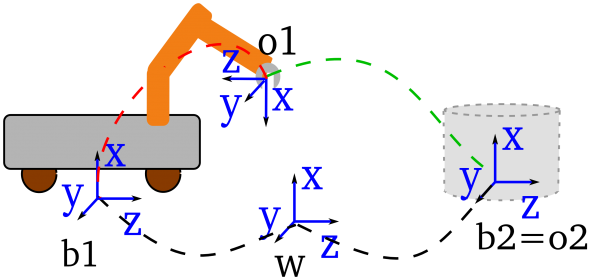
The two motions are constraining the same relationship between the end effector of the robot and a fixed frame in space. Therefore, the same task can be used for both motions. The only difference is a different input from the trajectory generators. The following figures show the kinematic loop describing the task: kinematic loop
 - frames
- o_1=f_1=end effector
- o_2=f_2=fixed object
- feature coordinates
- X_fI=(-)
- X_fII=in this case actually the full pose!
- X_fIII=(-)
- outputs
- y= X_f = T
 itasc_youbot_app kinematic loop
Draw the behavior of the application at runtime
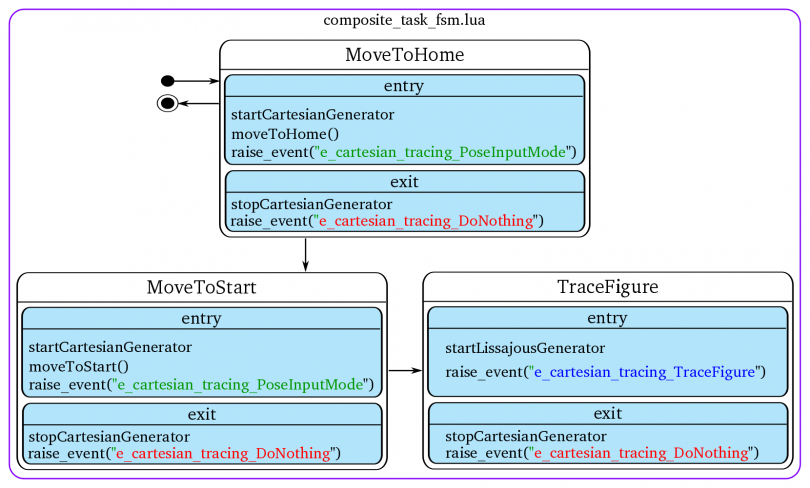
This will afterwards be implemented in the composite_task_fsm.lua and the running_cartesian_tracing_fsm.lua files. Consult 'subFSM's of the running state' of the iTaSC user guide for more information. The following figure depicts the behavior of this application.In the figures, a (sub-)FSM is represented by a purple rounded box, a state by a rounded black box and a possible state transition by an arrow. State transitions are triggered by an event or combination of events. The state transitions of the task subFSM that are indicated by a colored arrow and circle, are caused by the event with the corresponding color, fired in the composite_task_fsm.lua.  composite task FSM of the youbot_lissajous_app To automatically transition from the MoveToStart to the TraceFigure state, an event indicating that the start position is reached must be fired. This event will be generated by the 'cartesian_generator'.
  running_cartesian_tracing_fsm of the youbot_lissajous_app
Create or download all necessary packages
- general components and scripts (from the itasc_core stack)
- scene
- start from the itasc and application level script templates in the script subdir
- robots and objects (from the itasc_robots_objects stack)
- youbot: itasc_youbot package
- fixed_object: fixed_object package
- task (from the itasc_tasks stack)
- cartesian_tracing: cartesian_motion package
- solver (from the itasc_solvers stack)
- solver: wdls_prior_vel_solver package
- trajectory generators (from the trajectory_generators stack)
- cartesian_generator: cartesian_trajectory_generator package
- lissajous_generator: lissajous_generator package
Overview of the modifications needed:
- Computation: No modifications needed
- Coordination:Modifications needed
- for the specific behavior at runtime, see 'behavior at runtime'
- for the other behavior, see following sections
- Configuration: Modifications needed
- see 'Check, create or adapt the configuration files of your components'
- Communication and Composition:
- see 'Create a deploy script'
Create an empty ROS-package for your application and create 2 subdirectories:
- scripts: this subdirectory will contain the for your application adapted scripts
- cpf: this subdirectory will contain all (non-standard) property files for your application
Create the FSM of the cartesian_tracing task
A FSM on the task level consists of 3 parts (see also 'the 3 FSM levels' of the iTaSC manual), for this task:- cartesian_tracing_fsm.lua: this is the actual FSM, other files are loaded in certain states of this FSM,
- running_cartesian_tracing_coordination.lua: this part takes care of the coordination of the algorithm at runtime, it is part of the running state of the actual FSM,
- running_cartesian_tracing_fsm.lua: this part takes care of the coordination of the behavior at runtime, it is also part of the running state of the actual FSM and is executed after the coordination of the algorithm,
Templates of these files can be found in the cartesian_motion package, scripts subdirectory (cartesian_tracing is an instance of cartesian_motion).
- cartesian_tracing_fsm.lua: you can use the template without modifications: no need to change the name, just use cartesian_motion_fsm.lua,
- running_cartesian_tracing_coordination.lua: you can use the template without modifications: no need to change the name, just use running_cartesian_tracing_coordination.lua,
- running_cartesian_tracing_fsm.lua: this file has to be edited (application dependent), copy this file to the scripts subdirectory of the package you have created for this application, leave it for now, in the section 'Create the FSMs that coordinate the behavior at runtime' is explained what to edit here,
The actual FSM is loaded in the cartesian_tracing_supervisor component (which is written in the lua language, hence the .lua file). Since you'll (probably) need to add functions to execute RTT specific code in the running_cartesian_tracing_fsm, make a copy of this file to your scripts subdirectory of the package you have created for this application. Leave it for now.
The FSM for this application consists of multiple files on different locations, the cartesian_tracing_supervisor has properties that contain the path to these files. Create a property file (cartesian_tracing_supervisor.cpf for example) in your scripts subdirectory of the package you have created for this application and edit these properties.
There is no timer_id_property for task supervisors, because tasks are triggered by the iTaSC level by events.
Create the FSM on the iTaSC level
The FSM on the iTaSC level consists of 4 parts (see also 'the 3 FSM levels' of the iTaSC manual):- itasc_fsm.lua: this is the actual FSM, other files are loaded in certain states of this FSM, it is responsible, among other things, to configure, start, stop (and cleanup) the iTaSC level components,
- running_itasc_coordination.lua: this part takes care of the coordination of the algorithm at runtime, it is part of the running state of the actual FSM,
- composite_task_fsm.lua: this part takes care of the coordination of the behavior at runtime, it is also part of the running state of the actual FSM and is executed after the coordination of the algorithm,
- itasc_configuration: this file contains the description of the scene and the composition of the kinematic loops.
Templates of these files can be found in the itasc_core package, scripts subdirectory.
- itasc_fsm.lua: you can use the template without modifications, because this application makes use of the template components of the cartesian_motion package, which are configured/started... by the template FSM,
- running_itasc_coordination.lua: you can use the template without modifications,
- composite_task_fsm.lua: this file has to be edited (application dependent), copy this file to the scripts subdirectory of the package you have created for this application, leave it for now, in the section 'Create the FSMs that coordinate the behavior at runtime' is explained what to edit here,
- itasc_configuration.lua: this file has to be edited (application dependent),copy this file to the scripts subdirectory of the package you have created for this application.
Edit the itasc_configuration.lua file you just have copied: define the scene and kinematic loops as depicted in the figures of the first steps of this tutorial. Look at the comments in the template for more information on the syntax.
The actual FSM is loaded in the itasc_supervisor component (which is written in the lua language, hence the .lua file). Since you'll (probably) need to add functions to execute RTT specific code in the composite_task_fsm, make a copy of this file to your scripts subdirectory of the package you have created for this application. Leave it for now.
The FSM for this application consists of multiple files on different locations, the itasc_supervisor has properties that contain the path to these files. Create a property file (.cpf) in your scripts subdirectory of the package you have created for this application and edit these properties. The itasc_supervisor and application_supervisor have a property "application_timer_id": make sure these have the same value. Take in this case eg. 1. The timer id makes sure that both components are triggered by the same timer.
Create the FSM on the application level
This is similar to the creation of the FSMs on the other levels. The FSM on the application level for this application consists of only 1 part (see also 'the 3 FSM levels' of the iTaSC manual):- application_fsm.lua: this is the actual FSM.
A template of this file can be found in the itasc_core package, scripts subdirectory.
- application_fsm.lua: this file has to be edited (application dependent), copy this file to the scripts subdirectory of the package you have created for this application.
The application FSM is loaded in the application_supervisor component (which is written in the lua language, hence the .lua file). Since you'll (probably) need to add functions to execute RTT specific code in the application_fsm, make a copy of this file to your scripts subdirectory of the package you have created for this application.
Edit the application_fsm and application_supervisor files:
- Check the functions called in the application_fsm and verify that the right rtt specific code is present in the application_supervisor, e.g. configureTrajectoryGenerators(), an example can be found in the template file itself.
- Add new functions for application specifics: the idea is to put a function in the FSM and the implementation with the RTT specifics in the supervisor.
Make sure that you configure, start, stop (and cleanup) all application level components in this state machine!
The FSM for this application can be on different locations, the application_supervisor has properties that contain the path to these file. Create a property file (application_supervisor.cpf) in your scripts subdirectory of the package you have created for this application and edit these properties. The itasc_supervisor and application_supervisor have a property "application_timer_id": make sure these have the same value. Take in this case eg. 1. The timer id makes sure that both components are triggered by the same timer.
Check, create or adapt the configuration files of your components
The following subsections explain which property files (.cpf files) to edit. The explanation on how to create such a .cpf file can be found in the orocos component builder's manual. An alternative is to deploy your component and write the properties with their current values to a file. Then adapt the values in this file. This alternative way allows you to create a cpf file, without learning the xml syntax.Configuration of the robot and object
The application has one robot, the youbot and one object, the fixed_object. Make a copy of the youbot.cpf file in the cpf subdirectory you just created. You can find the original file in the cpf subdirectory of the itasc_youbot package. The fixed_object doesn't need a cpf file. In the youbot.cpf file set the desired values of the properties of the youbot component:- the urdf_file property to the file location of the urdf file of the youbot on your system,
- leave the other properties as they are (all elements of W=1, joint names of the arm count up from 1 till 4, the joint names of the base are baseTransX, baseTransY, baseRotZ, in this order).
Configuration of the solvers
No changes needed.Configuration of the task
The application has one task: cartesian_tracing, which is an instance of cartesian_motion The constraint/controller has to be tuned for the application: Create a CC_cartesian_tracing.cpf file in the cpf subdirectory you just created. In this file set the desired values of the properties:- All feature coordinates have the same weight: put all elements of W to 1.
- Tune the control values: Kp (put 2 for all for now).
- We want to use velocity feed-forward: put all elements of Kff to 1.
- put the rotation type on 0 (RPY), and rotation reference frame to 1 (=object 1)
Configuration of the trajectory generators
The application has two trajectory generators: cartesian_generator and lissajous_generator. Create for both a cpf file in the cpf subdirectory you just created.- In the cartesian_generator.cpf file, add:
- the maximum velocity in m/s (in cartesian space): put for now 0.05,
- the maximum acceleration in m/s^2 (in cartesian space): put for now 0.02
- In the lissajous_generator.cpf file, add:
- the frequency of the sine in the x direction, in Hz: 0.06,
- the frequency ratio of the sine in the y direction vs. the sine in the x direction: 0.666666 (meaning the second frequency will be 0.4Hz),
- amplitude of the sine in the x direction, in m: 0.25,
- amplitude ratio of the sine in the y direction vs. the sine in the x direction: 1,
- phase difference between the sines in radians (phase of x-phase of y): 0,
- the index of the yd vector (containing the desired positions), that needs a fixed value as constraint, starting from 0. In our case z: 2,
- the constant desired value that we constrain on the position determined with the previous property, in meters: 0.45.
Create a deploy script
The deploy script's primary responsability is:- the loading of components (making an instance of a certain component type),
- the composition of the non-iTaSC level components,
- the connection of the non-iTaSC level components,
- starting the supervisors and timers to get everything running.
Start from the following templates, which you can find in the itasc_core package, scripts subdirectory:
- run.ops
- run.sh
Copy these files to the package you have created for this application.
Edit the run.ops file (see also comments in template):
- import components, requires correctly setup RTT_COMPONENT_PATH or ROS_PACKAGE_PATH
- load components
- set activities
- periodic activities: general and application level components
- non-periodic activities: all iTaSC and task level components and the application_supervisor
- connect peers
- execute lua files (important that it is before loading property files)
- configure lua components (already here so they can create the ports and properties before we connect/load them)
- load property files
- connect ports
- create connectionPolicies: buffered/ non-buffered connections
- timer ports
- event ports
- application_supervisor connections
- add connections between the application supervisor and your tasks for the priority events only, with a bufferedcp
- itasc_supervisor connections
- add connections between the itasc supervisor and your tasks for all types of events, with the right type of connection
- add connections between components that fire events and the FSMs that need to react on them
- task ports
- add connections between application level components and task level components, e.g. trajectory generators and CC, with the right connection, normally cp
- add connections between the CC and VKC for non standard ports, e.g. the pose in case of a cartesian_motion task, standard itasc level ports are connected automatically
- configure timers
- start timers
- start the supervisors
- order is of importance! First tasks, then itasc_supervisor, then application_supervisor !!
- Set up timer
- first argument: timer identity number:
- second argument: timer period in seconds
- Make sure the all application and itasc level supervisors that have to be triggered at the same moment have the same timer_id, in this case: application_supervisor and itasc_supervisor. They have a property application_timer_id for this purpose, standard set to 1
put before configuring the timer:
# we have to configure it first to get the ports connected, maybe better to put all this in the application_fsm.lua
youbot_driver.configure()
connect("youbot.qdot_to_arm", "youbot_driver.Arm1.joint_velocity_command", cp)
connect("youbot.qdot_to_base", "youbot_driver.Base.cmd_twist", cp)
connect("youbot_driver.Arm1.jointstate", "youbot.q_from_arm", cp)
connect("youbot_driver.Base.odometry", "youbot.q_from_base", cp)
The template creates automatically an eventFirer, which is a component with ports connected to the event ports of the itasc- and application_supervisor. This allows easy firing events yourself at runtime, by writing an event on one of the ports.
Create the FSMs that coordinate the behavior at runtime
This section explains how to create the finite state machines that coordinate the behavior at runtime, which is already drawn in the section 'Draw the behavior of the application at runtime' above and explained in detail in 'subFSM's of the running state' of the iTaSC user guide. It consists in this application of the interaction of two state machines: composite_task_fsm.lua at the iTaSC level and running_cartesian_tracing_fsm.lua at the task level (only 1 task in this application).For both levels:
- The idea is to put a function in the FSM and the implementation with the RTT specifics in the supervisor.
- Make sure the task FSM is reacting on the right events, send out by the composite_task_fsm.
- The section 'Create a deploy script' explains how to get the events from other state machines and components in your state machine.
iTaSC level
Start from the template composite_task_fsm.lua in the itasc_core package, scripts subdirectory. Copy this file to the scripts subdirectory of the package you have created for this application. Implement here the composite_task_fsm state machine as drawn above. In the figure is a bullet with a circle shown as a representation for the initial transition. In this case the initial transition shown in the figure is preceded by the obligatory 'initialize' and 'initialized' states, which are already present in the template.The event needed for the transition from the MoveToStart to the TraceFigure state, will be send out by the 'cartesian_generator'. Look in his code for the event name.
task level
Edit the running_cartesian_tracing_fsm.lua that you have created in the section 'Create the FSM of the cartesian_tracing task' above. Implement here the running_cartesian_tracing_fsm state machine as drawn above.Configuration of the solution of the tutorial
- Setup binaries to avoid running as root (required to grant the ethercat driver non-root raw socket access)
roscd ocl/bin/for i in deployer* rttlua*; do sudo setcap cap_net_raw+ep $i; done
- Platform configuration
roscd youbot_master_rtt/lua/- in youbot_test.lua configure your youbot type and network interface to which the youbot ethercat is connected.
FUERTE_YOUBOT=false -- false Malaga, true is FUERTEETHERCAT_IF='ethcat'
Execution of the solution of the tutorial
Connection with ethercat check (optional)
roscd soem_core/binsudo ./slaveinfo eth0(or ethcat...)
Calibration
- Open a terminal window
roscd youbot_master_rtt/luarttlua-gnulinux -i youbot_test.lua- When youbot test got up and running without errors:
- start_calib()
- kill the application when it reached the home position (upright): ctrl+C
Application
- Open 2 terminal windows
- In the first, run a roscore:
roscore - In the second, go to itasc_youbot_lissajous_app:
roscd itasc_youbot_lissajous_app - run the application:
./run.sh - When your application has gone trough the configuration and starting phase, it will reach the running state: You should find a line on your screen saying "===Application up and running!==="
- To interact with the composite_task_fsm, you can send events to it:
- Start the full application (go to start pose and start tracing the lissajous figure after that):
event_firer.itasc_common_events_in.write("e_start") - More eventnames can be found in scripts/composite_task_fsm.lua => transitions
- Start the full application (go to start pose and start tracing the lissajous figure after that):
FAQ
- Q: My robot is not moving, when I send eg. the e_start event
- A:
- Check the values send by the solver to the youbot: go to the scene in the taskbrowser and type: youbot_qdot.last if this is NaN, see answer on that question...
- Check whether your arm is in Velocity mode: go to the youbot_driver in the taskbrowser and type: Arm1.control_mode.last, if it responds with 'MotorStop', type: Arm1.setControllerMode(Velocity)
- Q: The solver is sending NaN as qdot
- A: Check that your Wq is not a zero matrix (in itasc_youbot package, cpf/youbot.cpf)
»
- Printer-friendly version
- Login or register to post comments
